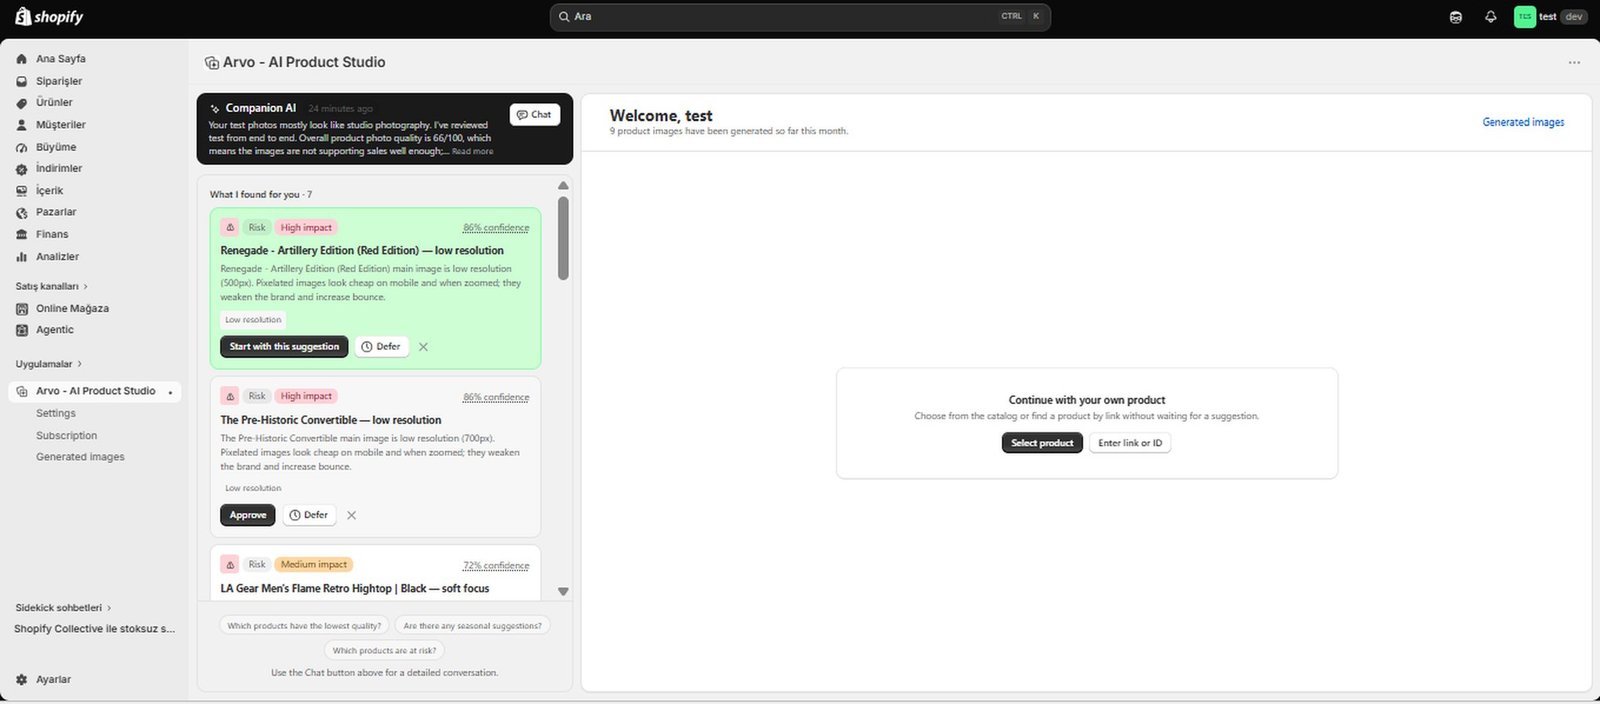
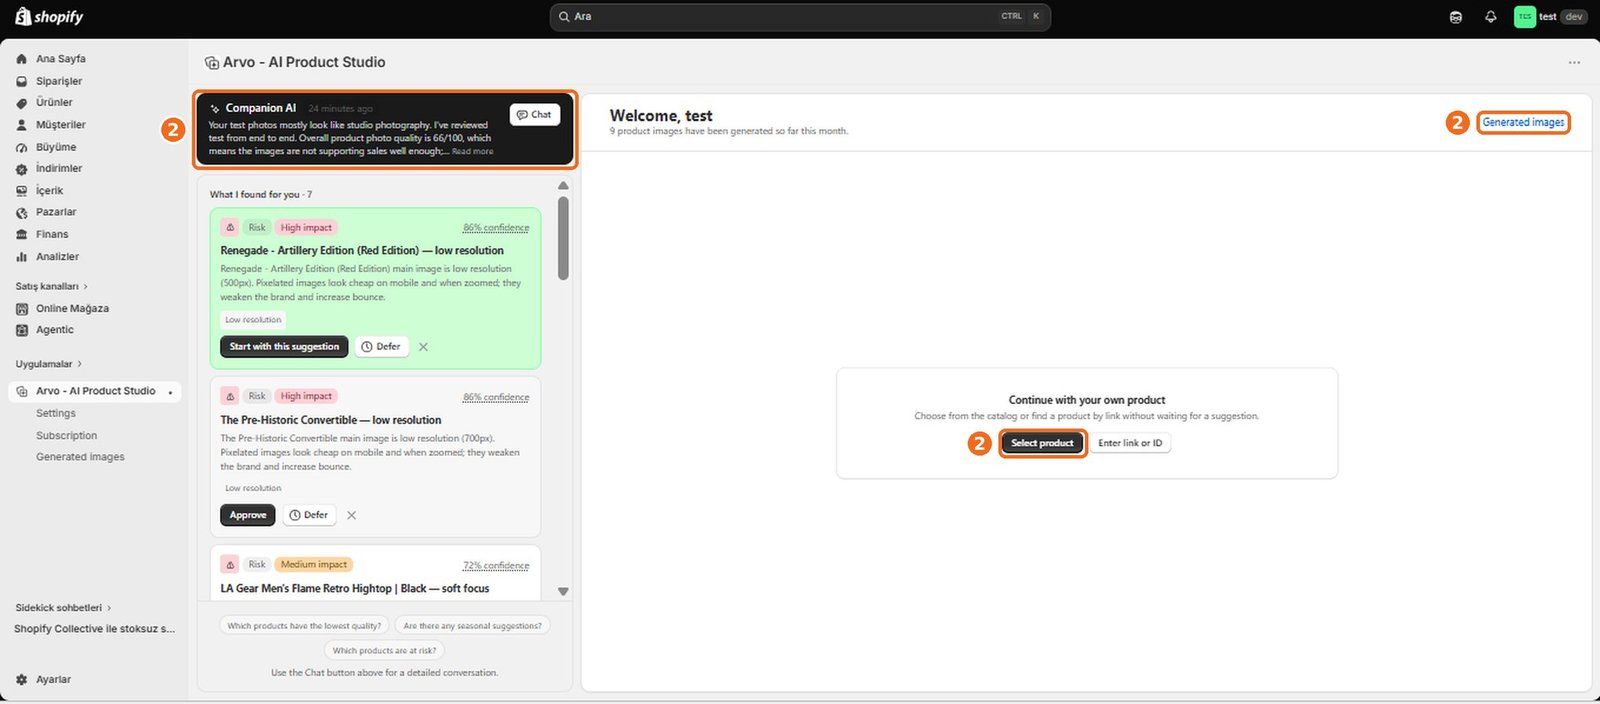
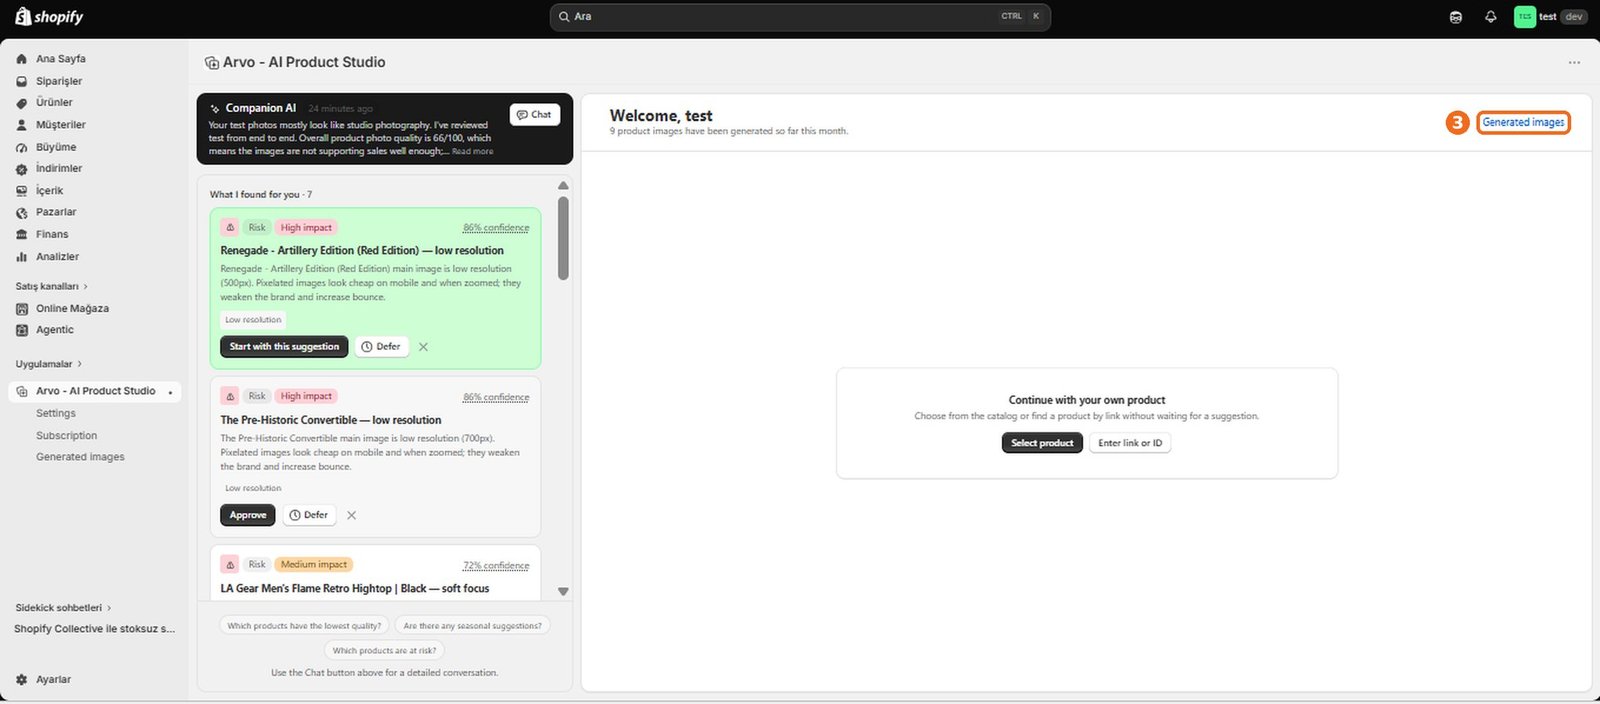
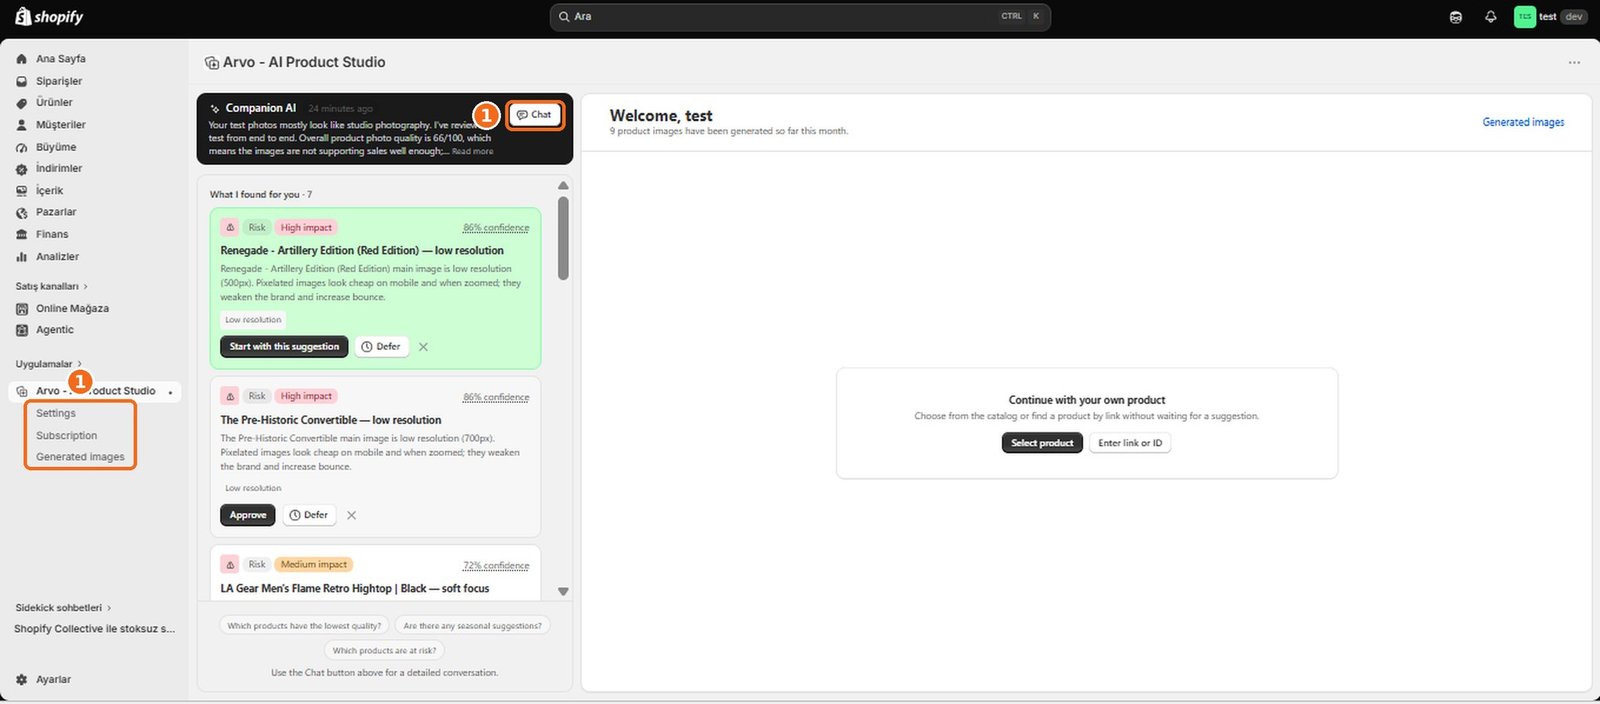
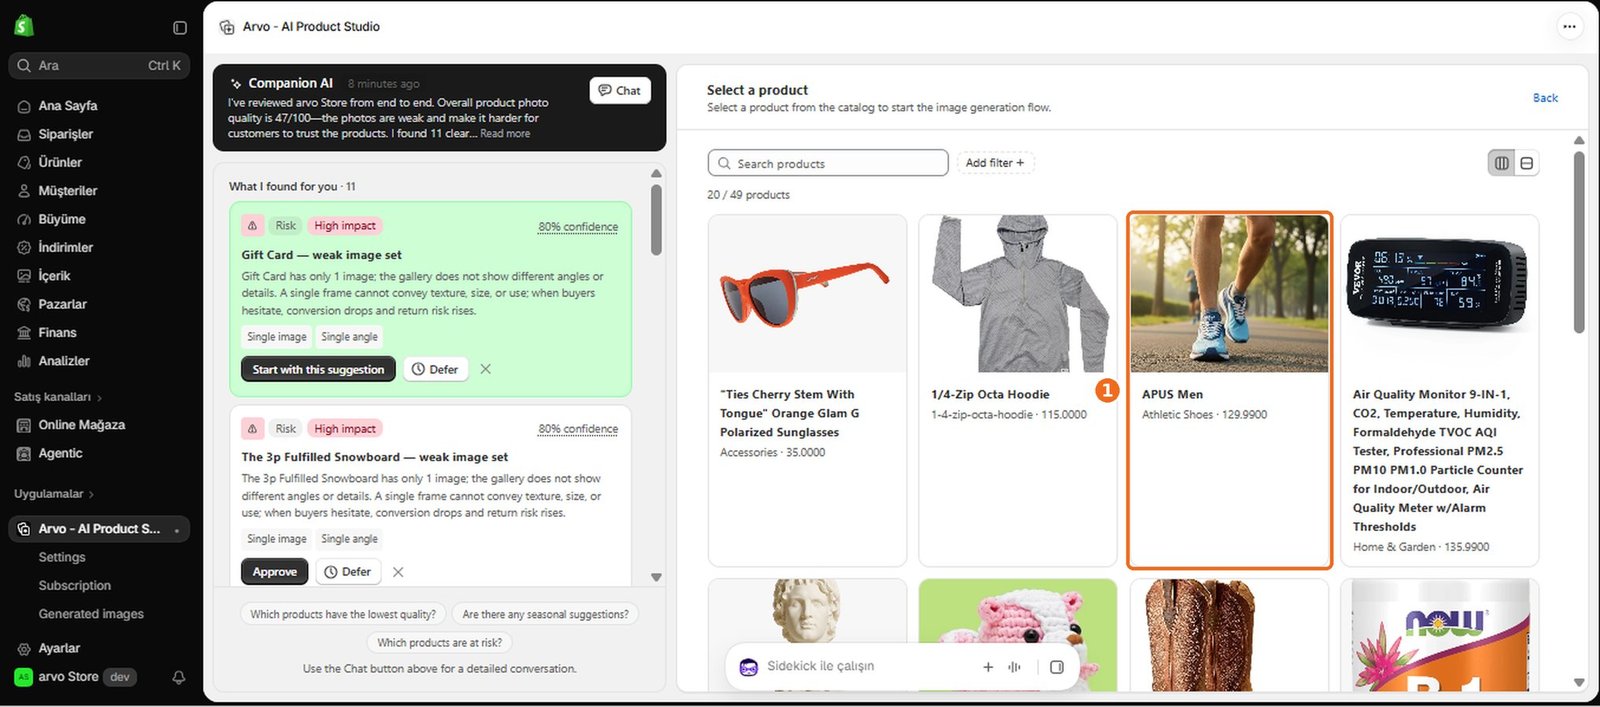
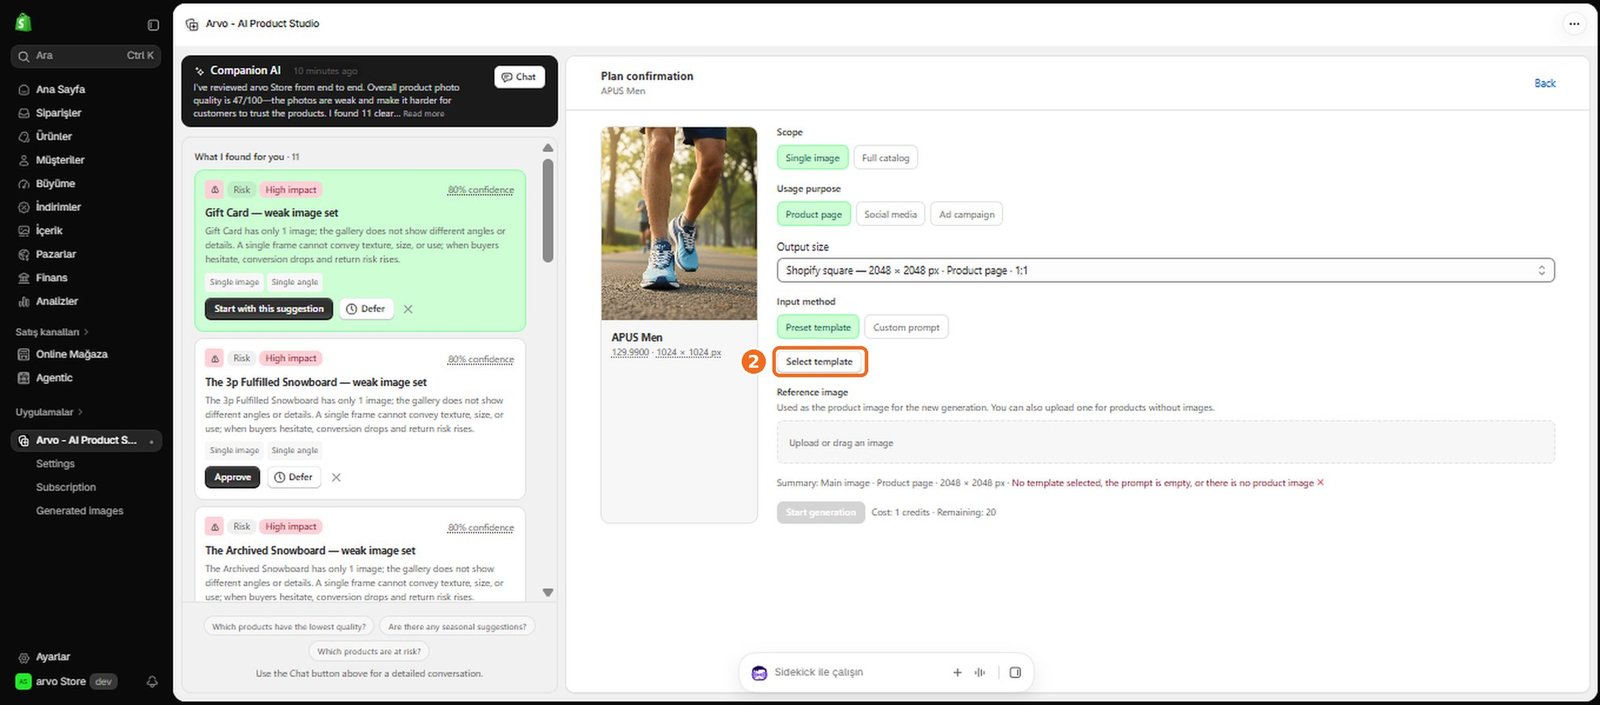
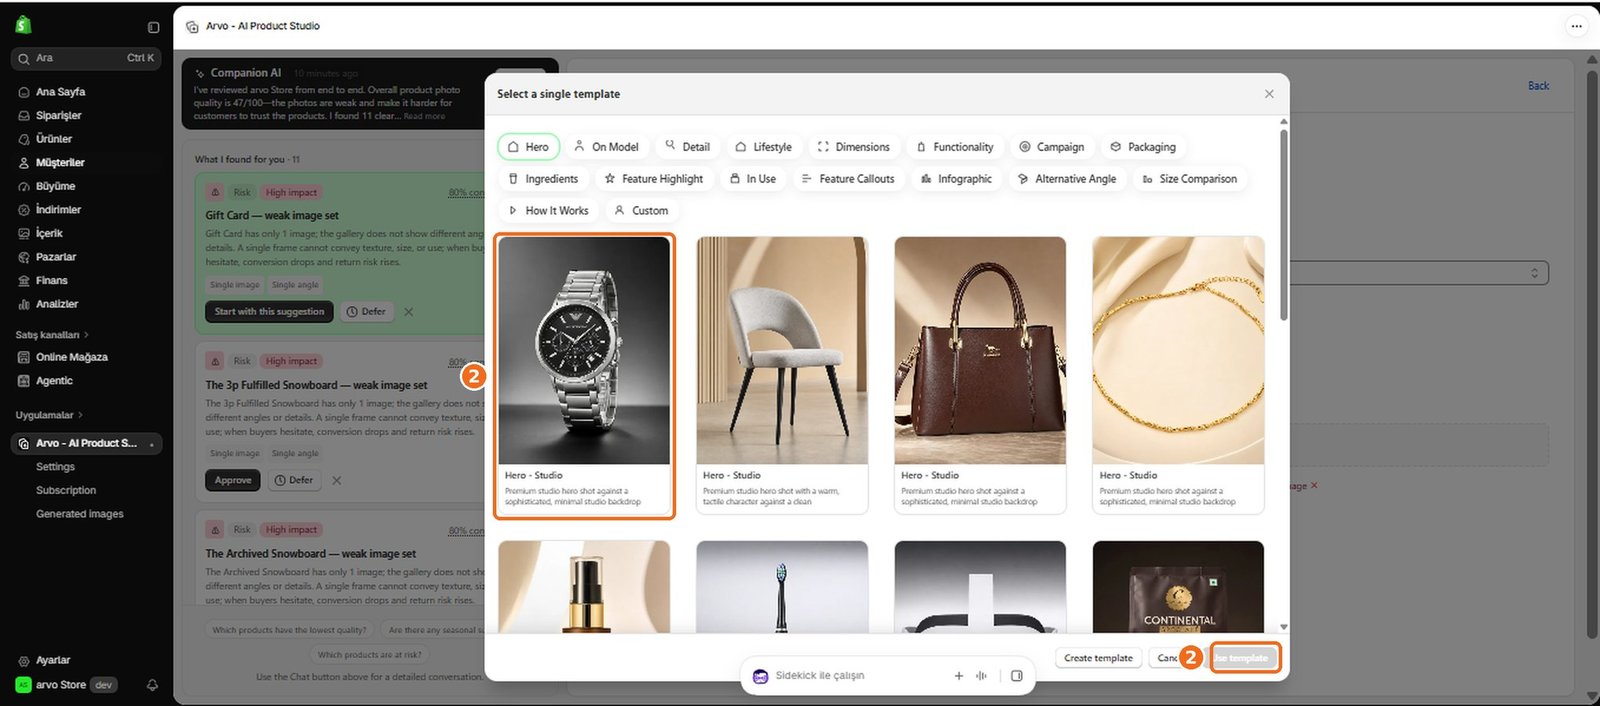
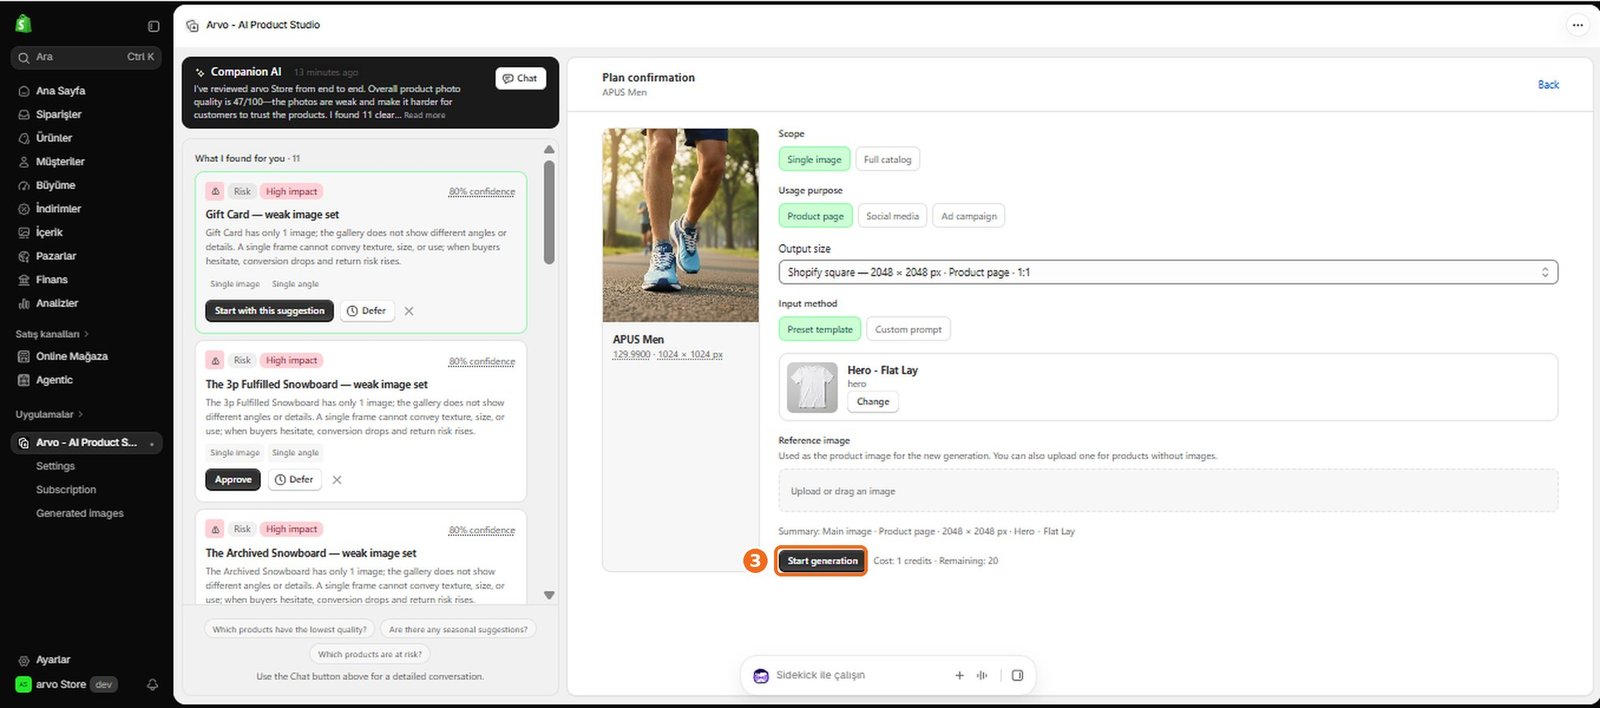
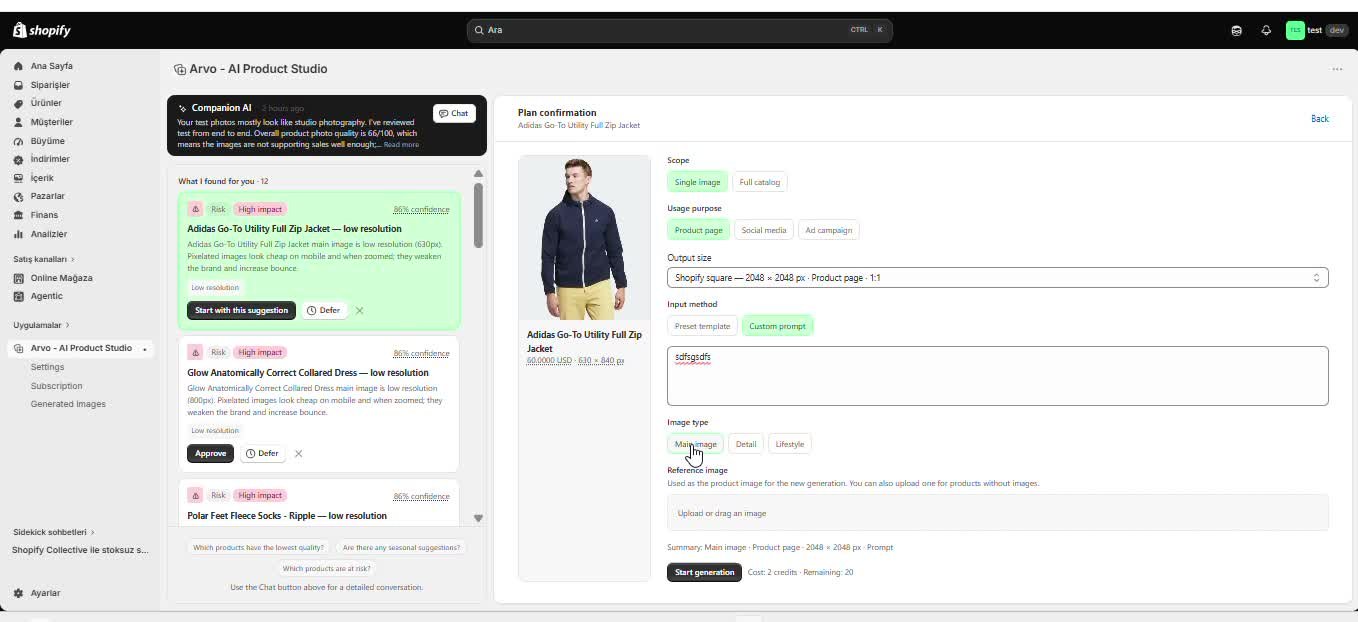
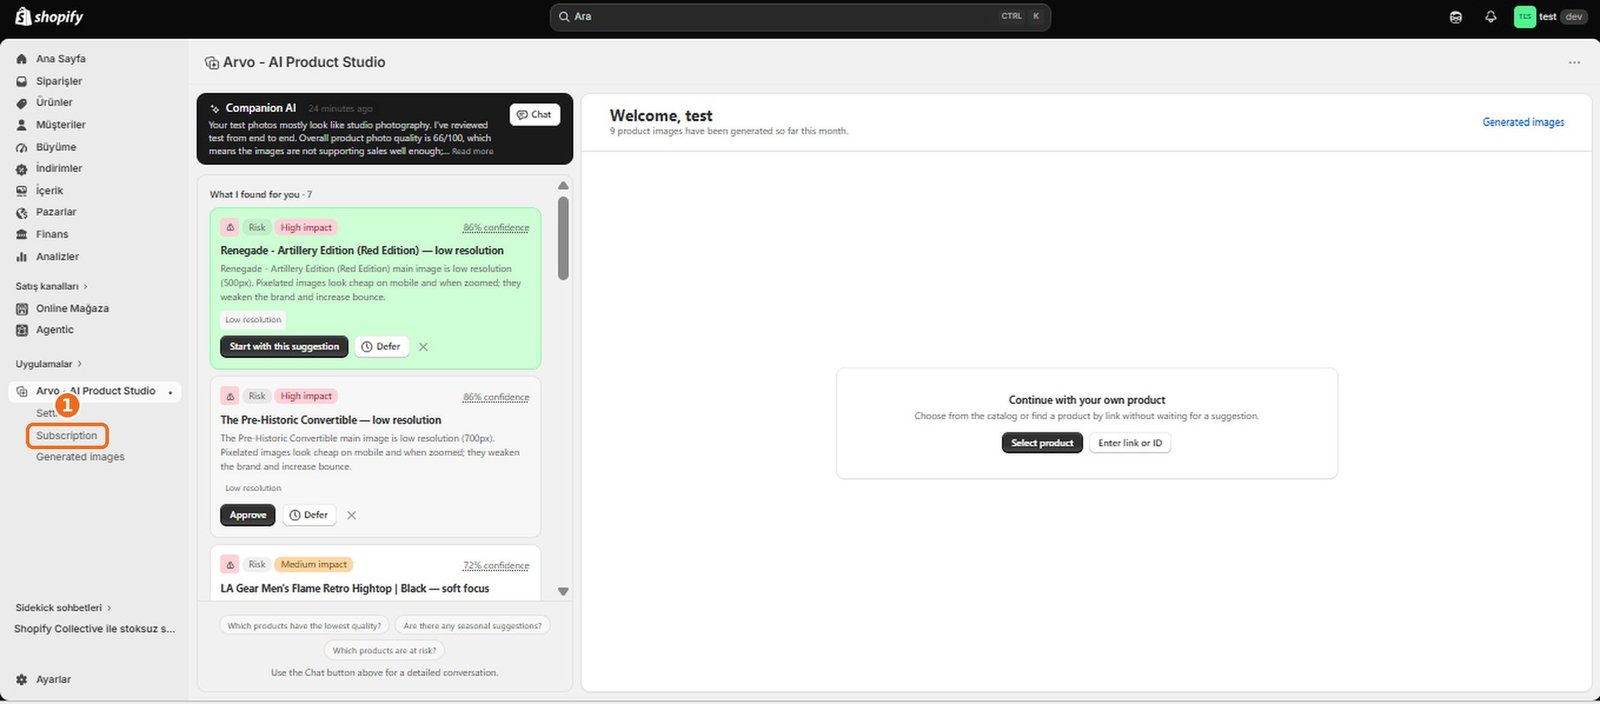
Arvo AI Product Studio is a Shopify app that helps store owners create polished product and marketing visuals with AI. You can use it to generate main product images, detail images, lifestyle scenes, campaign visuals, banners, and social media content. Generated results are saved in the Gallery, where you can review them and add suitable images to Shopify.
How do I get started with Arvo AI Product Studio?
1
Begin by installing Arvo AI Product Studio for your Shopify store and opening the app.
2
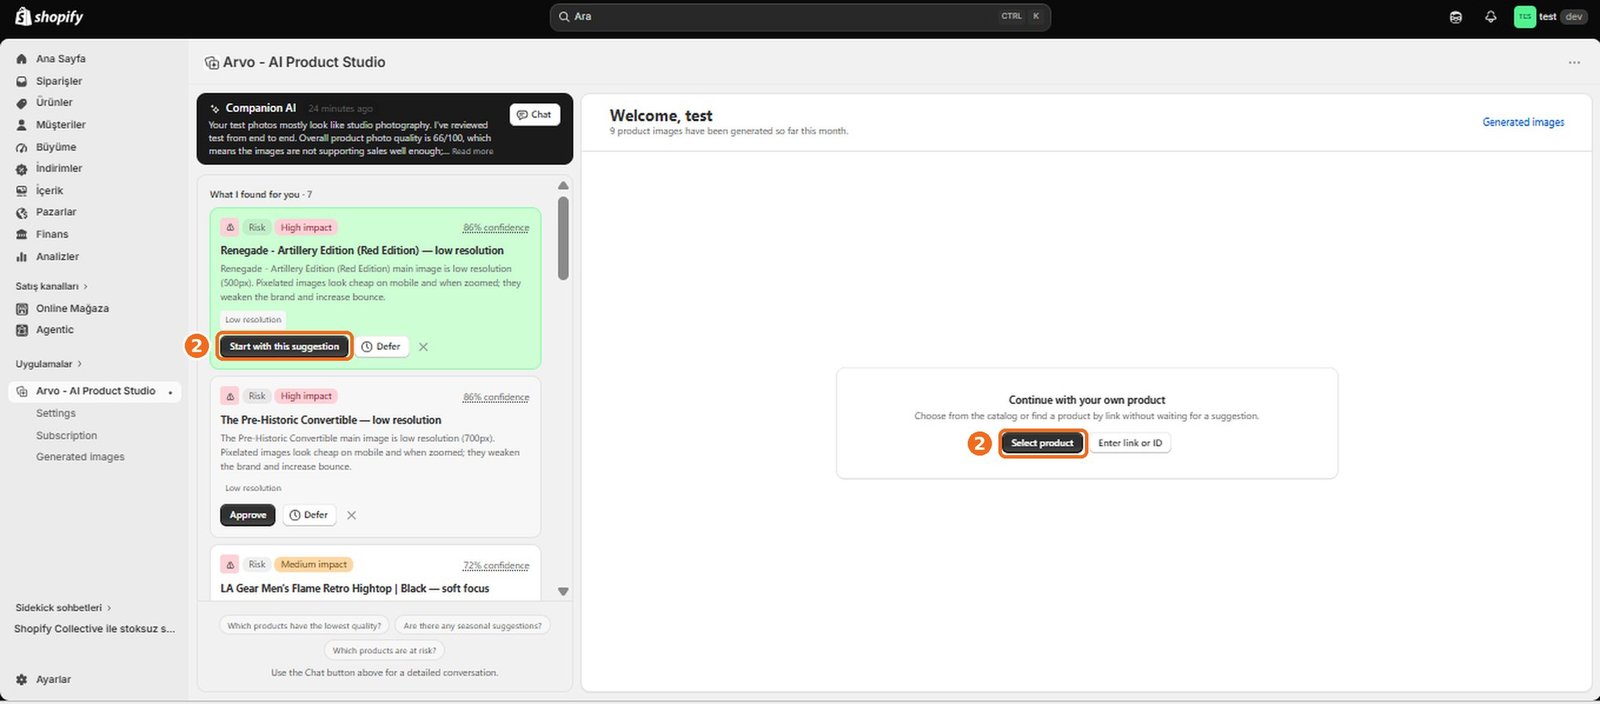
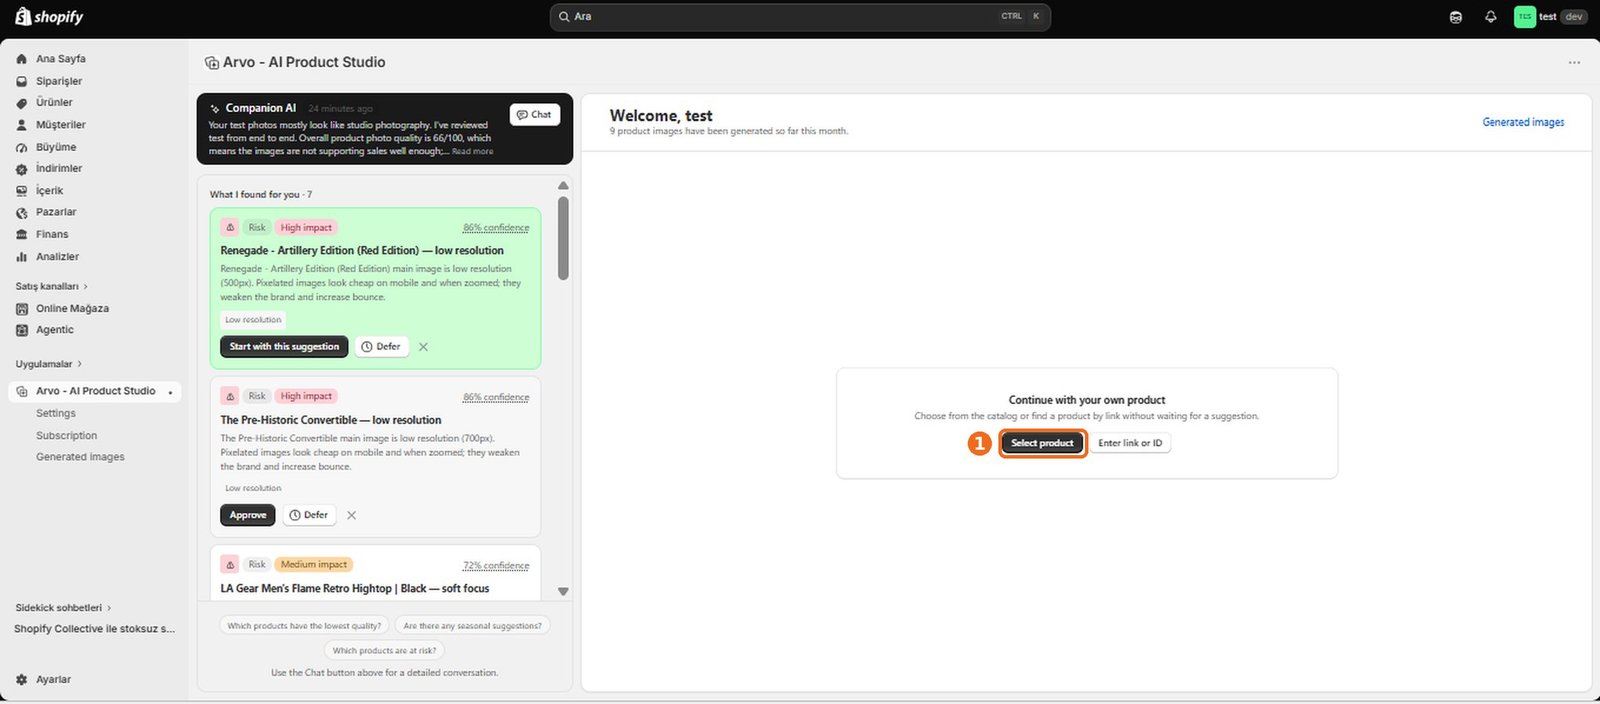
Once your store is connected, review your products and choose whether to follow a Companion AI recommendation or start creating a visual directly.
3
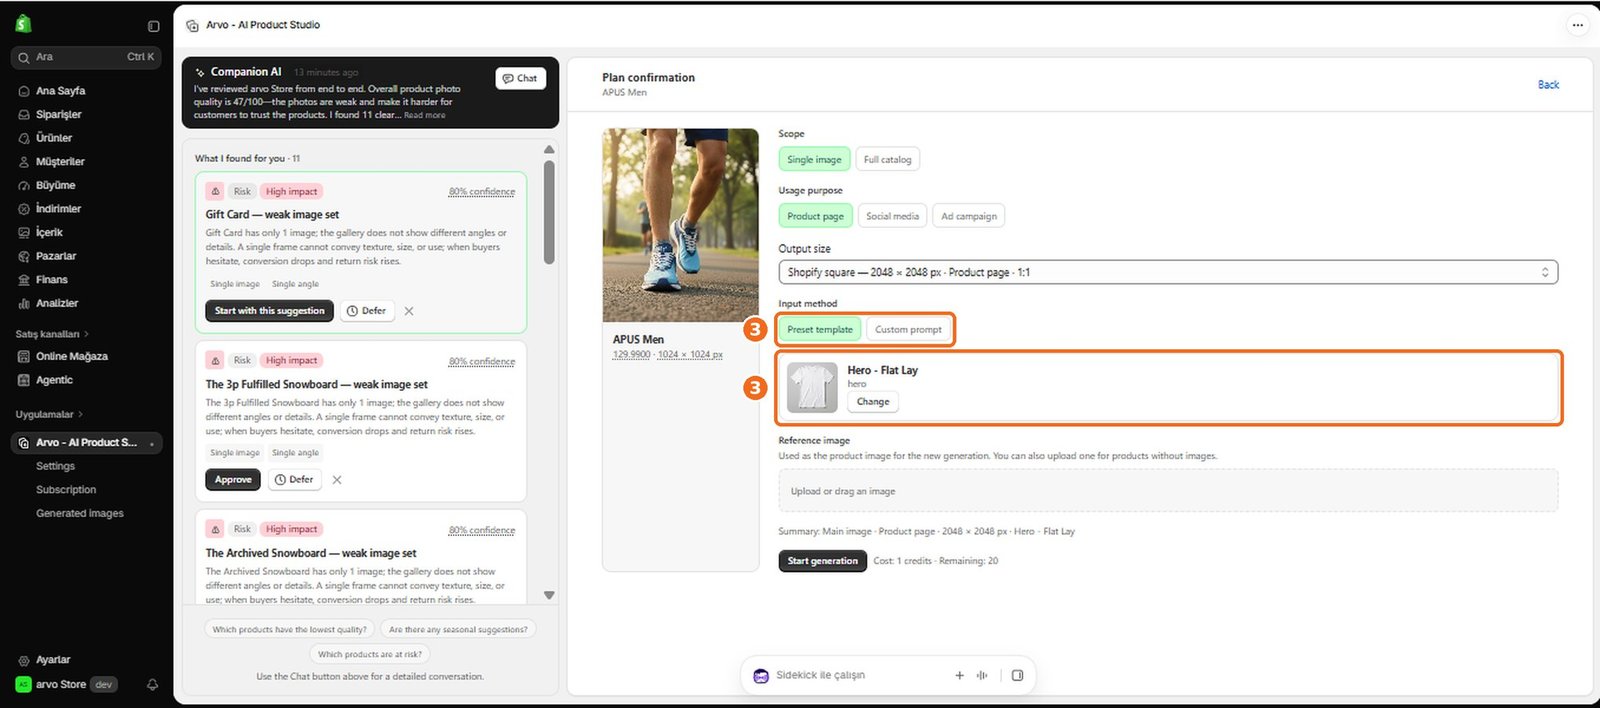
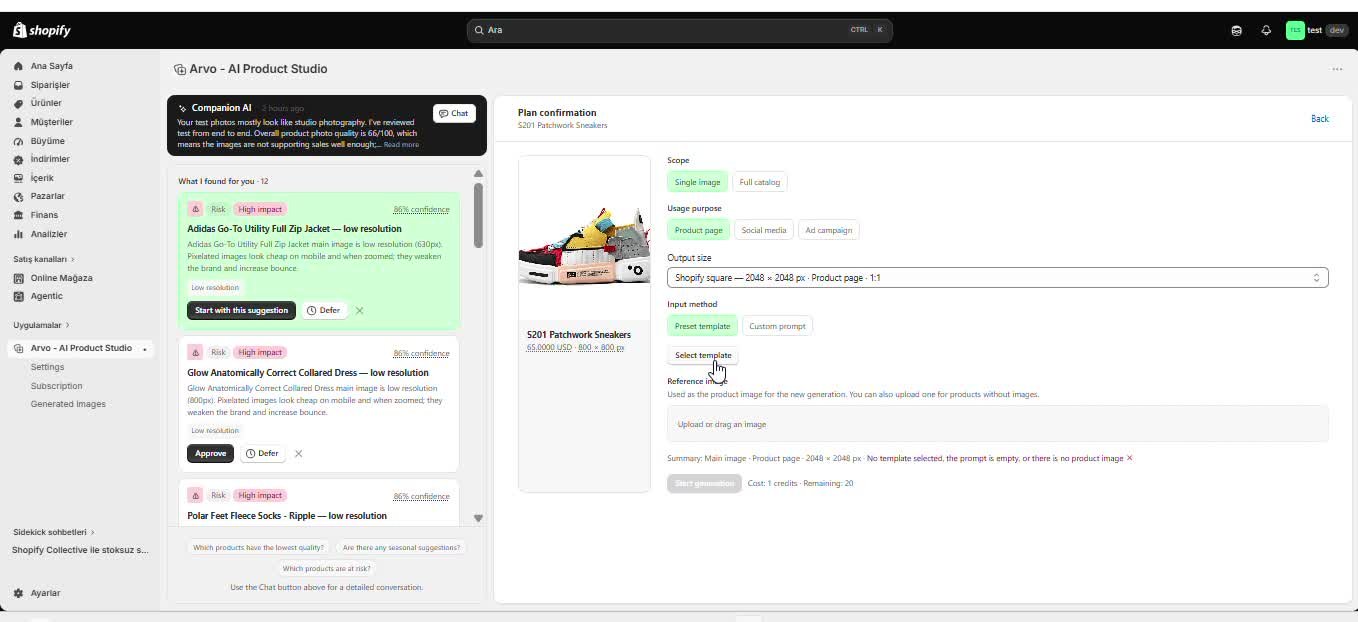
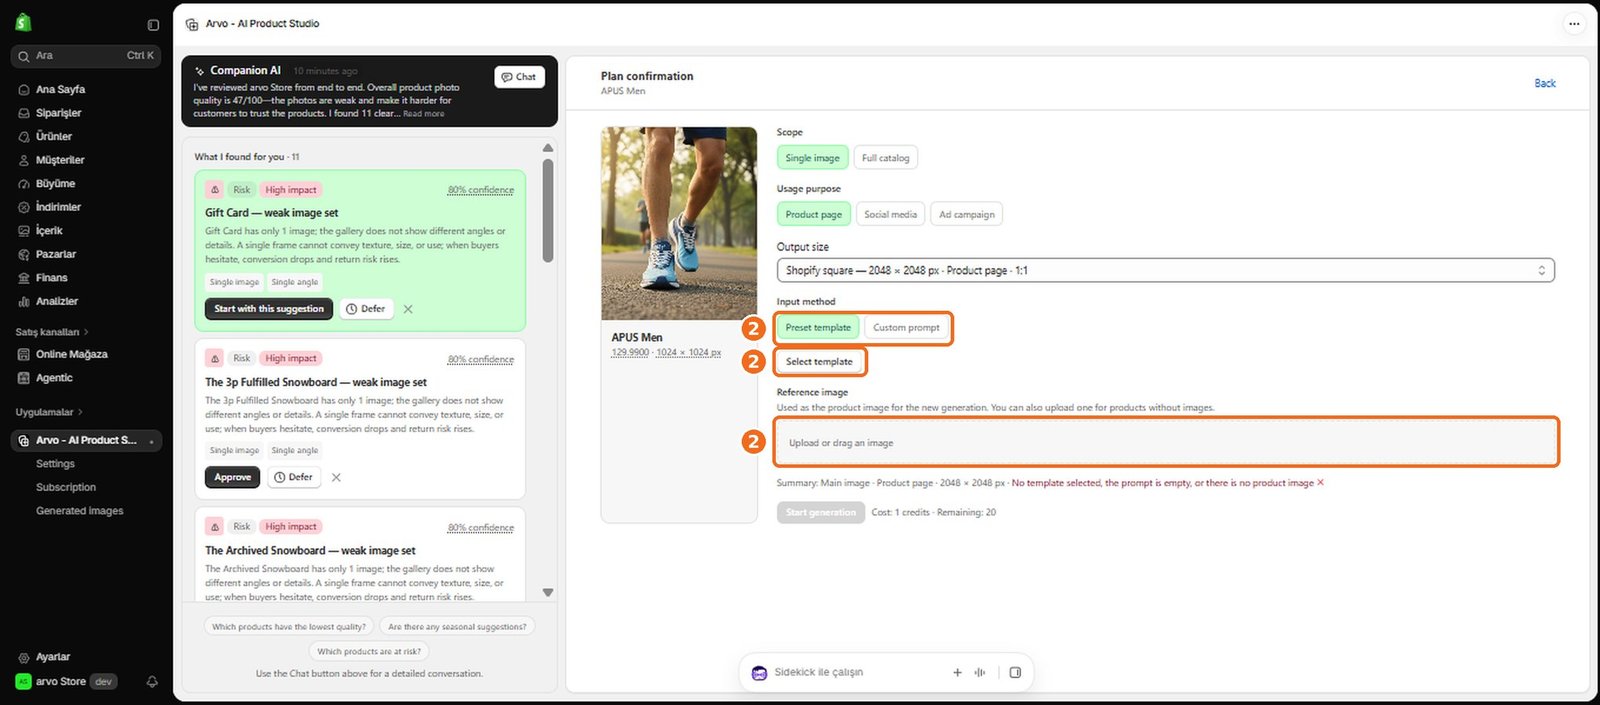
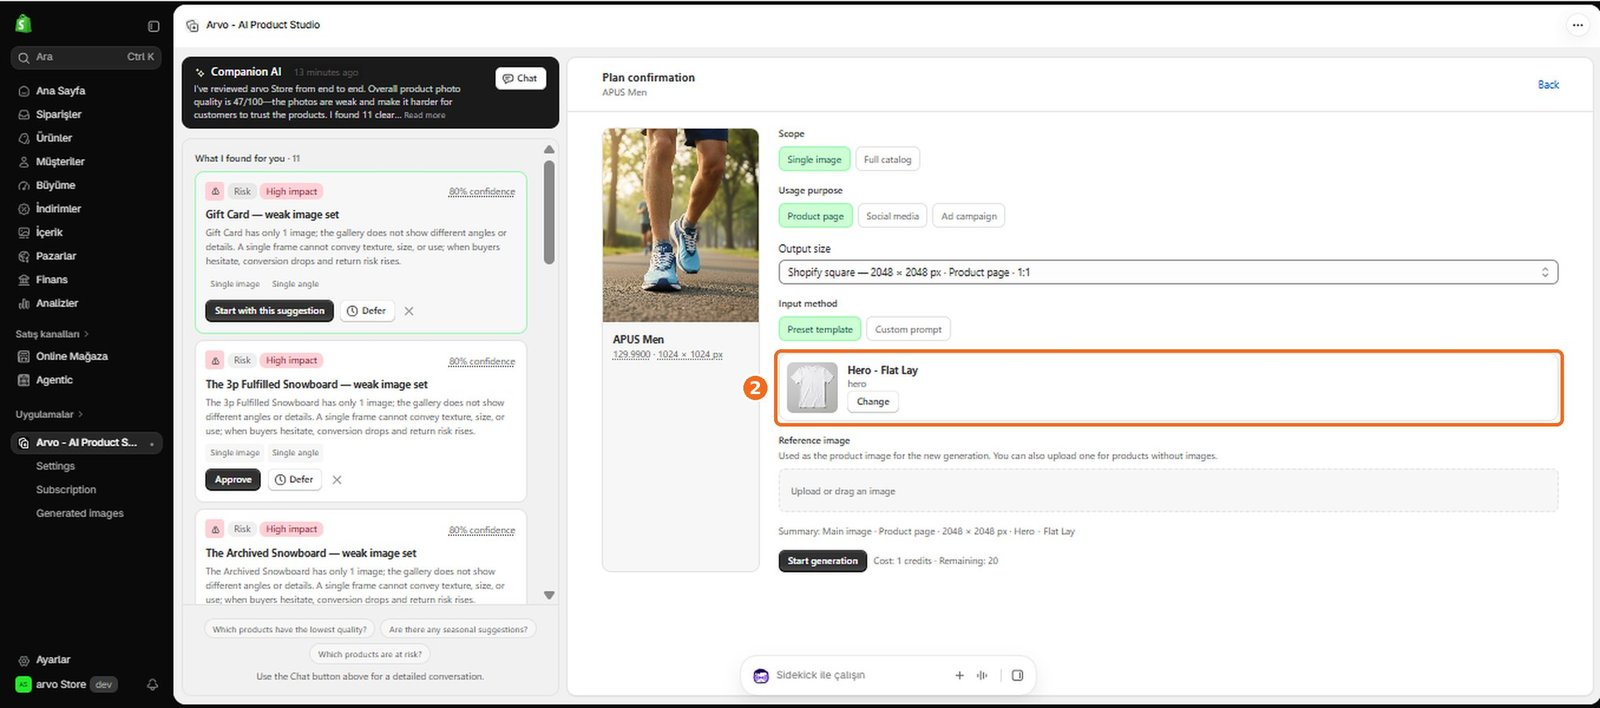
You can guide the result with a preset or custom template, a reference image, or a custom prompt.
4
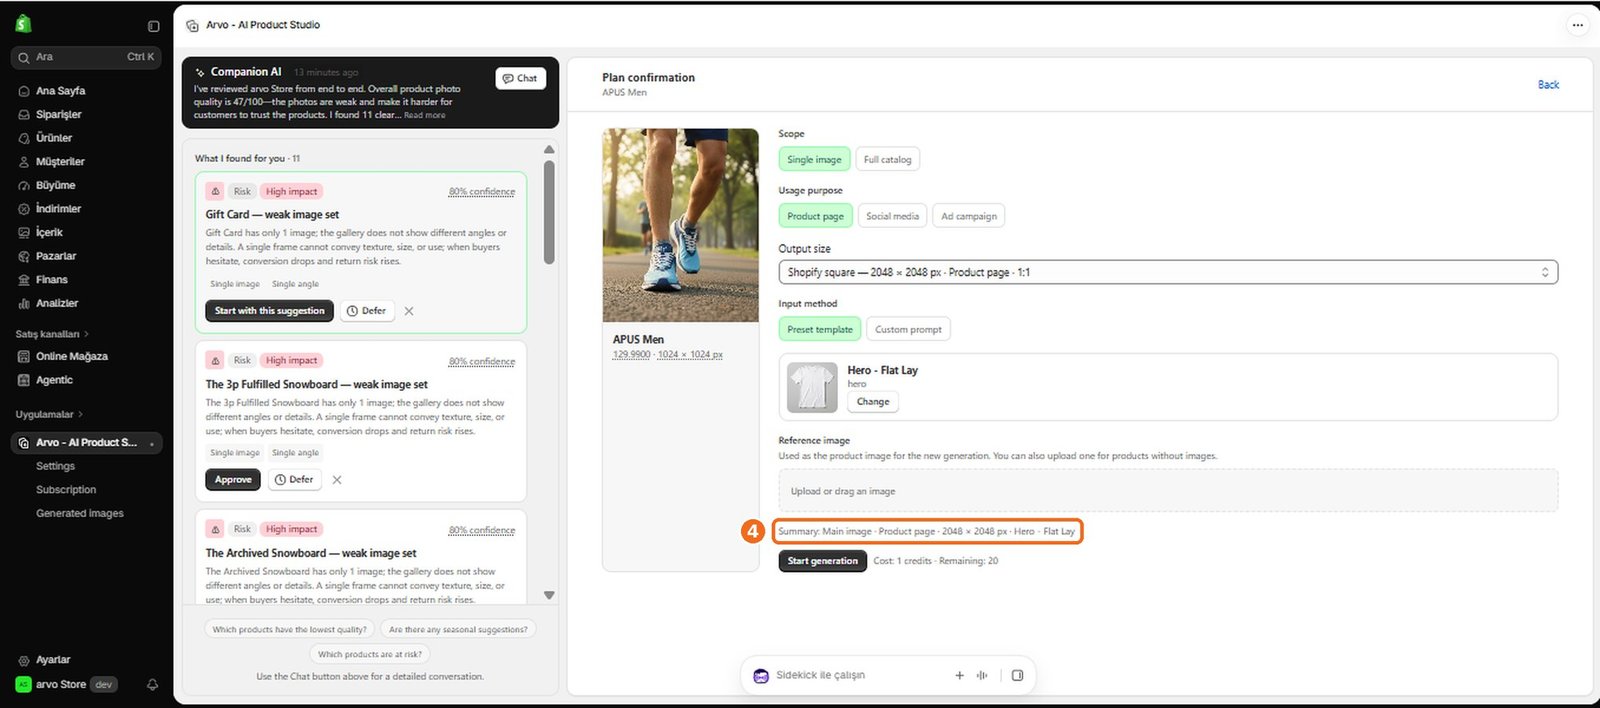
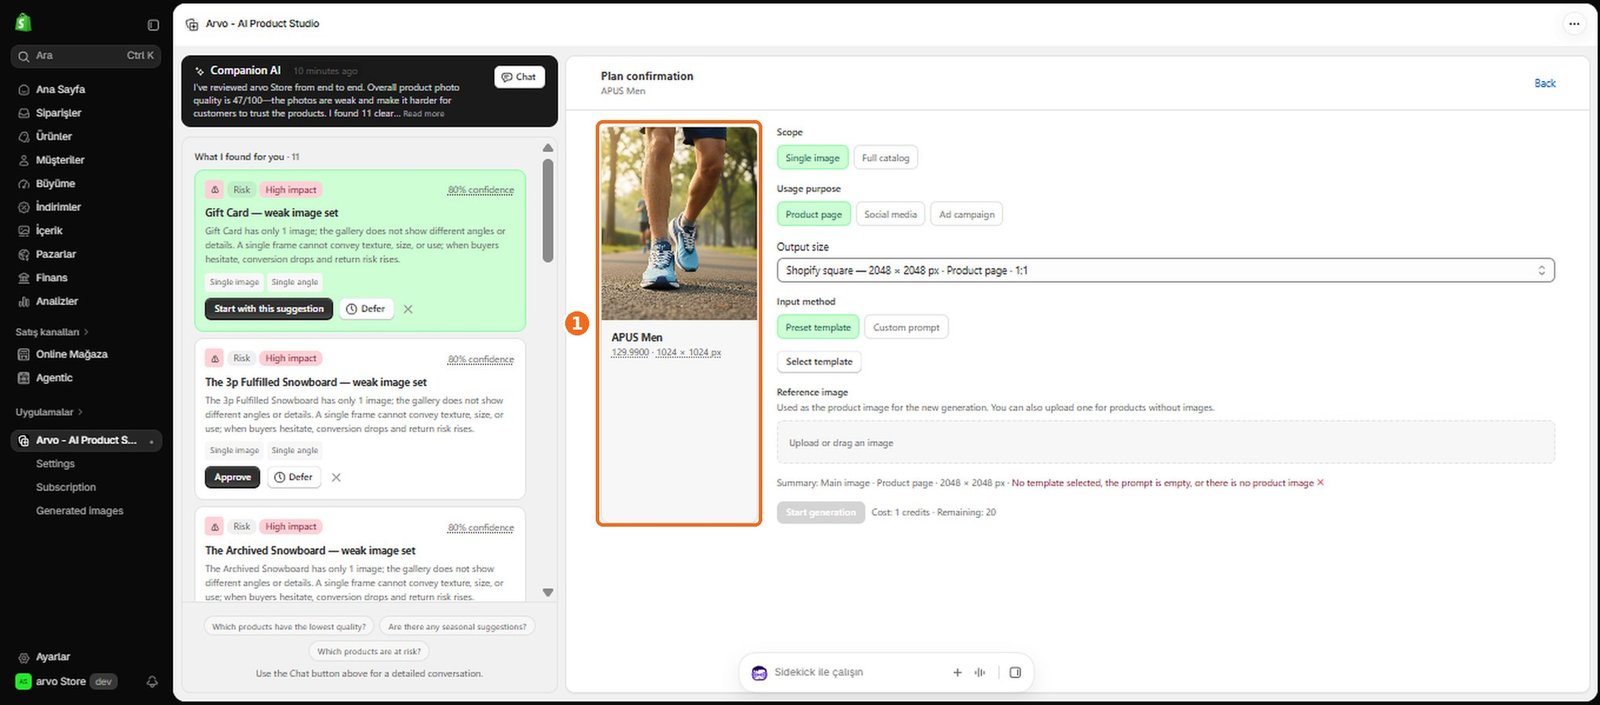
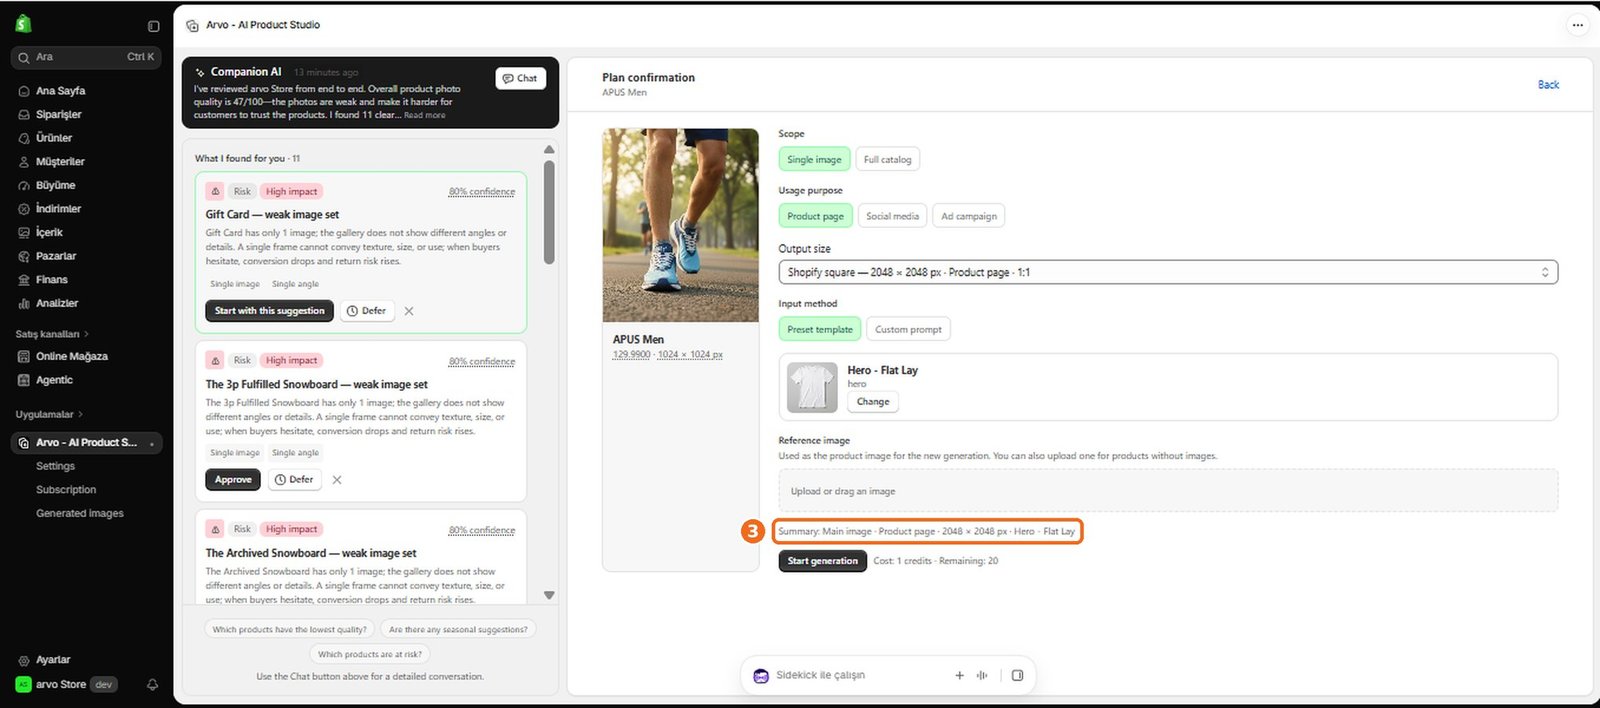
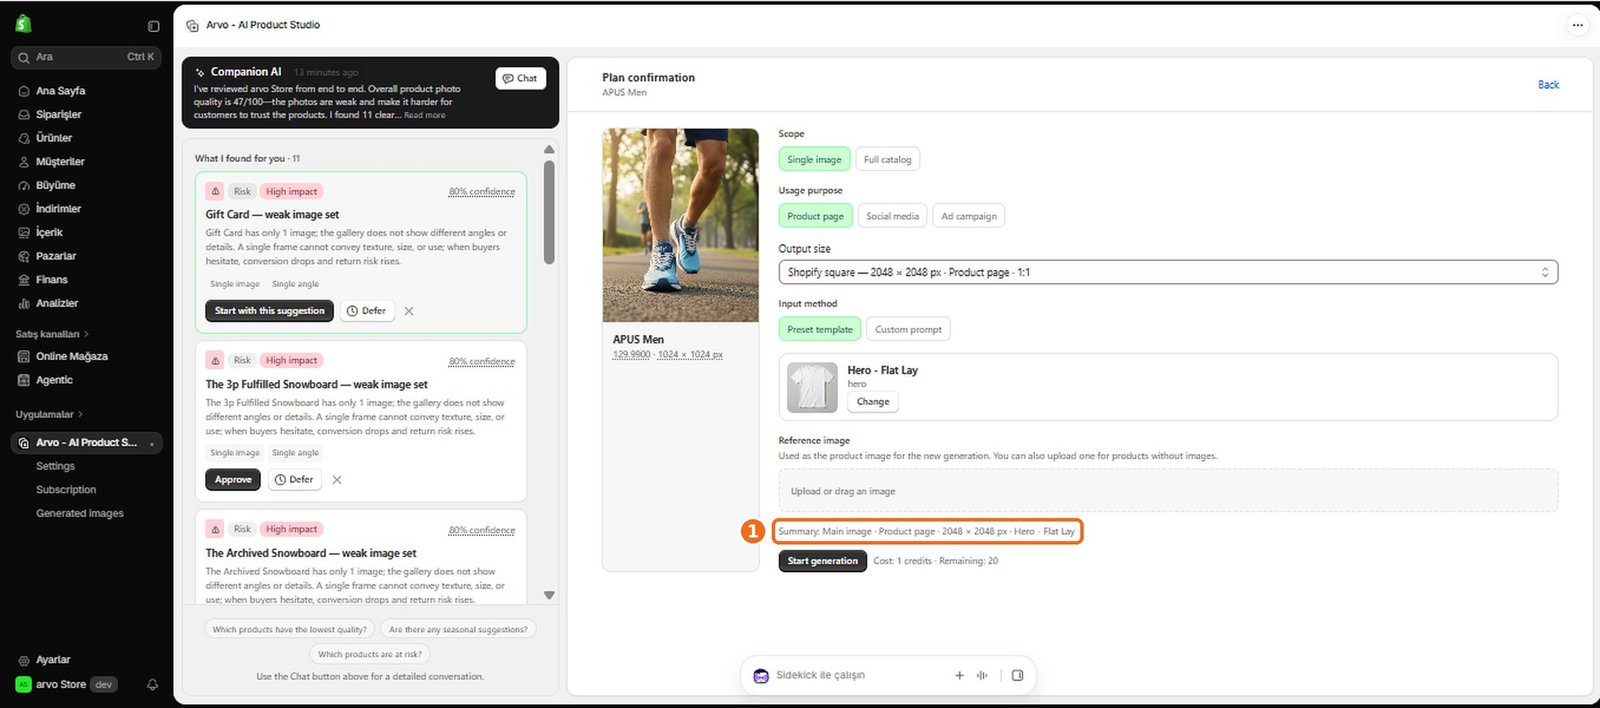
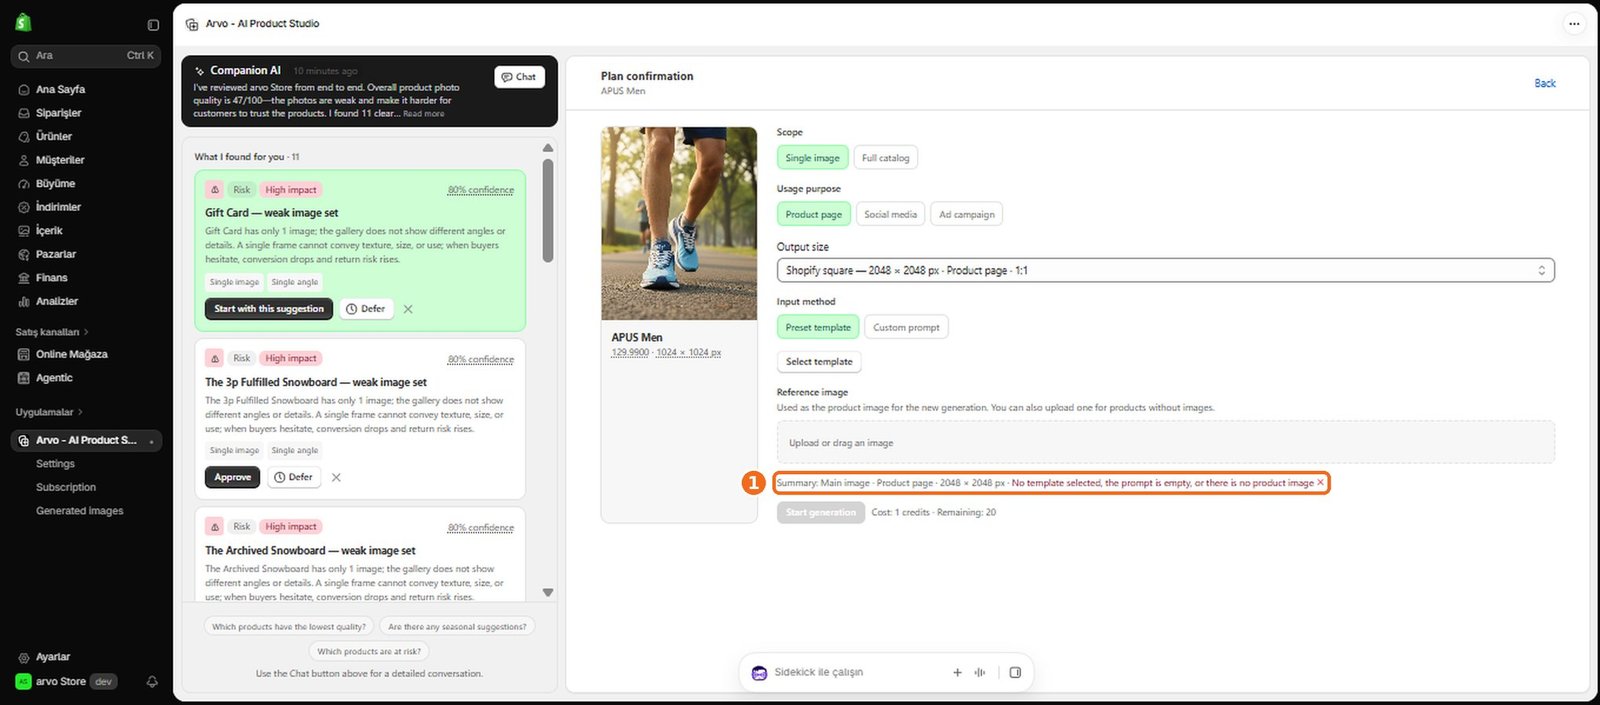
Before generating, review the selected product, visual type, and creative direction.
5
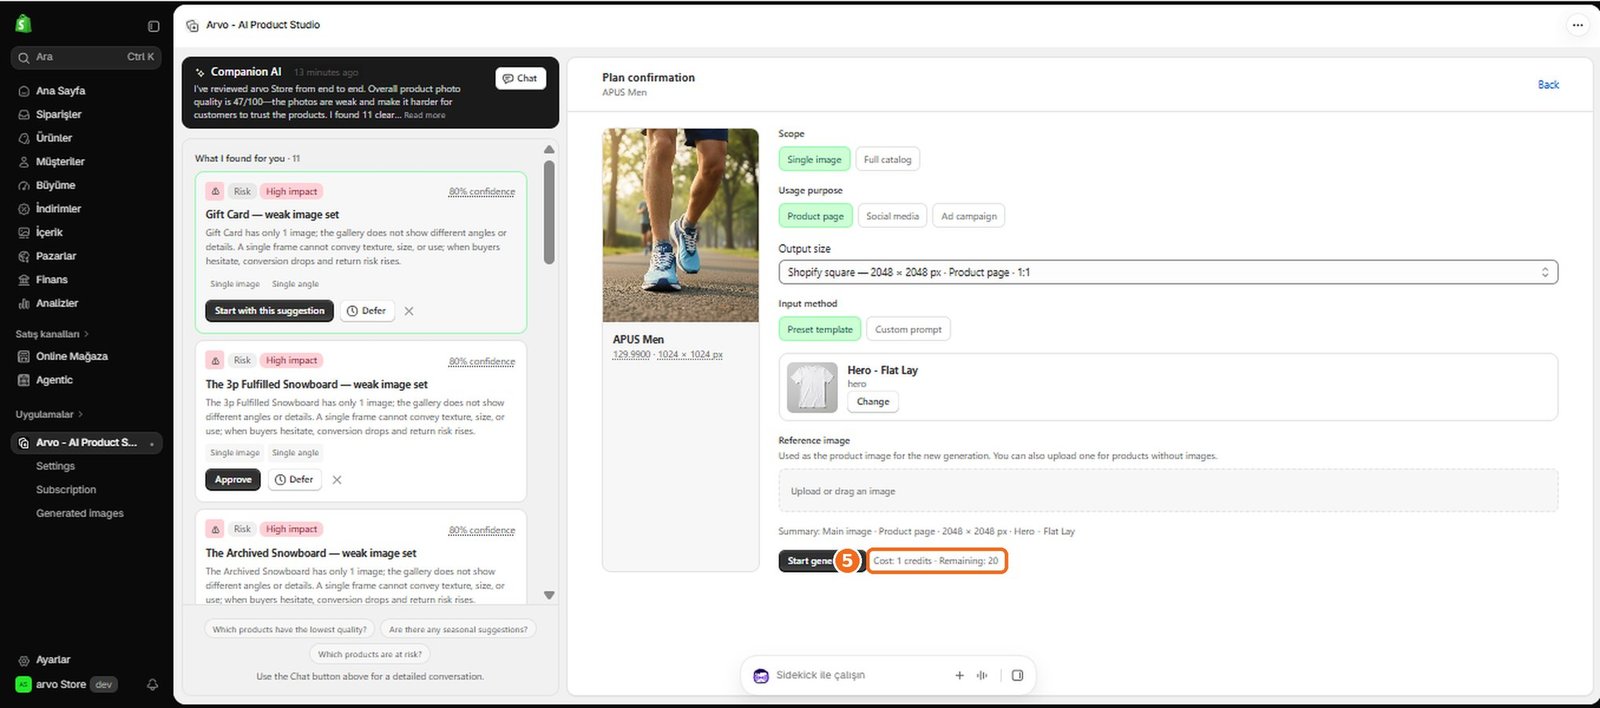
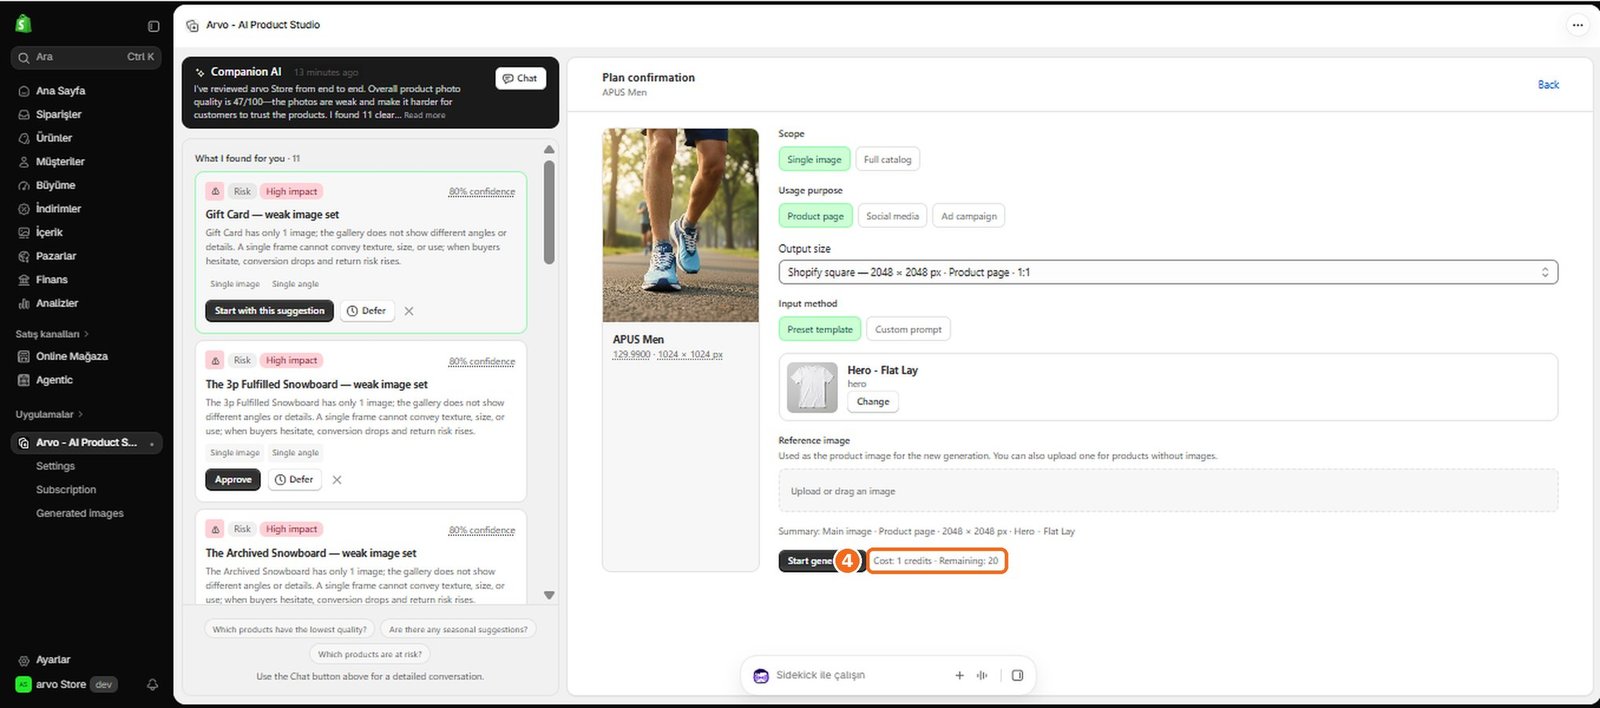
Generation uses credits.
6
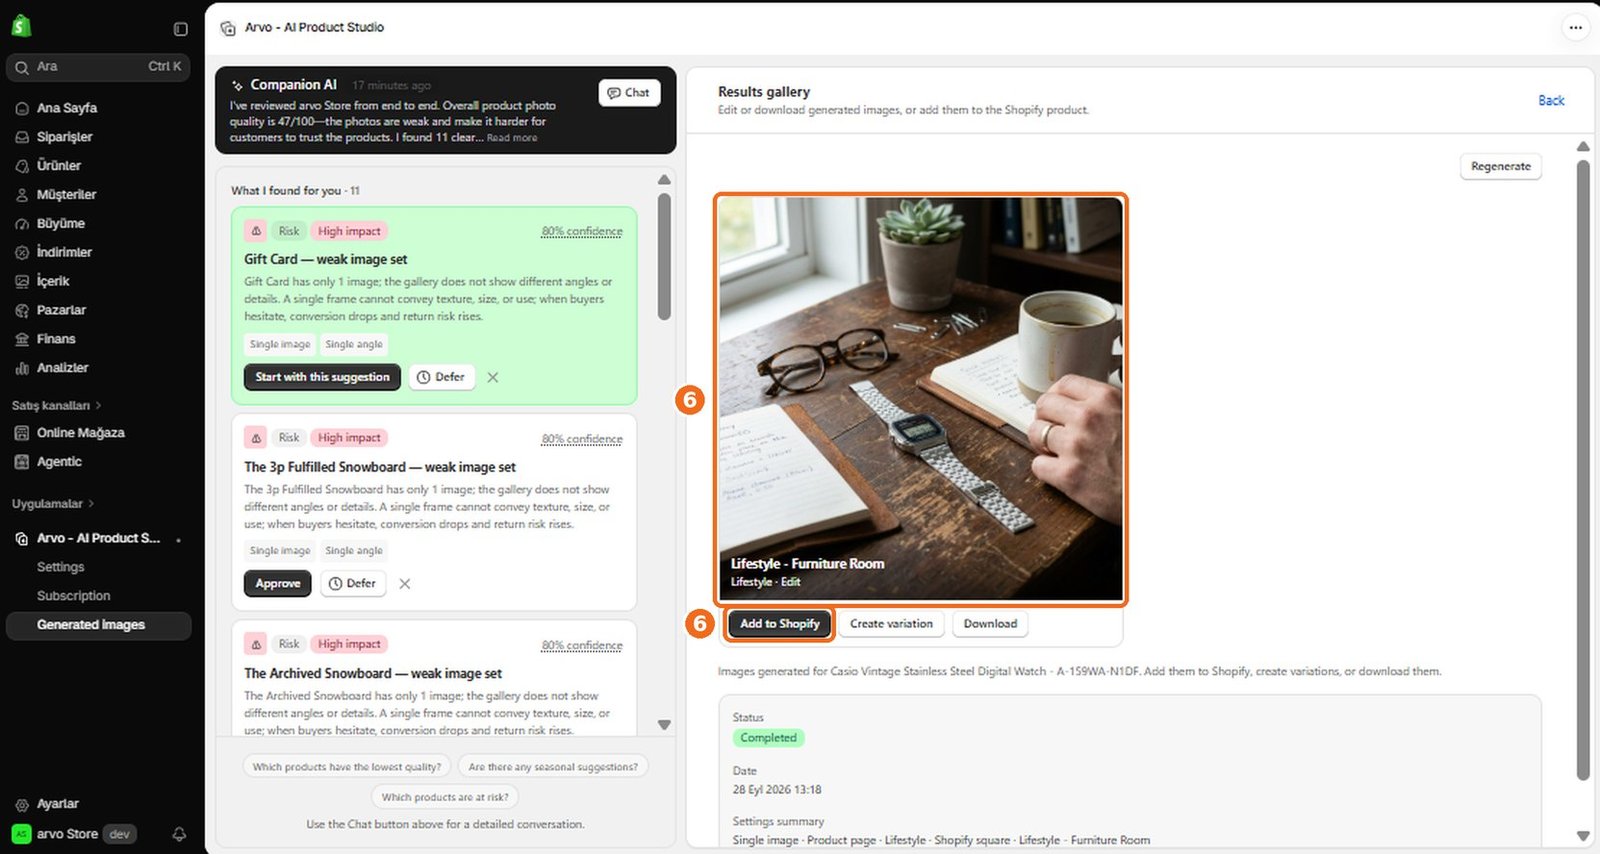
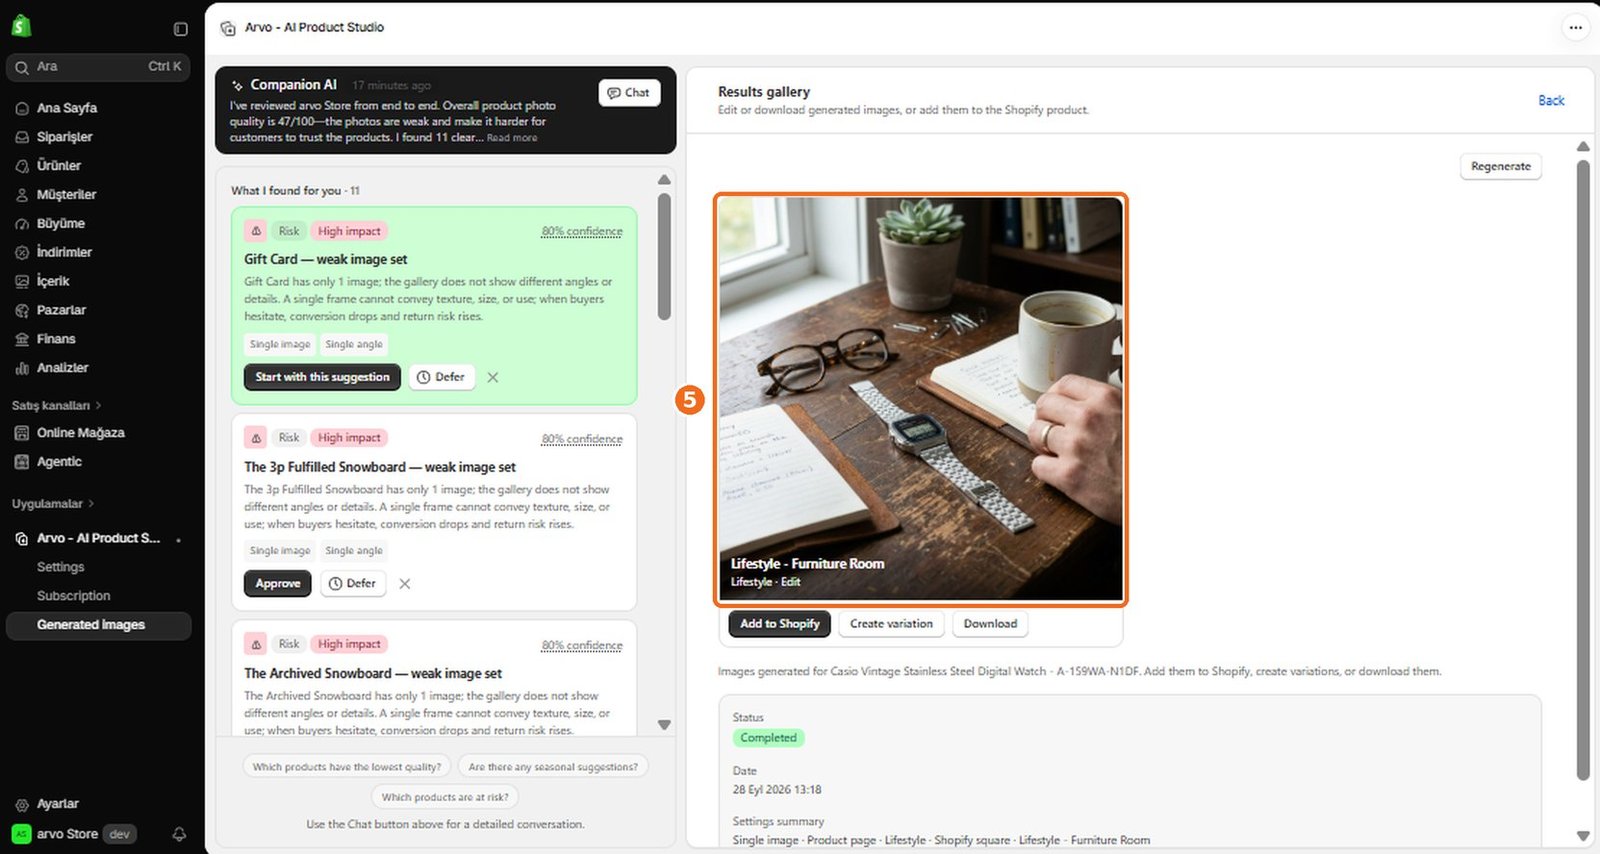
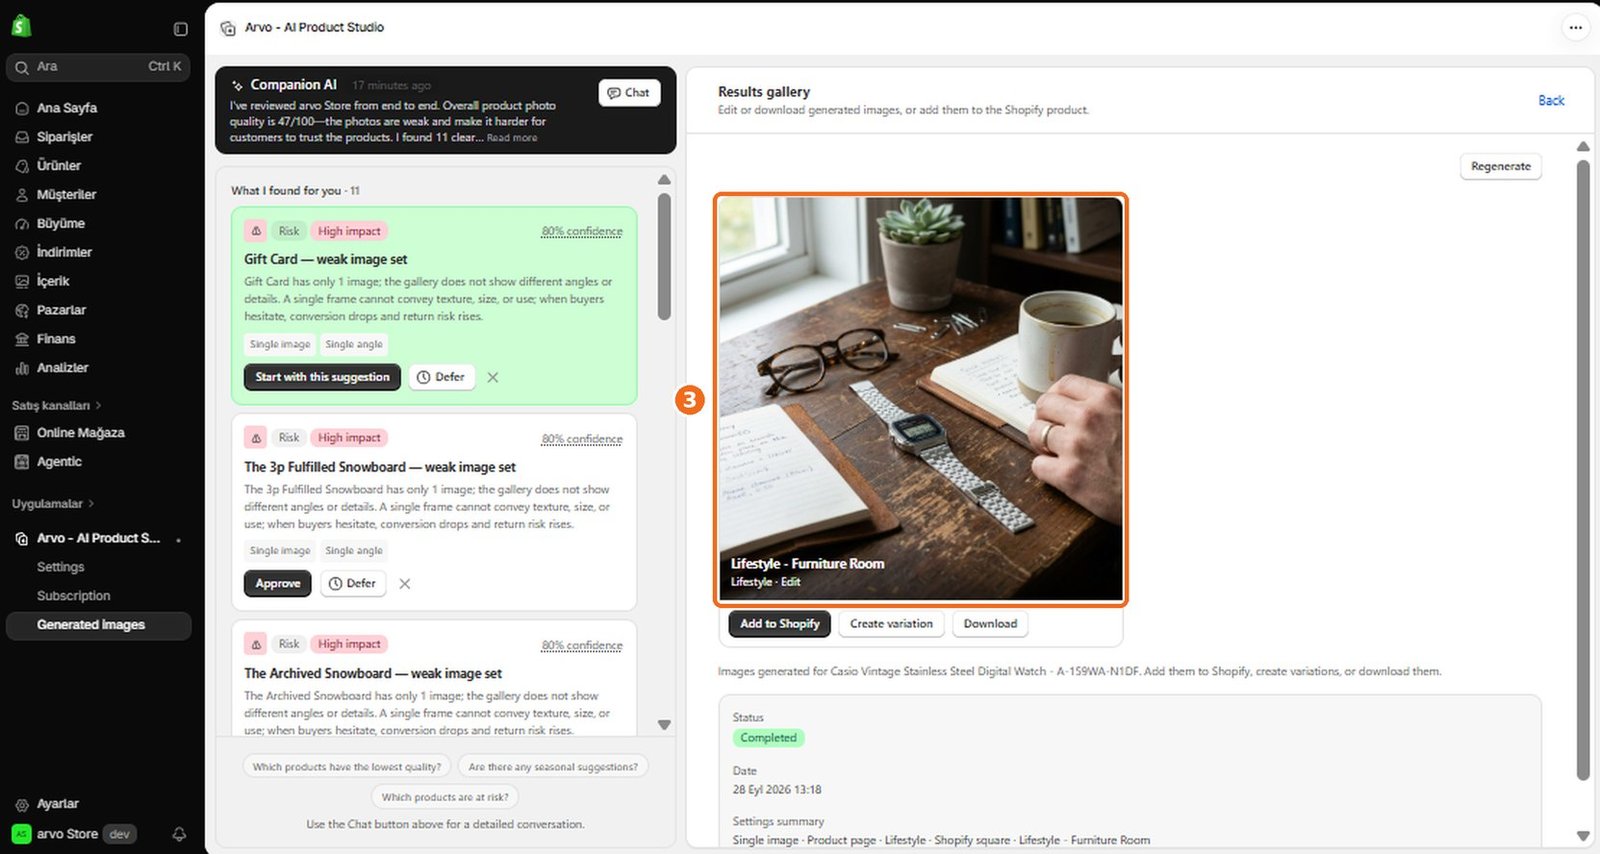
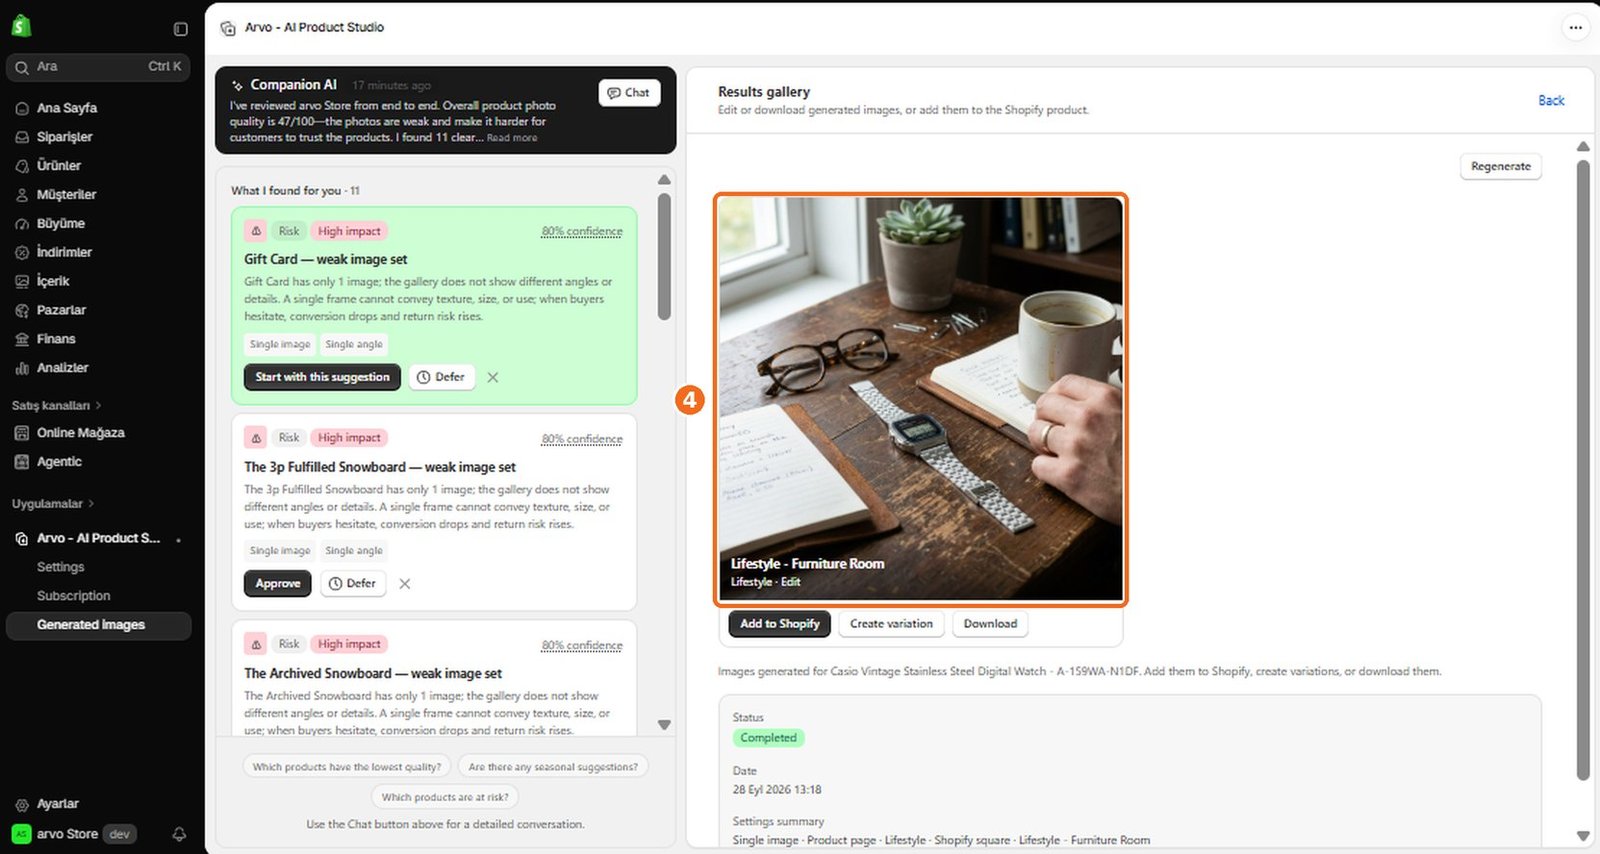
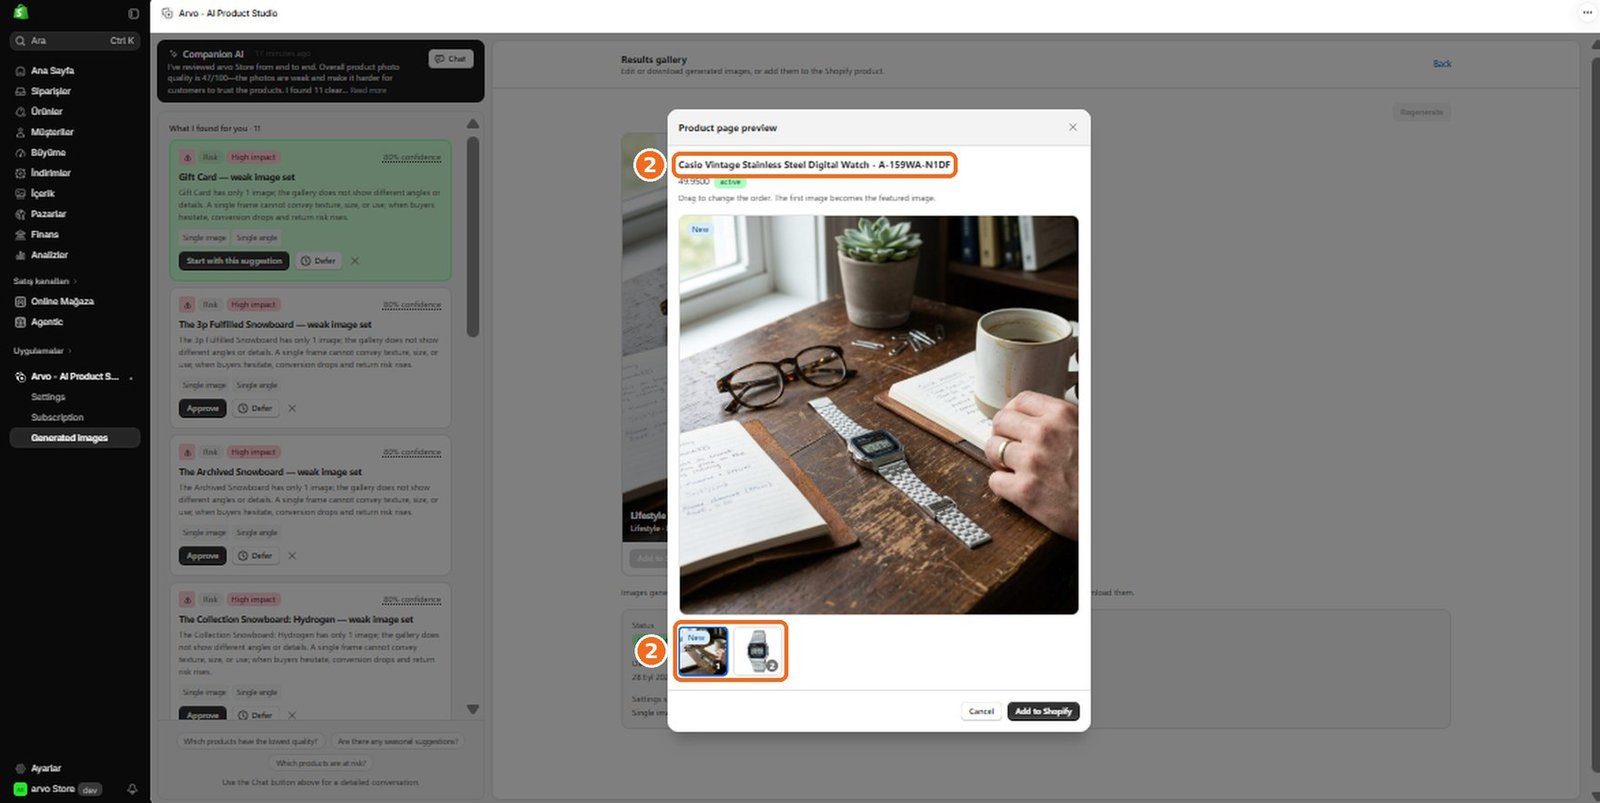
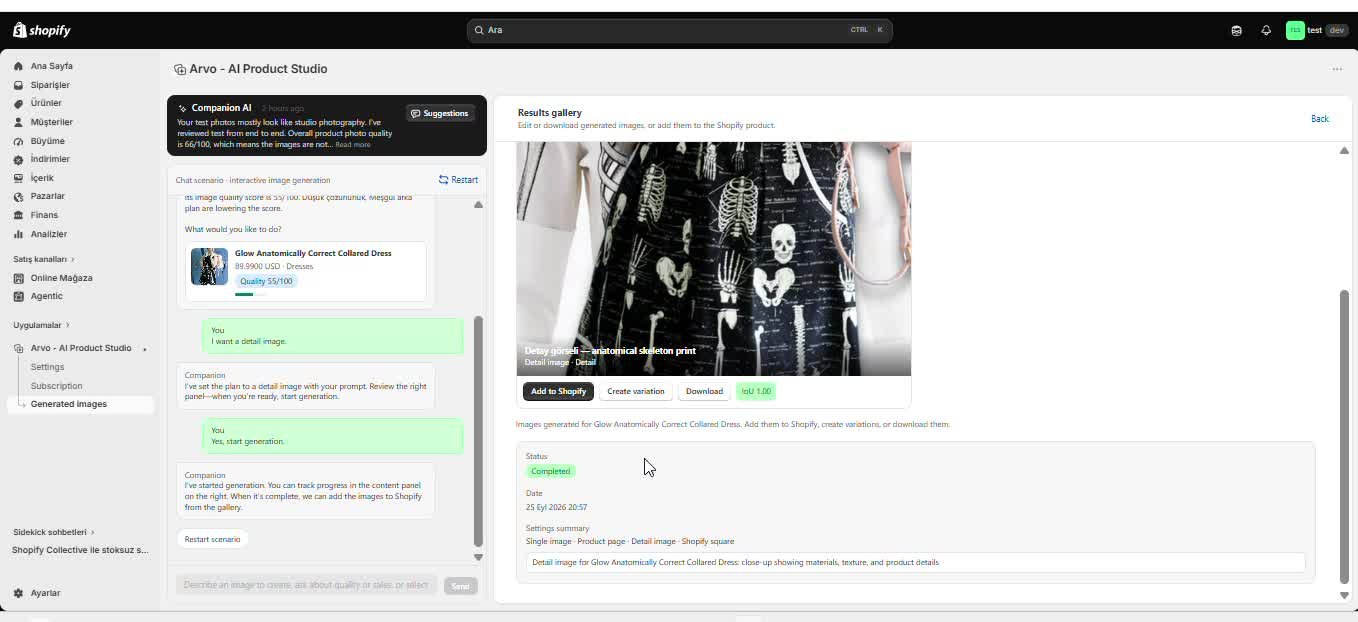
When the process succeeds, the new visual appears in the Gallery and can be added to Shopify.
7
If setup cannot be completed, confirm that you have access to the intended Shopify store and try opening the app again.
How do I connect my Shopify store?
1
Arvo AI Product Studio works with a connected Shopify store so it can access the product information needed to create visuals and return approved results to Shopify.
2
Install or open the app from the store you want to use, then complete any authorization steps shown.
3
You will need permission to install apps and grant the requested store access.
4
After a successful connection, your Shopify products should become available in Arvo AI.
5
If they do not appear, check that you opened the app from the correct store and that the required access was approved.
How does Arvo AI work?
1
Arvo AI combines information from your Shopify store with the creative direction you provide.
2
You select the product and kind of visual you need, then guide the generation with a preset or custom template, reference images, or a custom prompt.
3
The AI uses that context to create a new visual.
4
Generation consumes credits.
5
Completed results are stored in the Gallery so you can inspect them before using them, and suitable visuals can then be added to Shopify.
6
If a result does not meet your needs, adjust the creative guidance and generate a new result.
What can I create with Arvo AI Product Studio?
You can create main or cover images, detail images, lifestyle images, campaign visuals, banners, and social media visuals. These can support individual products or broader catalog and marketing needs.
The most suitable visual depends on your goal: use a main image to present the product clearly, a detail image to highlight a feature, a lifestyle image to show the product in context, and campaign, banner, or social visuals for promotion. You can shape the result with templates, reference images, or custom prompts.
How does the Dashboard work?
1
The Dashboard is the starting point for understanding your visual work in Arvo AI Product Studio.
2
It should help you move between store insights, Companion AI recommendations, visual creation, and generated results.
3
Use it to identify what needs attention, continue relevant work, and open the Gallery to review completed visuals.
4
If information appears missing, first confirm that the correct Shopify store is connected and that its products are available to Arvo AI.
How do I navigate the Arvo AI workspace?
1
Use the workspace navigation to move among the main areas for Companion AI, visual creation, templates, and the Gallery.
2
A typical flow is to review a recommendation or choose a product, define the visual you want, generate it with credits, and then review the result in the Gallery.
3
The available areas and actions may depend on where you are in that flow.
4
If you cannot find an item, return to the main workspace and confirm that your store is connected and the relevant product is available.
What is Companion AI?
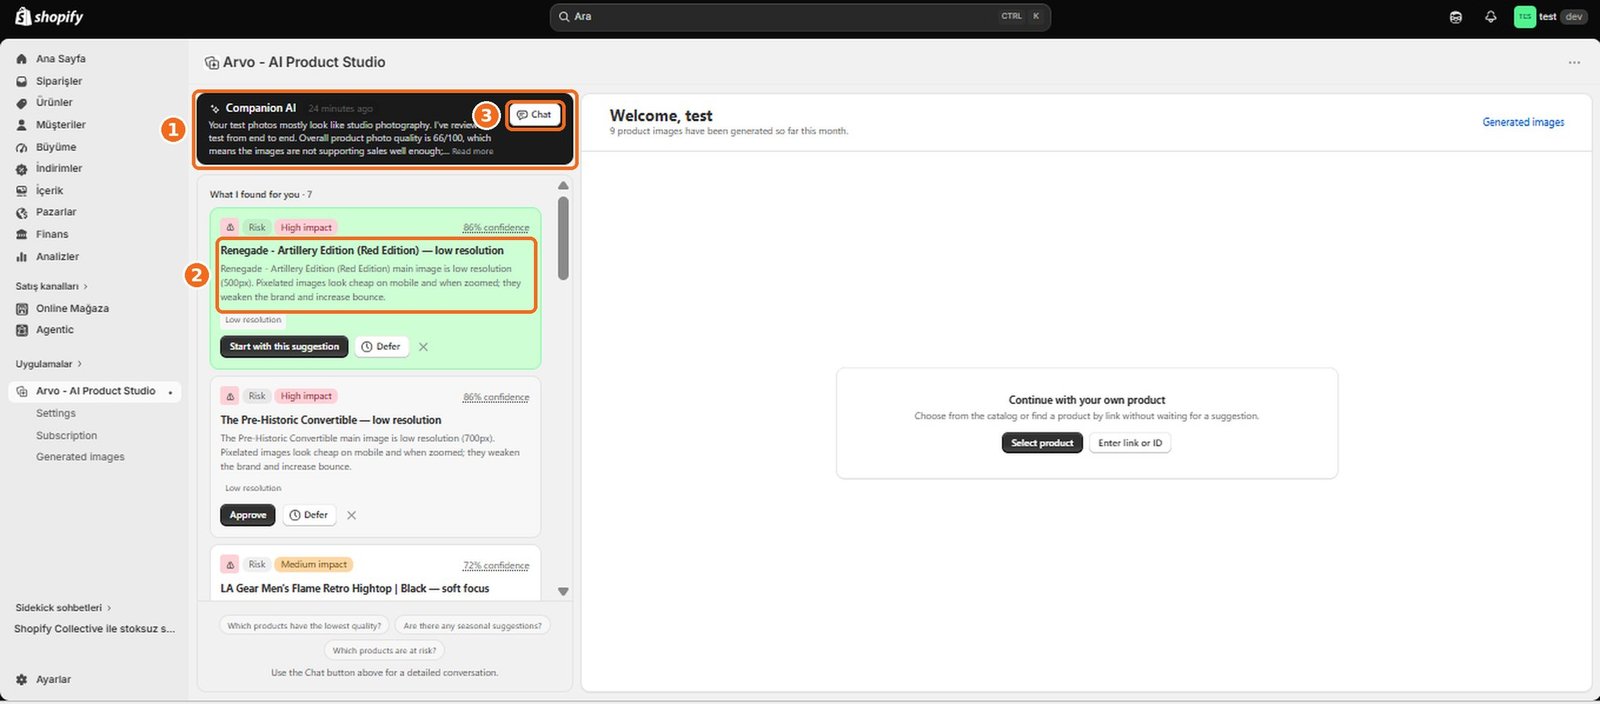
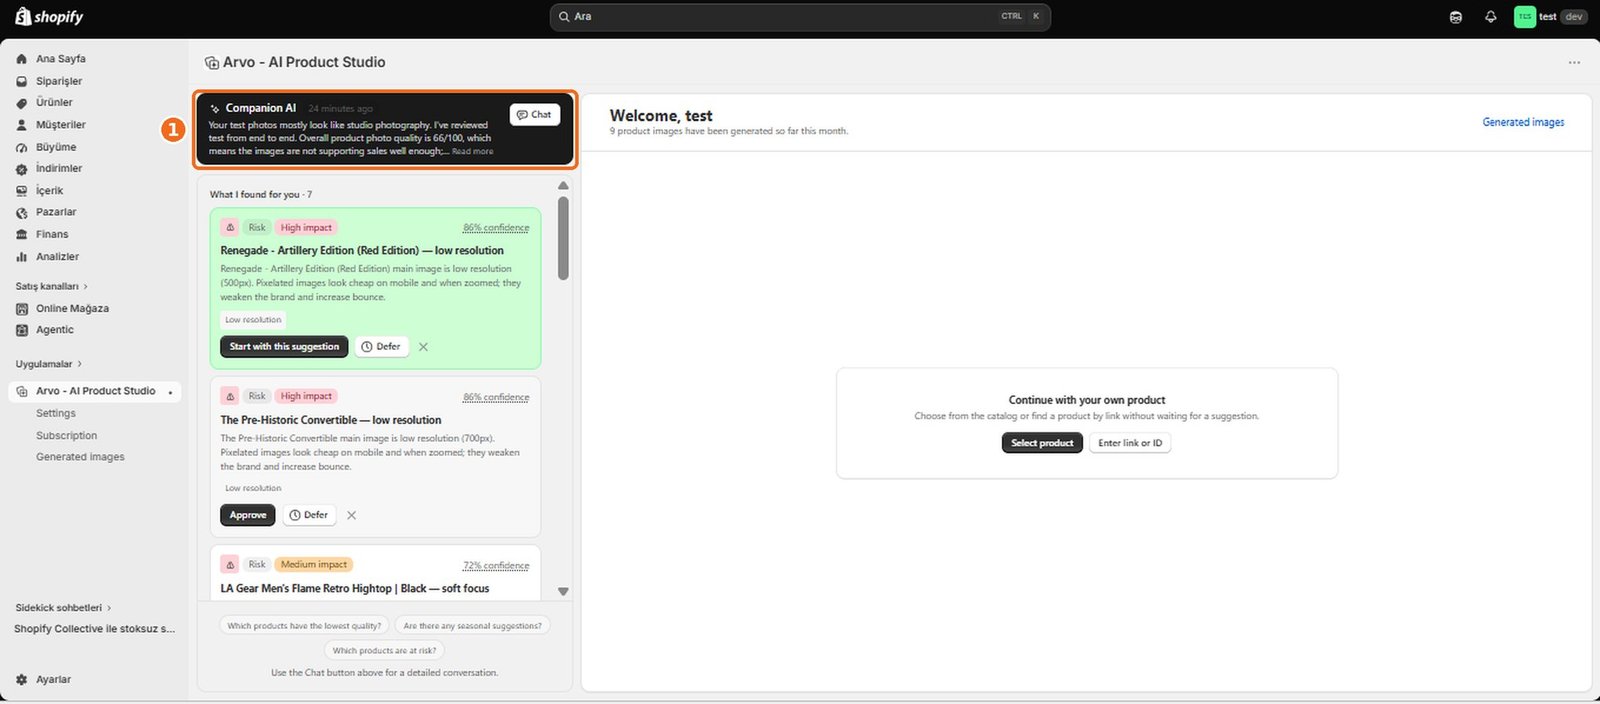
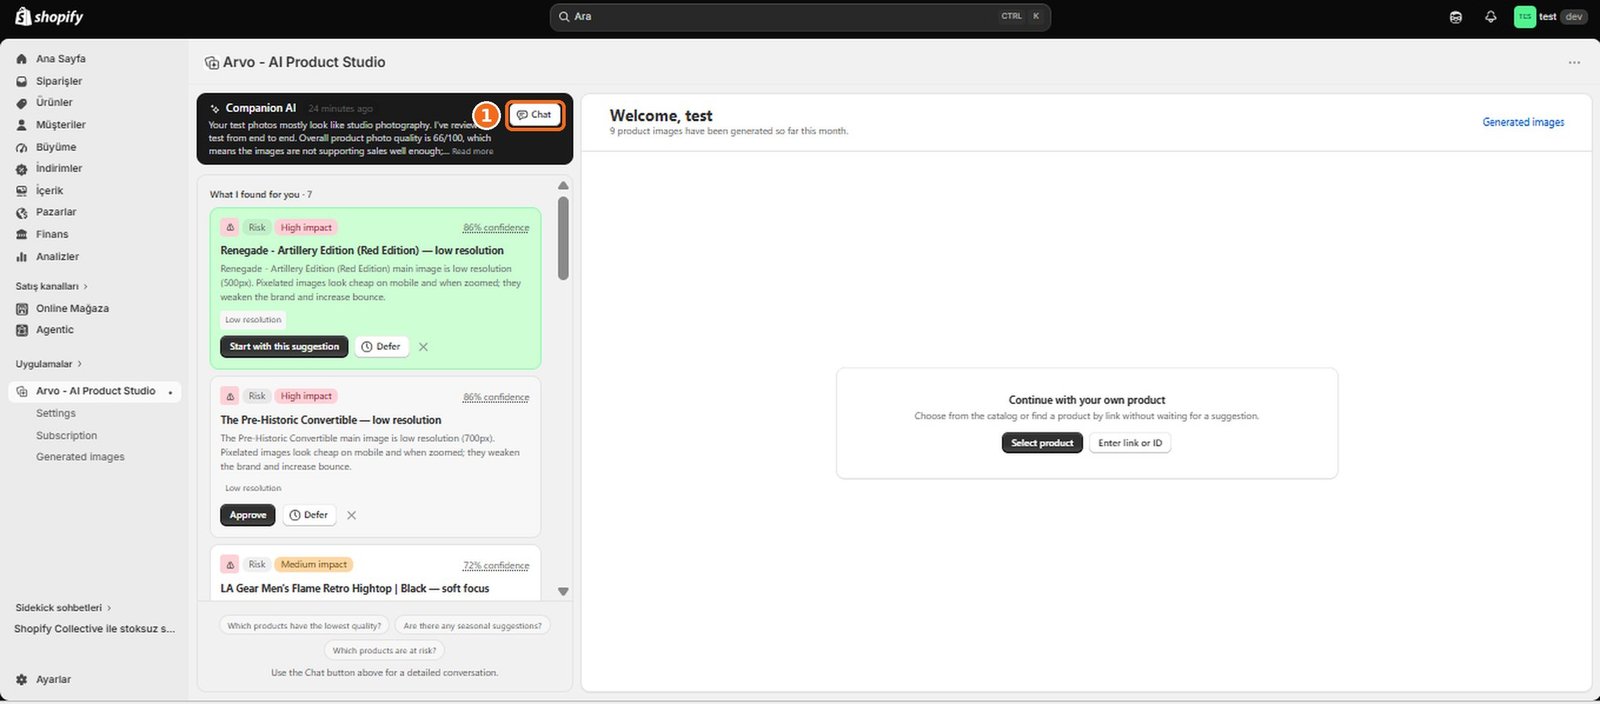
Companion AI is Arvo AI Product Studio’s store-aware assistant. It analyzes your store, identifies gaps or opportunities in your product and marketing visuals, and recommends improvements that may strengthen how products are presented.
You can review its recommendations, discuss ideas through chat, and use an accepted recommendation as the starting point for a visual plan. Its suggestions are guidance, so review each plan before generating and publishing any result.
How does Companion AI analyze my store?
1
Companion AI reviews available information from the connected Shopify store to understand its current visual presentation.
2
It uses that context to identify possible gaps and suggest visual improvements.
3
For useful results, make sure the intended store is connected and its product information is available.
4
If the analysis appears incomplete, verify the store connection and product data before trying again.
What does Companion AI analyze?
Companion AI analyzes the connected store to assess where product or marketing visuals may be missing or could be improved. Its recommendations can help direct attention toward main, detail, lifestyle, campaign, banner, or social visuals where relevant.
The analysis depends on the store information available to Arvo AI. Recommendations should be reviewed in context because the precise signals and scope of analysis are not shown here.
How does Companion AI identify visual opportunities?
1
Companion AI compares the visual needs it detects in your store with the visuals currently available, then presents recommendations for possible improvements.
2
An opportunity might indicate that a product would benefit from clearer presentation, more supporting imagery, or a visual suited to a particular marketing use.
3
Treat each opportunity as a suggested next step rather than an automatic change.
4
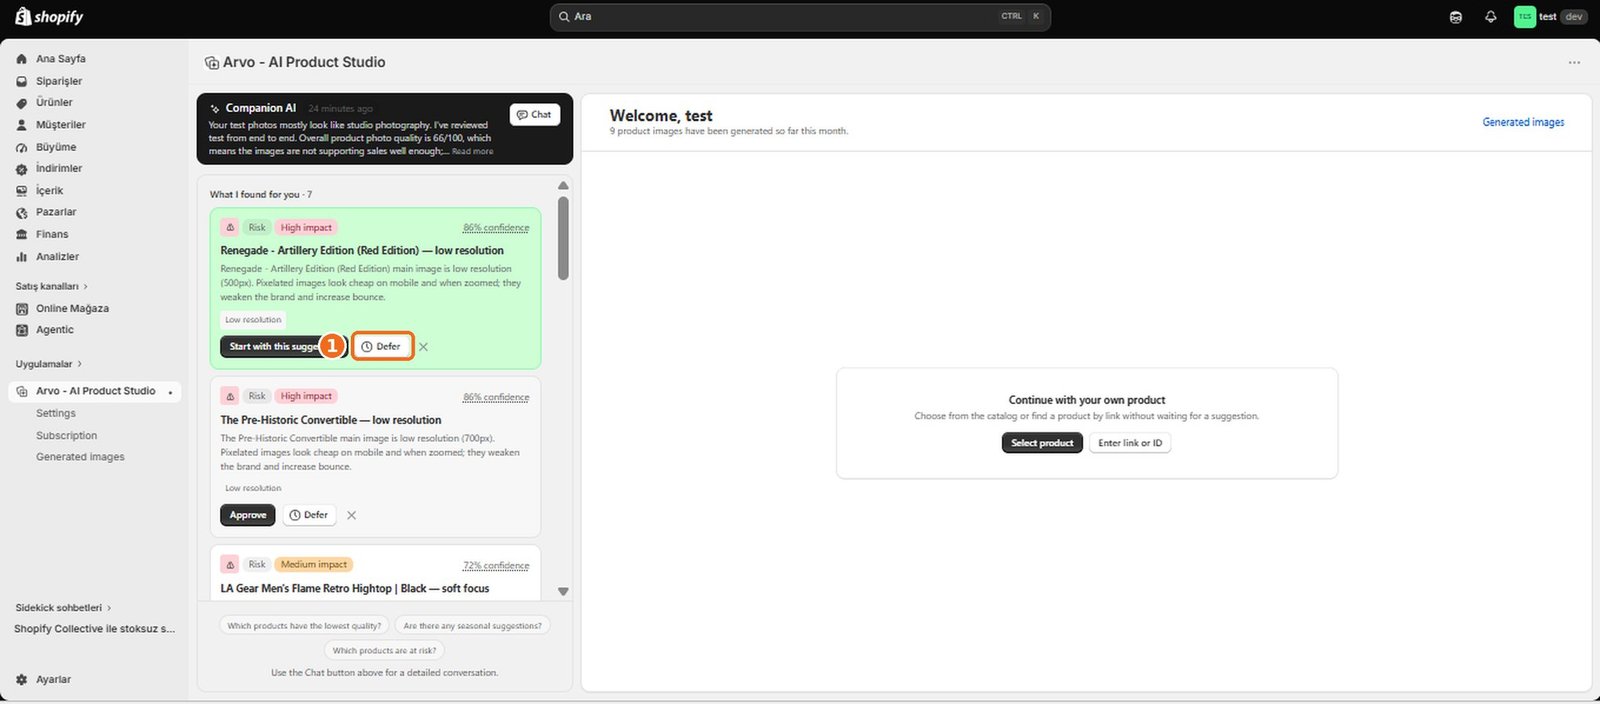
Review the recommendation and its supporting context before approving, deferring, or turning it into a visual plan.
How do I understand Companion AI recommendations?
1
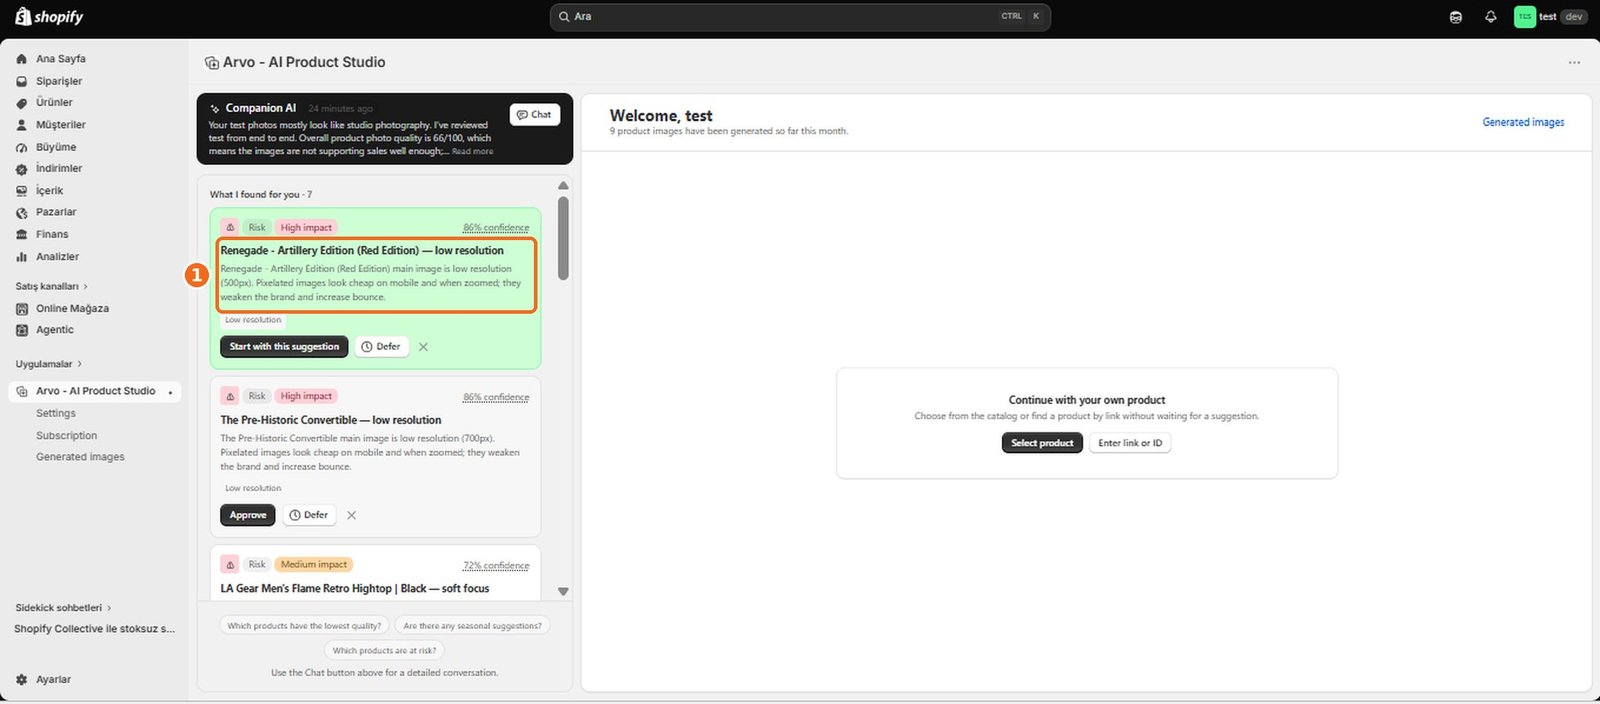
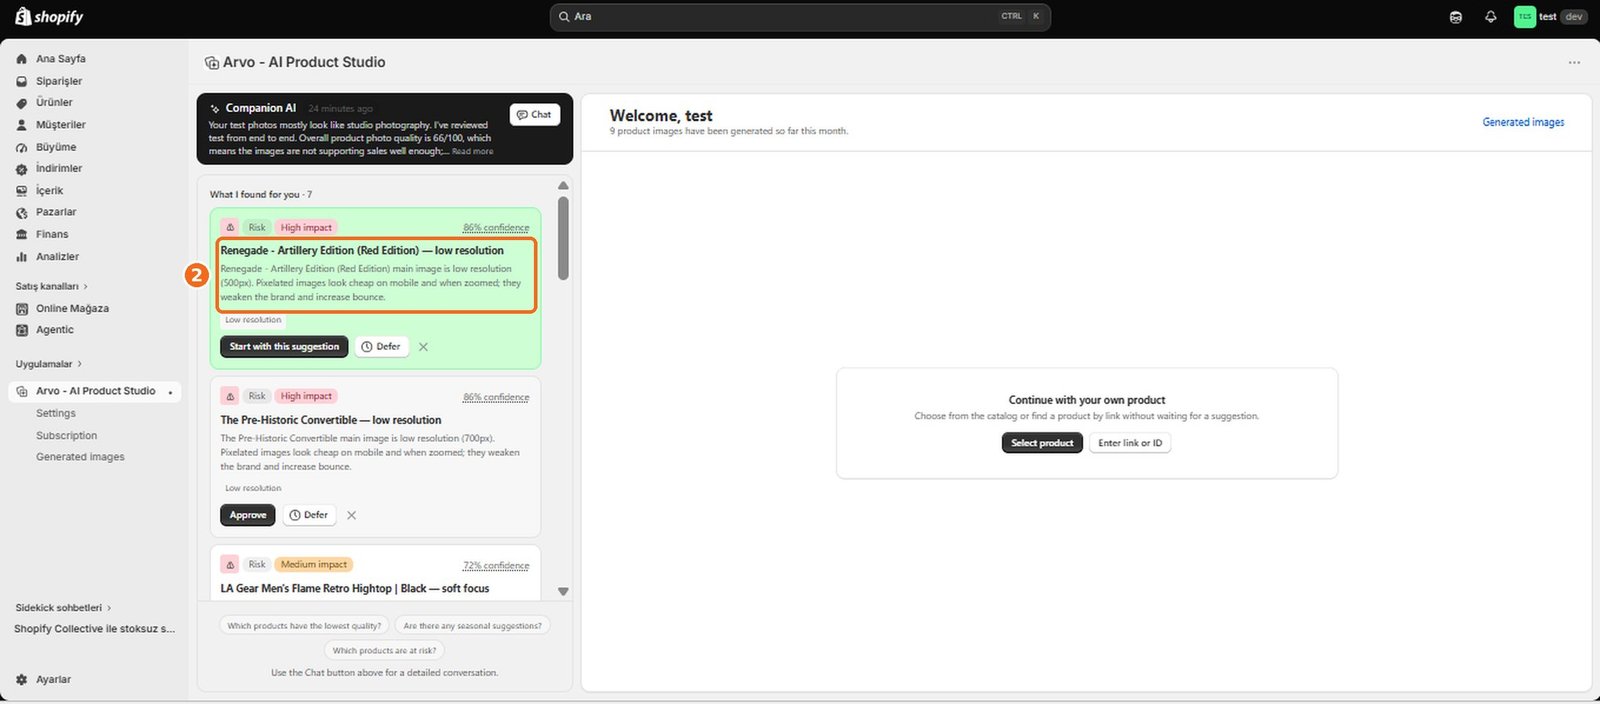
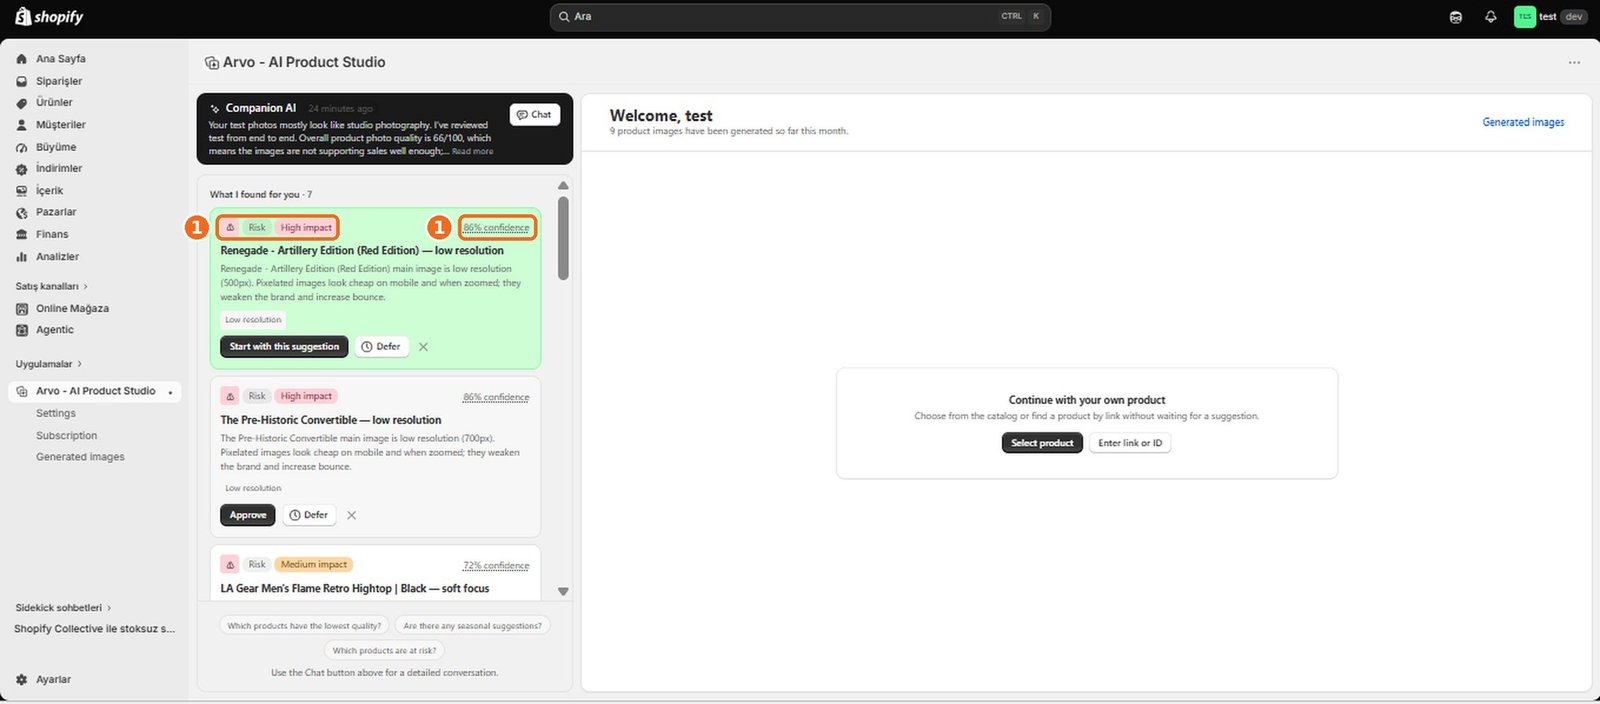
Each recommendation describes a visual opportunity Companion AI has identified and the improvement it expects that work to support.
2
Read the suggested visual type, affected product or area, and the reason for the recommendation before deciding what to do.
3
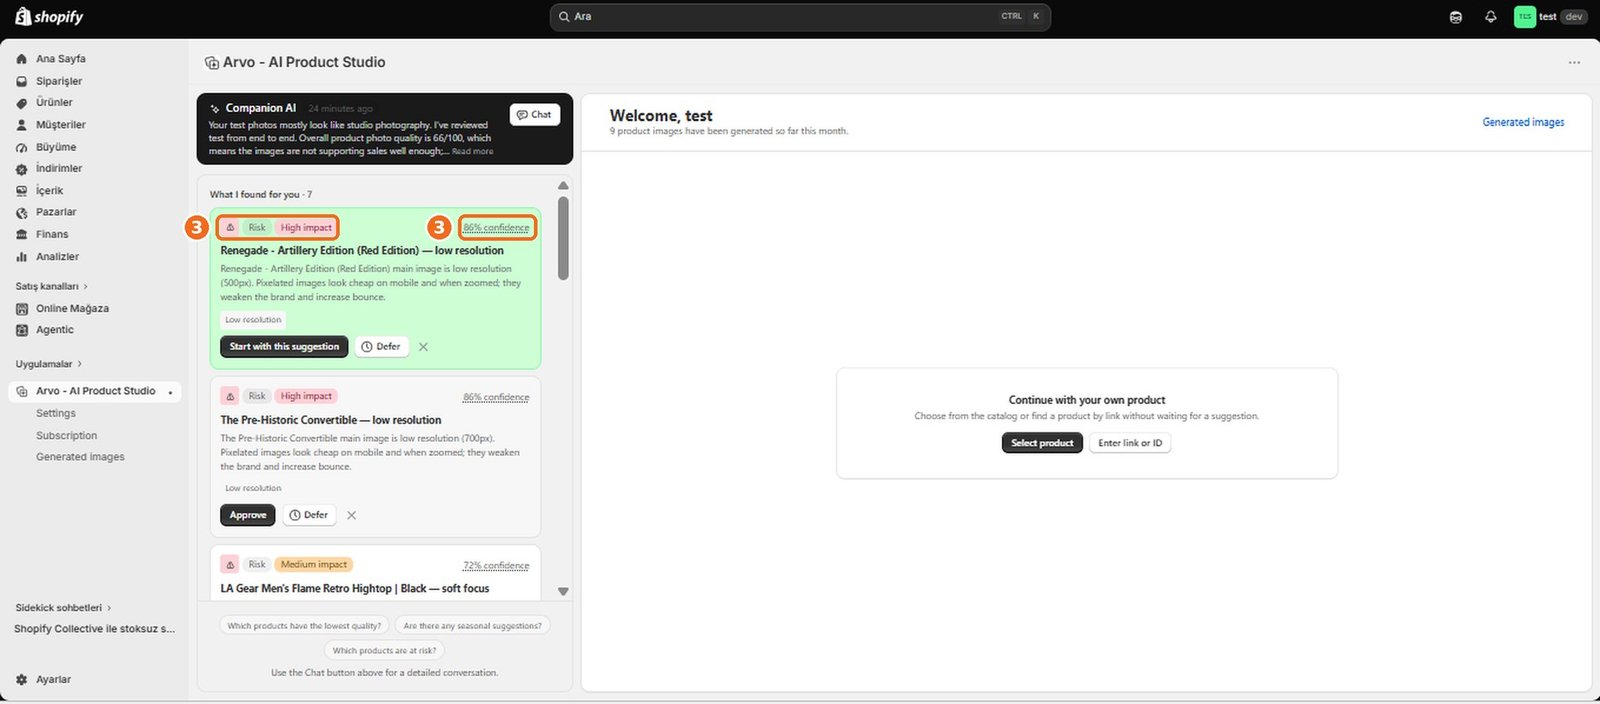
Use any displayed Risk, Impact, and Confidence information as decision support, then review the proposed visual plan before generation.
4
If the reasoning or scope is unclear, ask Companion AI for clarification rather than approving immediately.
What do Risk, Impact, and Confidence scores mean?
Risk indicates the potential concern associated with the identified visual gap or proposed action. Impact indicates how meaningful the expected improvement may be. Confidence indicates how certain Companion AI is that its analysis and recommendation are relevant.
These scores are decision aids, not guarantees. Consider them together with your knowledge of the product, brand, and campaign before acting.
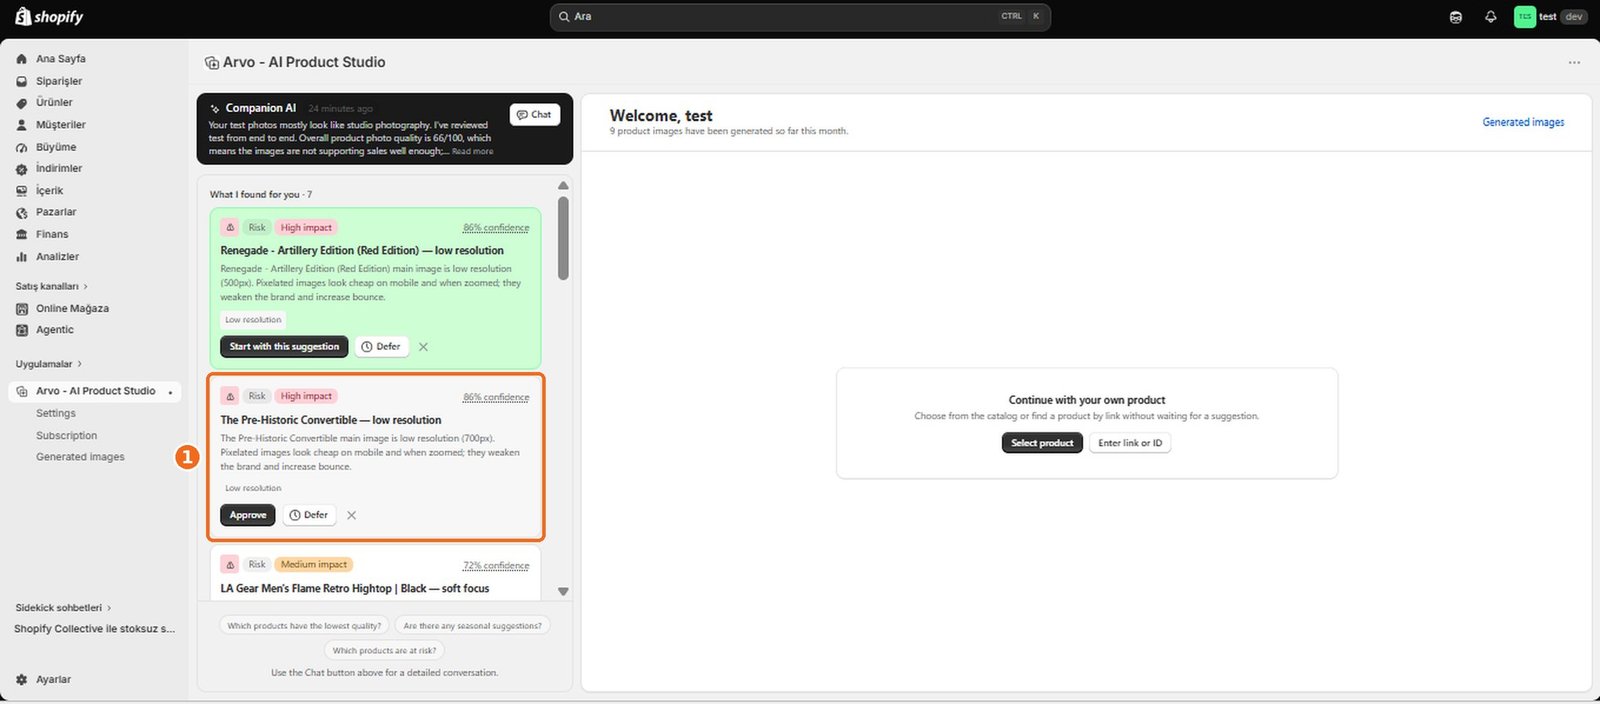
How do I approve a Companion AI recommendation?
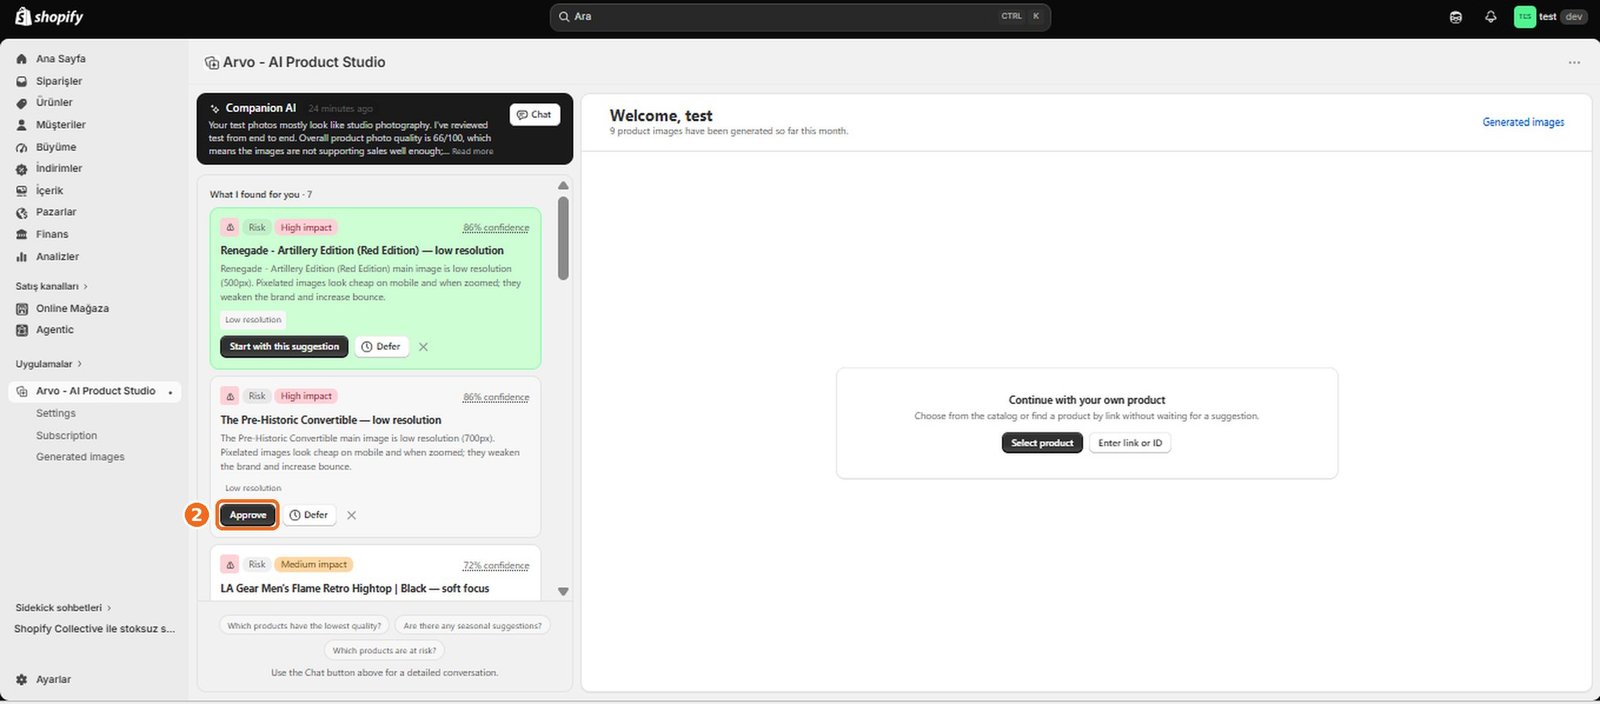
1
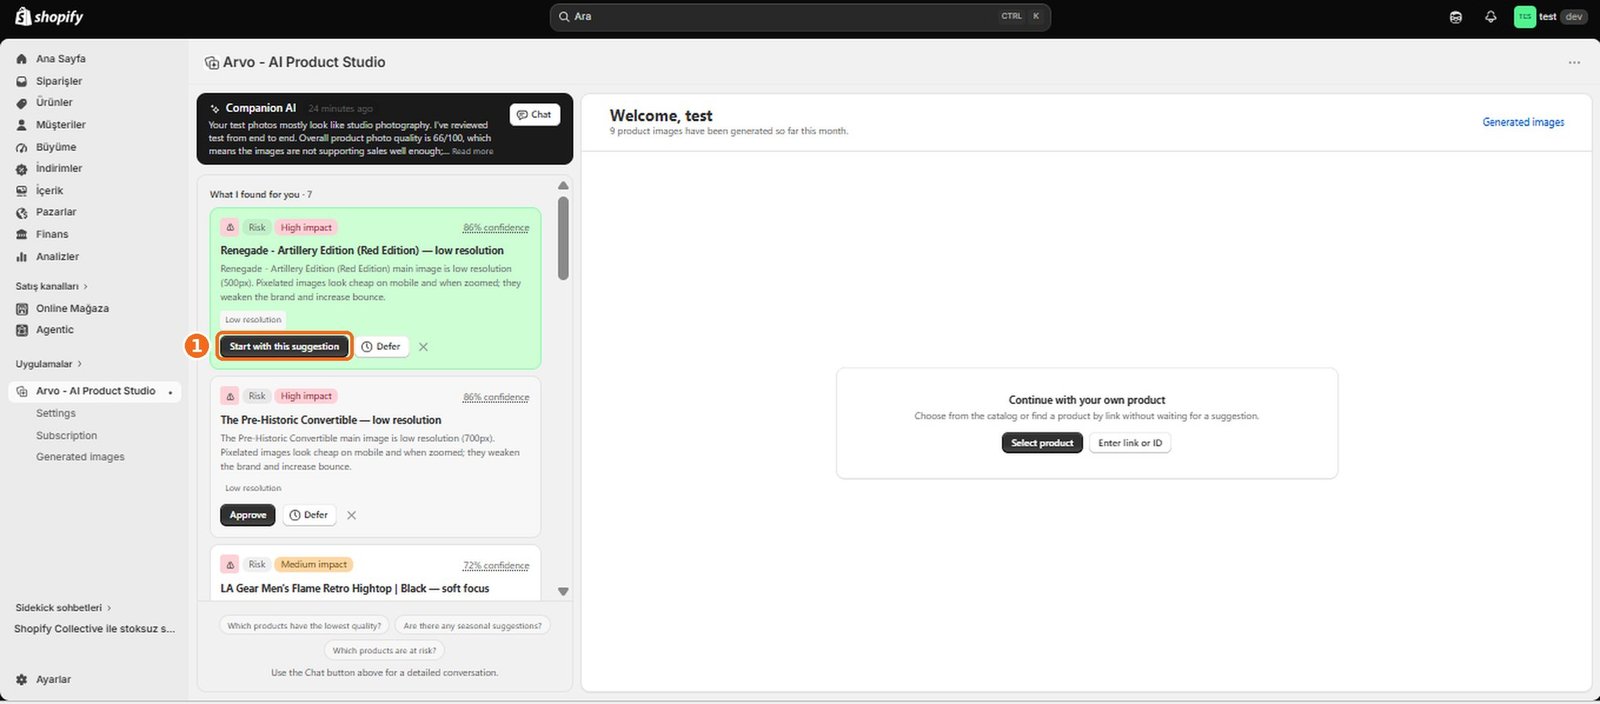
Open the recommendation and review its purpose, affected product or store area, supporting explanation, and any proposed visual direction.
2
Approve it only when the suggestion fits your product and brand goals.
3
Approval should allow you to continue toward a visual plan, which you can review before spending credits on generation.
4
If approval is unavailable, confirm that the store and relevant product are still accessible and that the recommendation has not already been handled.
How do I defer a Companion AI recommendation?
1
Open the recommendation and choose the option that postpones it when the idea may be useful later but is not a current priority.
2
Deferring should keep the recommendation from requiring immediate action without treating it as approved.
3
Use this option when you want to revisit the opportunity after a product update, campaign decision, or other change.
How do I start a visual plan from a recommendation?
1
Open a relevant Companion AI recommendation and continue to its visual-planning step.
2
Review the product, intended visual type, purpose, and creative direction that Companion AI proposes.
3
Adjust any available choices so the plan reflects your brand and goal before generating.
4
Starting or reviewing a plan should not be treated as publishing the result.
5
Generation uses credits, and a completed image should appear in the Gallery for review before it is added to Shopify.
How do I use Companion AI Chat?
1
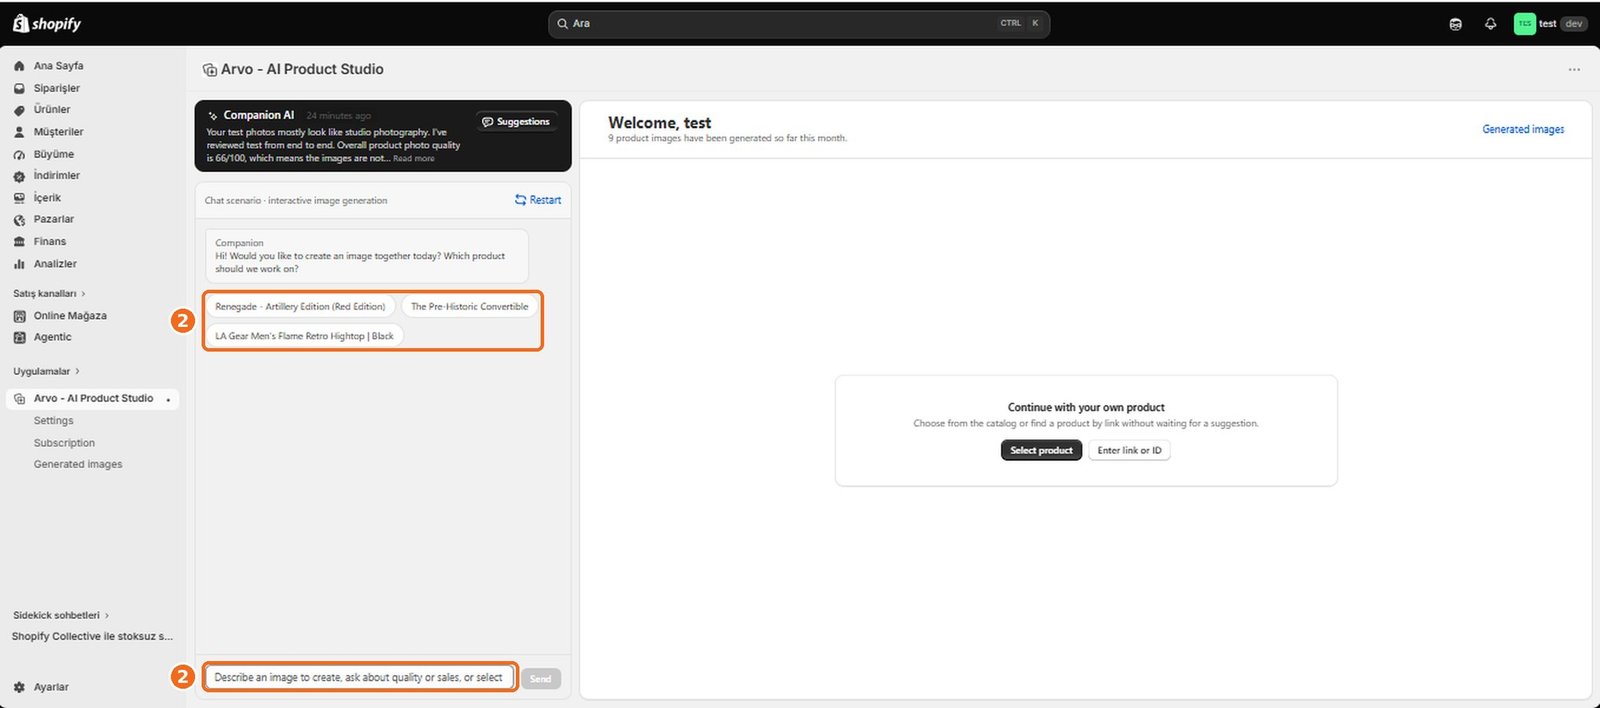
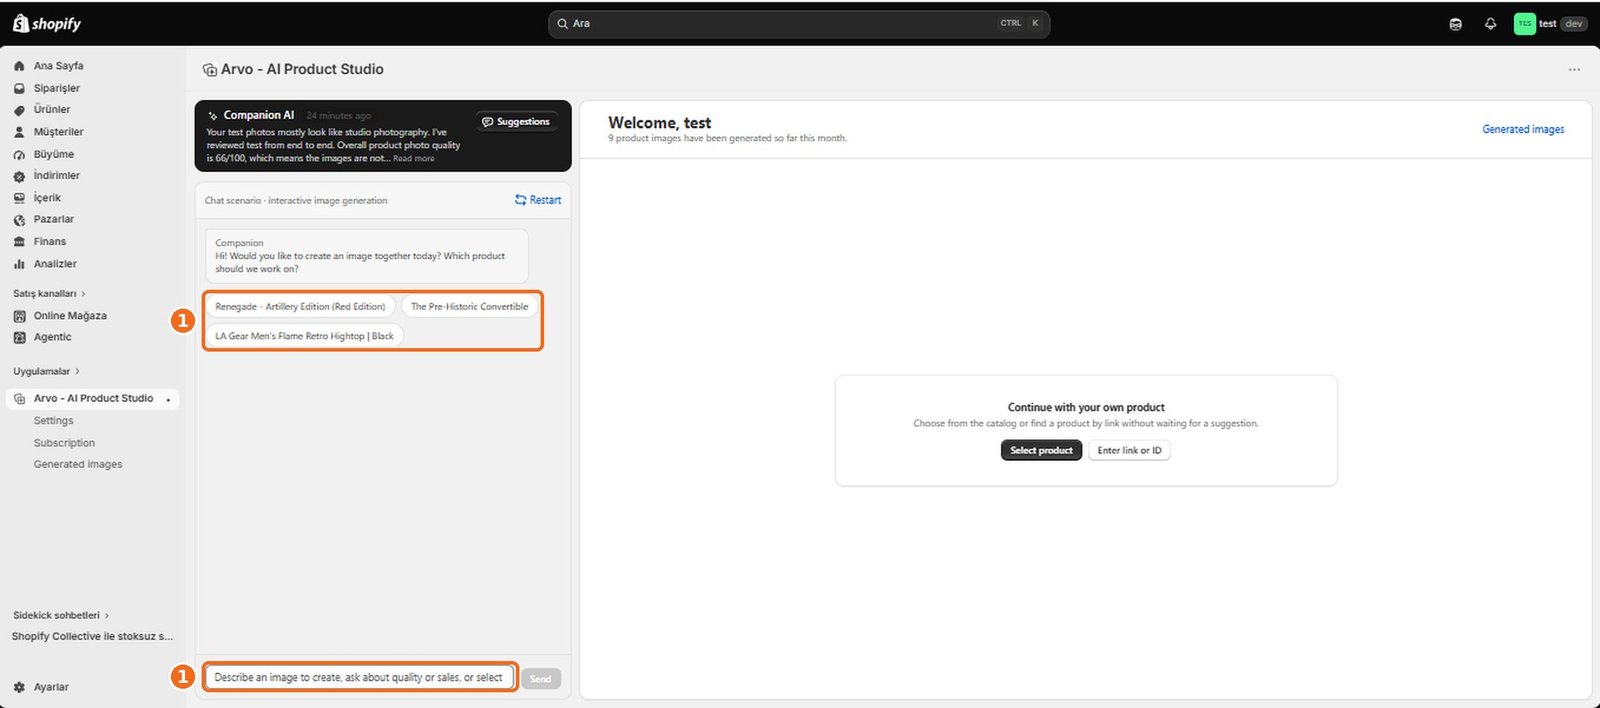
Use Companion AI Chat to discuss your store’s visual needs in natural language.
2
Describe the product, the business goal, and the kind of visual help you want; you can also ask follow-up questions to clarify a recommendation or refine an idea.
3
Review any proposed plan before generation, especially the selected product and creative direction.
4
If the response is not useful, add clearer context or rephrase the request.
How do I ask Companion AI to create a visual?
1
Tell Companion AI which product the visual is for, what type of visual you want, and where you plan to use it.
2
Add important creative guidance, such as the desired setting, mood, composition, or product feature to emphasize.
3
Companion AI can use this request to prepare generation settings or a visual plan.
4
Check the proposed setup before continuing.
5
Generation uses credits, and the completed visual should be stored in the Gallery rather than added to Shopify without your review.
How does Companion AI configure my generation settings?
1
Companion AI uses your request, the selected product, and available store context to propose settings that fit the visual goal.
2
Depending on the plan, this may include the kind of visual and creative direction, with templates, reference images, or custom prompts providing additional guidance.
3
Always review the proposed configuration before generating.
4
If the wrong product or direction is selected, correct the plan or clarify your request in chat.
How do I review a Companion AI visual plan?
1
Check that the plan uses the correct product and matches the recommendation or request you intended to pursue.
2
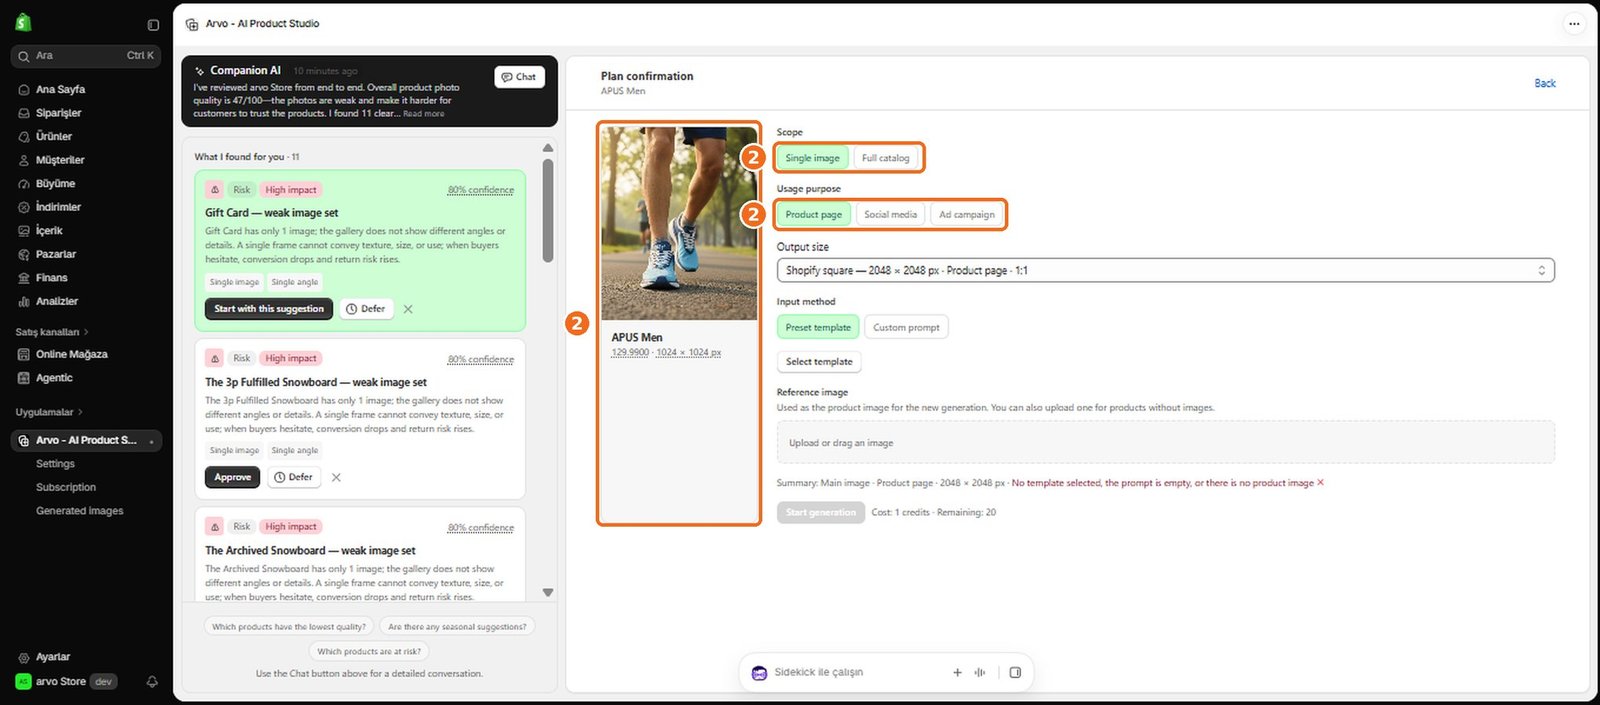
Review the visual type, intended use, creative direction, and any template, reference image, or prompt included in the plan.
3
Change unclear or unsuitable choices before proceeding.
4
Confirm the credit-related information shown before generation.
5
A successful generation should create a result in the Gallery, where you can inspect it before adding it to Shopify.
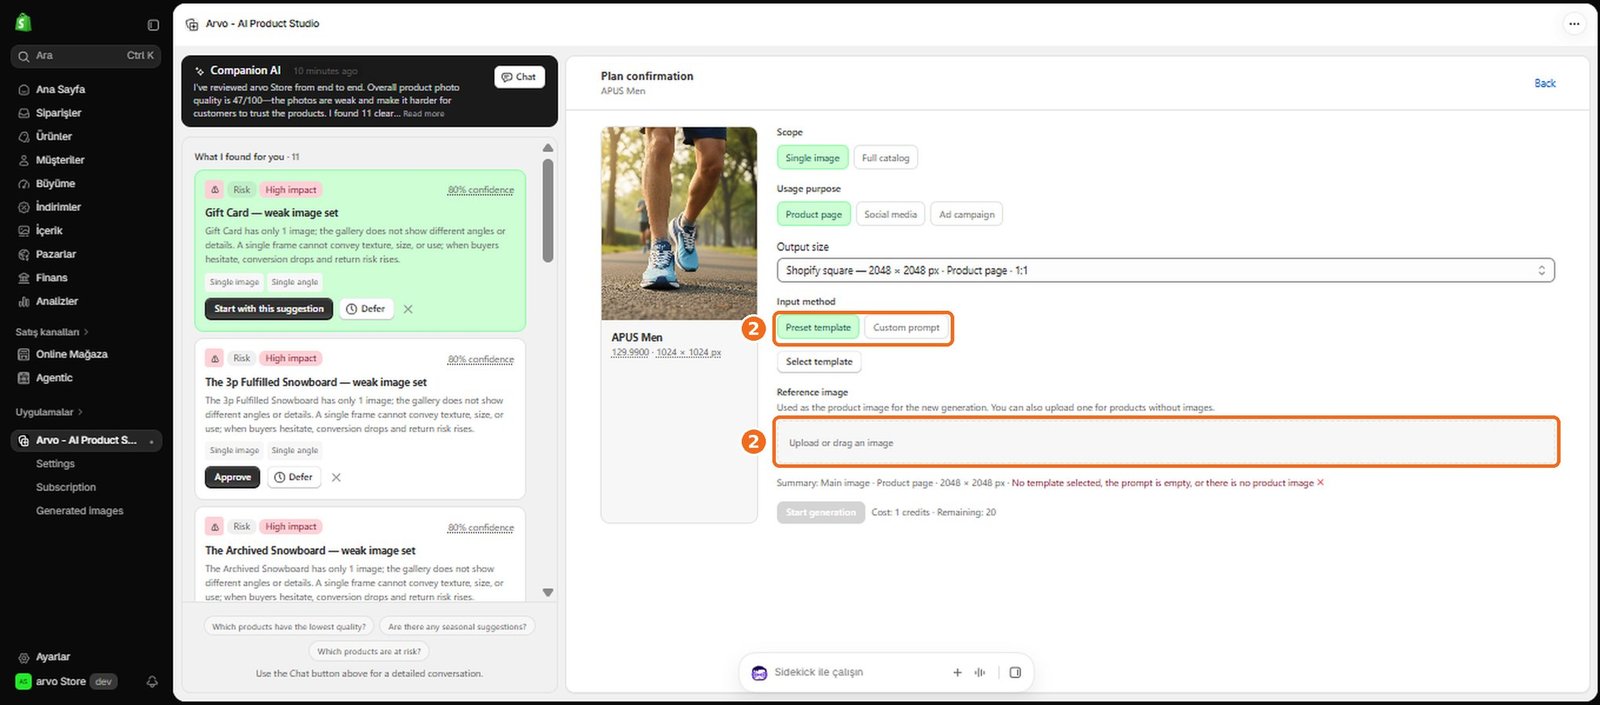
How do I create a single product image?
1
Choose the Shopify product you want to feature, then select the kind of visual that matches your goal.
2
Guide the image with a preset or custom template, a reference image, or a custom prompt, and review the setup before generating.
3
Generation uses credits.
4
If required product information or creative guidance is missing, complete or revise it before trying again.
5
When generation succeeds, the image is stored in the Gallery and can be reviewed and added to Shopify.
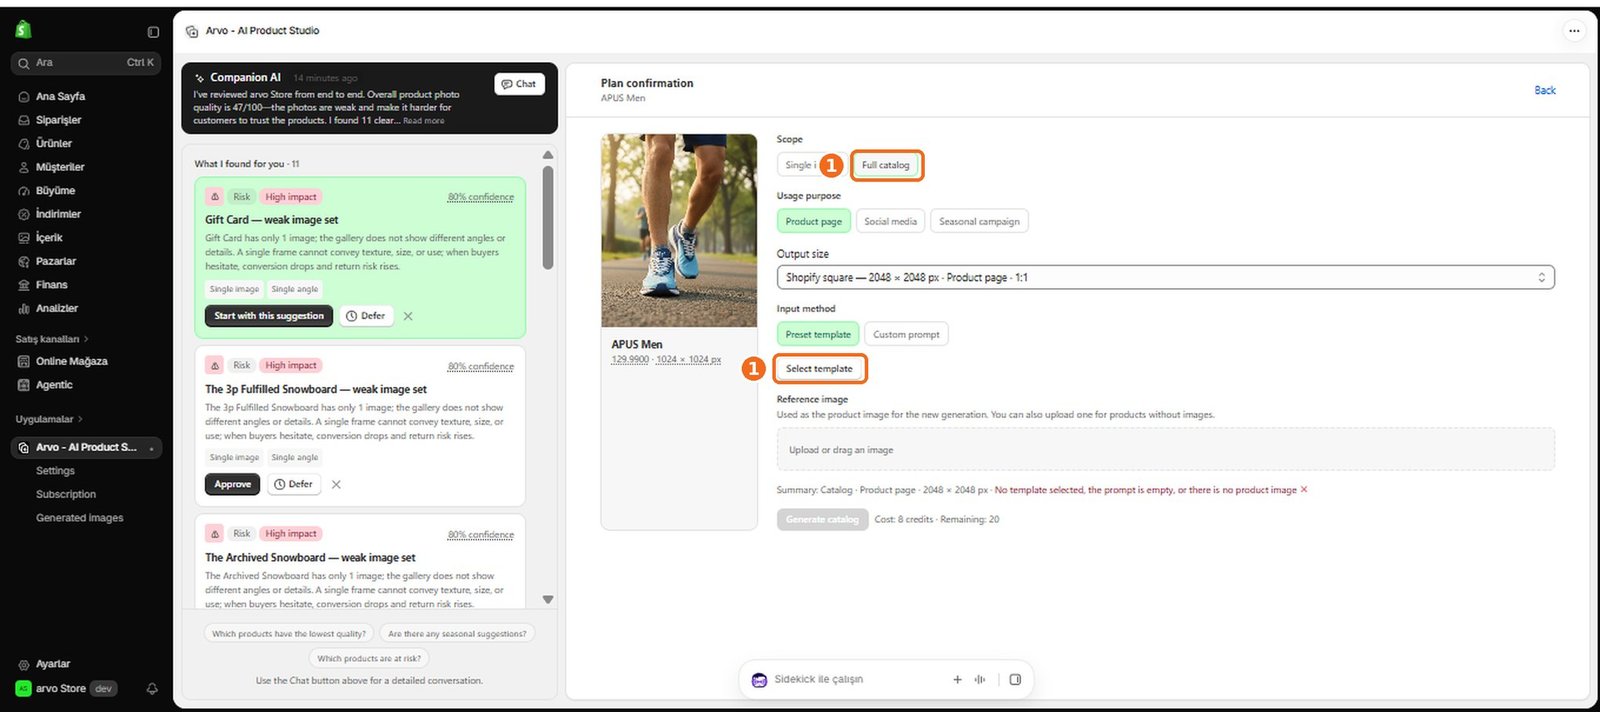
How do I create a full product catalog?
1
Start by choosing the products that should be included and decide on a consistent visual direction for the catalog.
2
A catalog template can help keep the composition and style coherent across products.
3
Review the selected products, template or creative guidance, and generation setup before continuing.
4
Catalog creation may involve multiple generated visuals and therefore use credits.
5
Check each completed result in the Gallery before adding it to Shopify or using it elsewhere.
How do I create a main/cover image?
1
Select the product and choose a main or cover image as the visual type.
2
Use creative guidance that keeps the product clear and prominent, whether you begin with a template, reference image, or custom prompt.
3
Review the product and composition before generating.
4
If the product is not represented accurately or clearly, revise the guidance and create a new result.
5
Successful generations are saved in the Gallery and can be added to the product in Shopify after review.
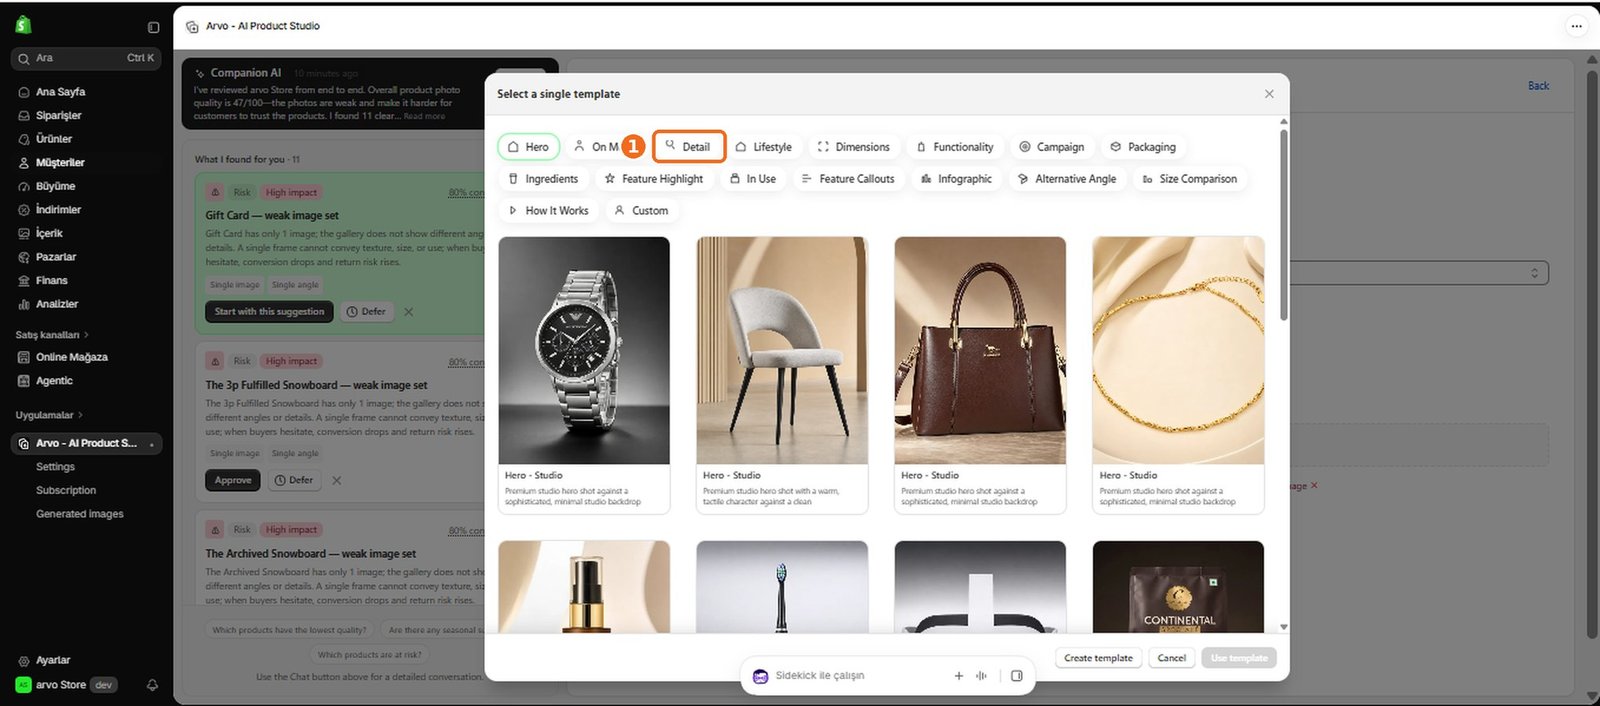
How do I create a detail image?
1
Select the product and choose a detail image as the visual type.
2
Identify the feature, material, texture, component, or use detail you want the image to emphasize, then express that focus through a template, reference image, or custom prompt.
3
Review the generated result in the Gallery to ensure the highlighted detail is accurate and easy to understand.
4
If it is not, refine the guidance and generate another result before adding an image to Shopify.
How do I create a lifestyle image?
1
Select the product and choose a lifestyle image as the visual type.
2
Describe or select a setting, mood, and context that suit the product and your brand.
3
A template, reference image, or custom prompt can guide how the product appears in the scene.
4
After generation, check that the product remains recognizable and that the setting supports its intended use.
5
The result is stored in the Gallery and can be added to Shopify once approved.
How do I create a campaign visual?
1
Choose the product or products associated with the campaign, then select a campaign visual.
2
Define the campaign goal and provide a clear creative direction, using a preset or custom template, reference images, or a custom prompt as needed.
3
Review the complete setup before using credits to generate.
4
When the visual is ready, inspect it in the Gallery for product accuracy, brand fit, and campaign relevance before using it.
How do I create a social media visual?
1
Select the relevant product and choose a social media visual.
2
Describe the message, audience, mood, and intended social use, then guide the design with a template, reference image, or custom prompt.
3
Keep the product and campaign purpose clear in your instructions.
4
Generate the visual using credits and review the result in the Gallery before publishing it outside Arvo AI.
How do I create a banner?
1
Choose the product or campaign focus and select a banner as the visual type.
2
Use a template, reference image, or custom prompt to describe the composition and the space needed for the banner’s message.
3
Review the creative direction before generating.
4
The completed banner is saved in the Gallery for review.
5
Confirm that its composition suits the place where you plan to use it before adding it to Shopify or using it in a campaign.
How do I create visuals for multiple products?
1
Select the products you want to include, then choose a visual type and creative direction that work for the group.
2
Use a suitable template, reference images, or a custom prompt to explain how the products should relate within the visual or across a set of visuals.
3
Check the product selection carefully before generating, because multiple-product work may create more than one result and use credits accordingly.
4
Review every completed image in the Gallery before use.
How do I create visuals for products without existing images?
1
Select the product and provide enough reliable visual guidance for Arvo AI to understand its appearance.
2
If supported for this flow, add an appropriate reference image and a clear custom prompt, or use a template that defines the intended composition.
3
Do not rely on generated results when product appearance cannot be verified.
4
Review the result closely for accuracy before adding it to Shopify.
5
If Arvo AI requires an existing Shopify product image, or if the generated product does not match the real item, add suitable source imagery before trying again.
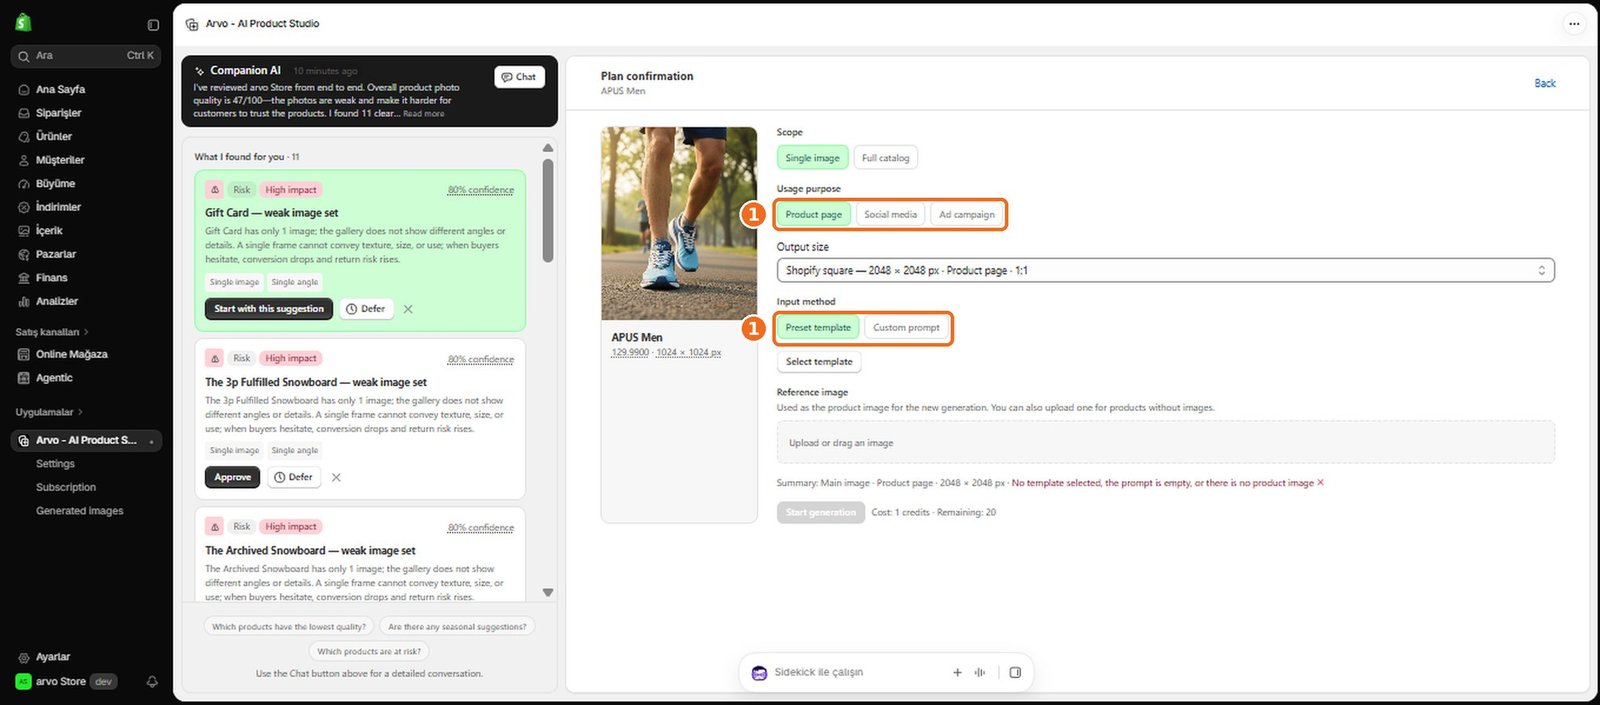
How do I generate an image?
1
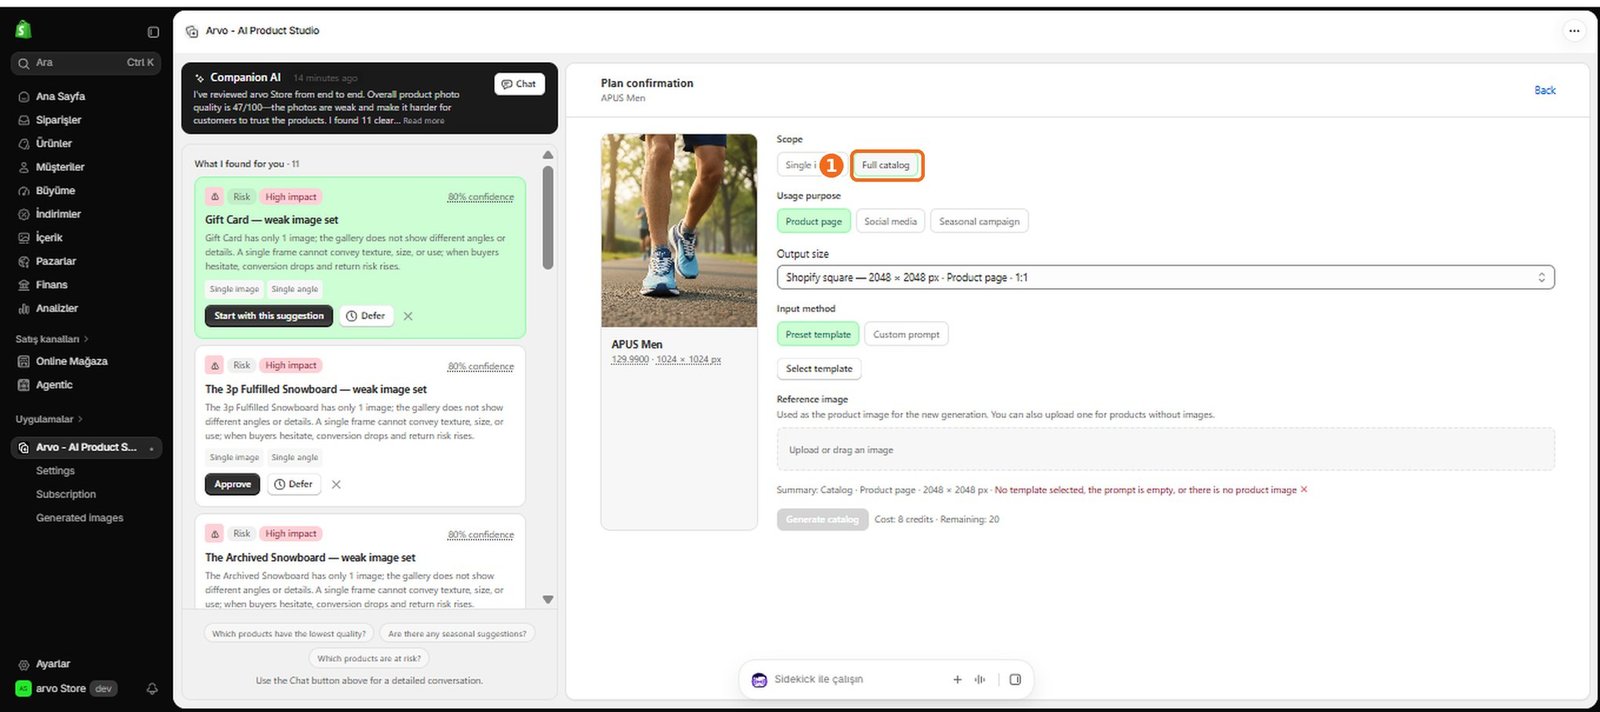
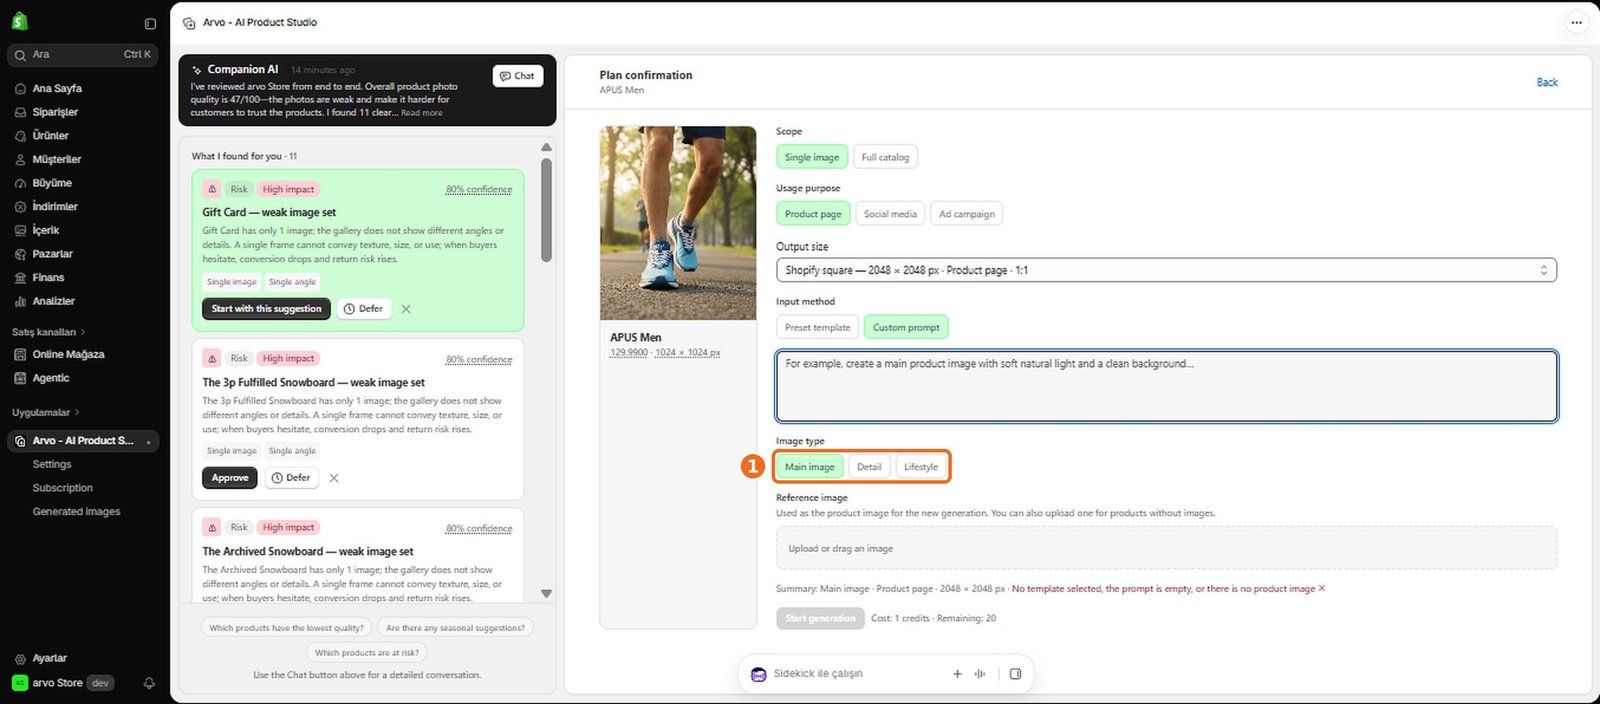
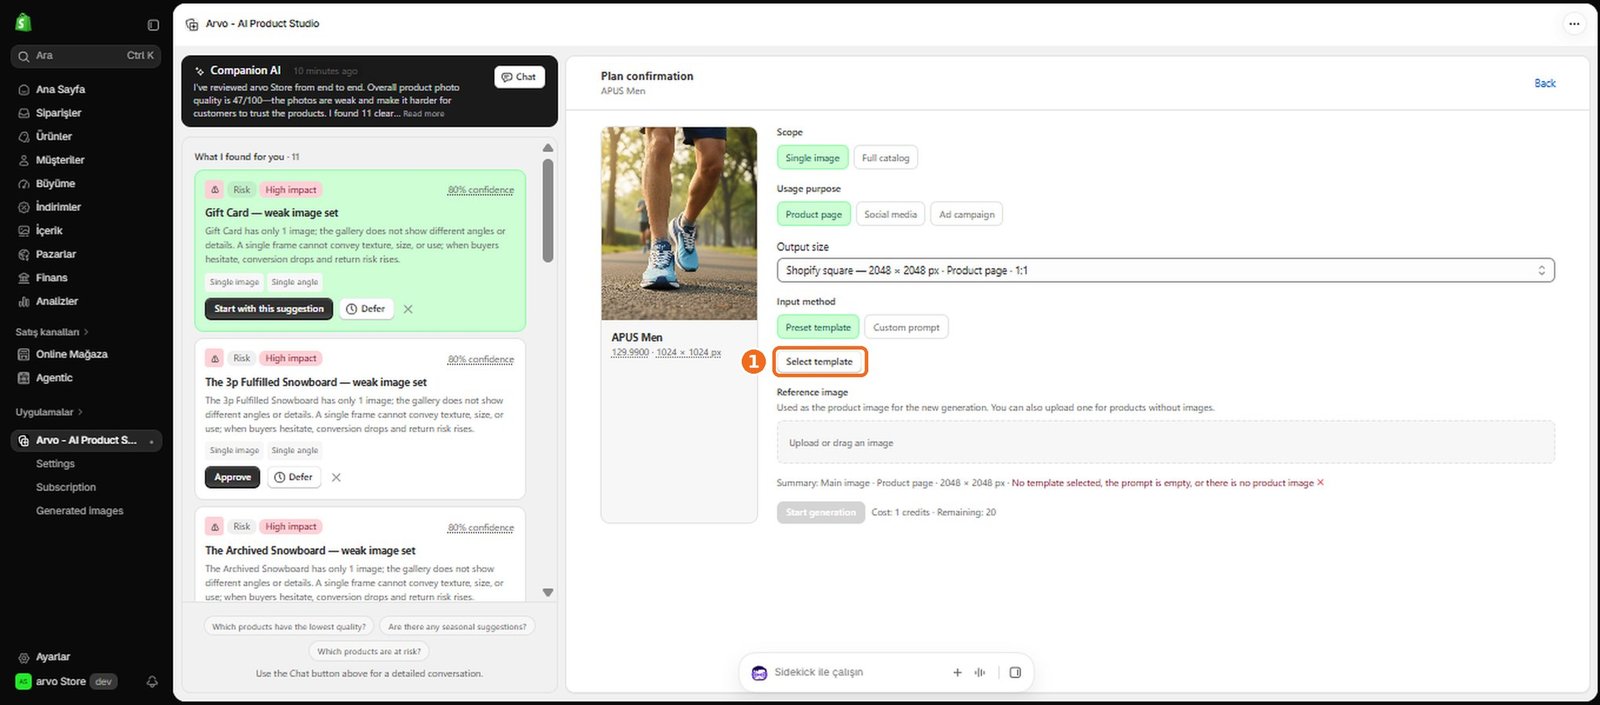
Start an image generation, select the Shopify product you want to feature, and choose the kind of visual you need, such as a main, detail, lifestyle, campaign, banner, or social image.
2
Then choose a preset or custom template, add a reference image, or write a custom prompt, depending on how much creative direction you want to provide.
3
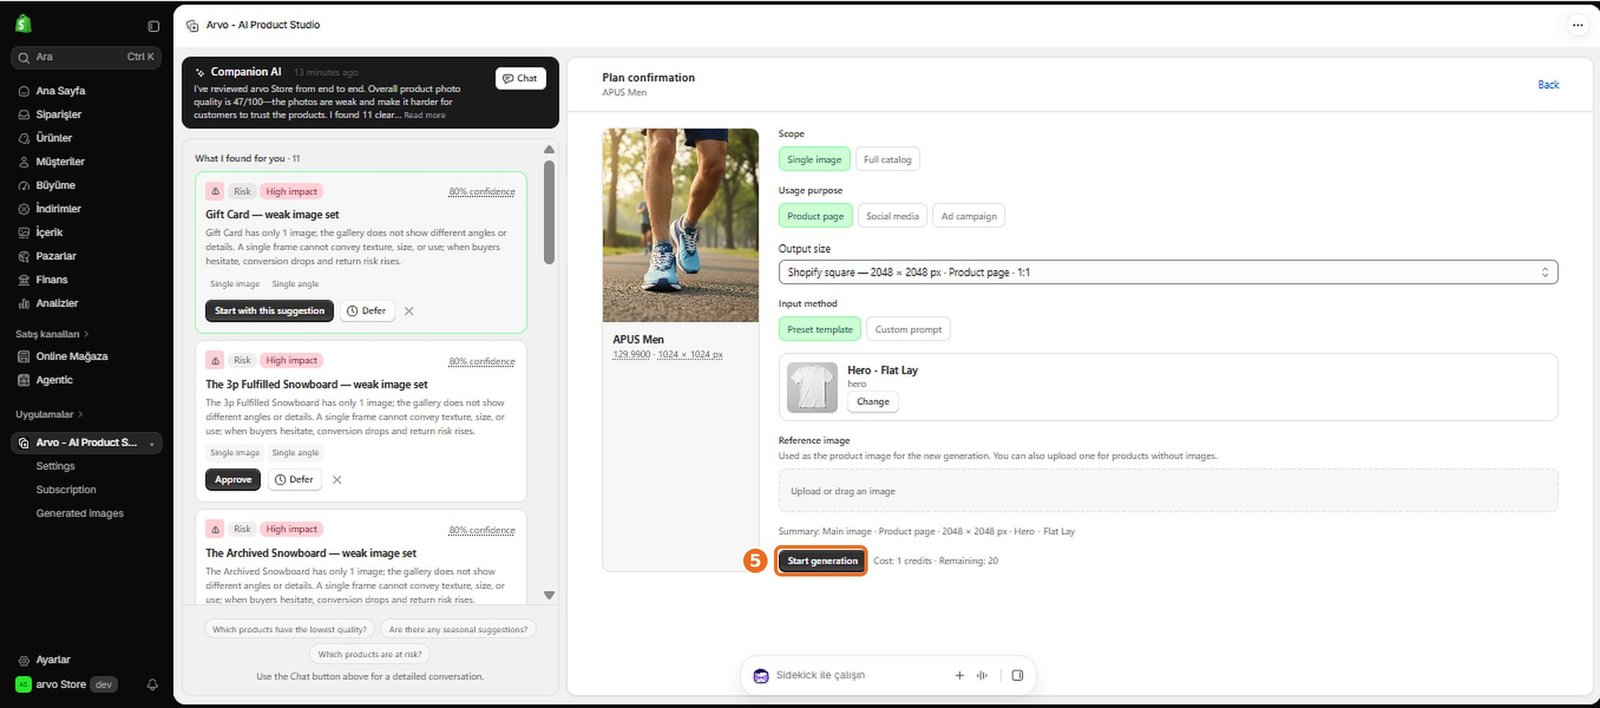
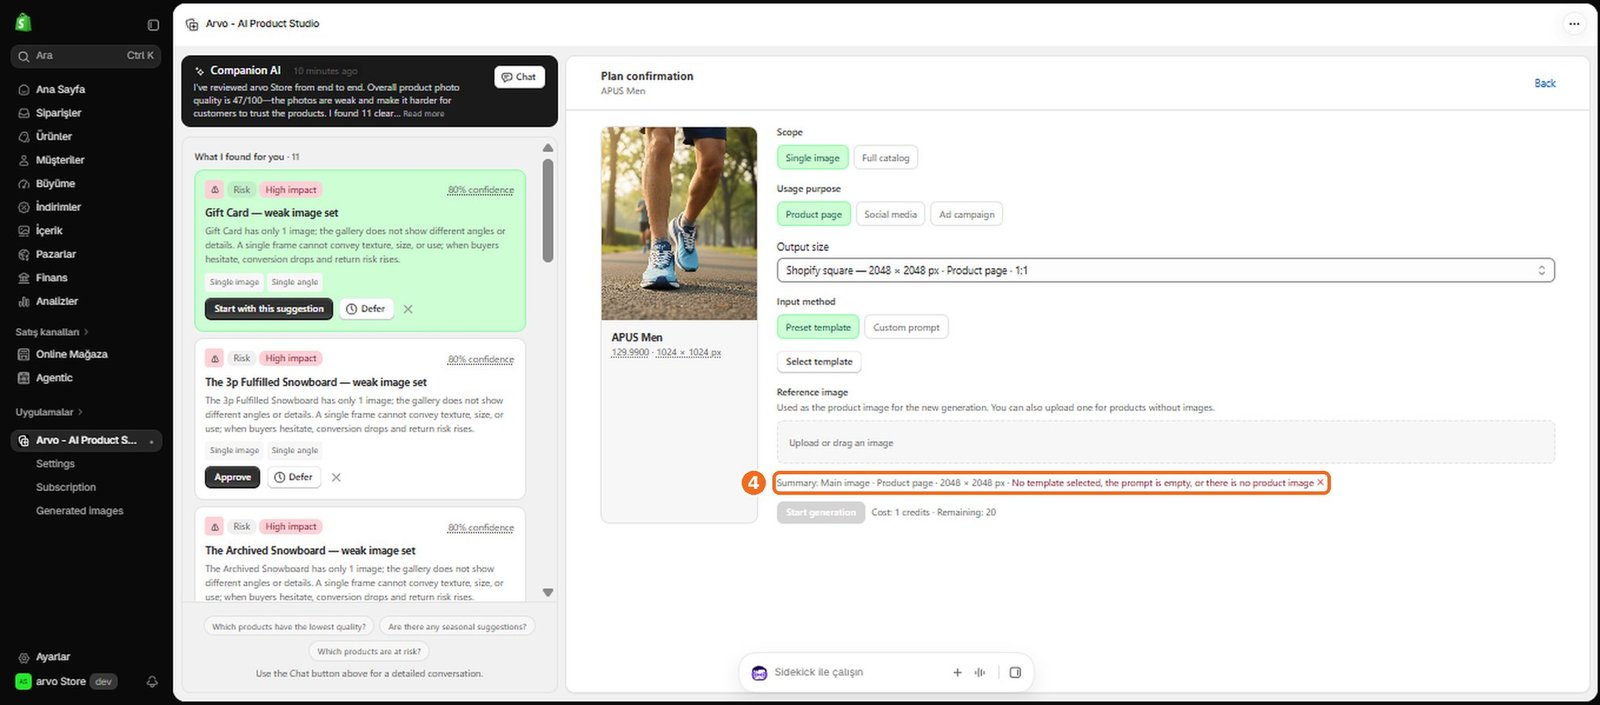
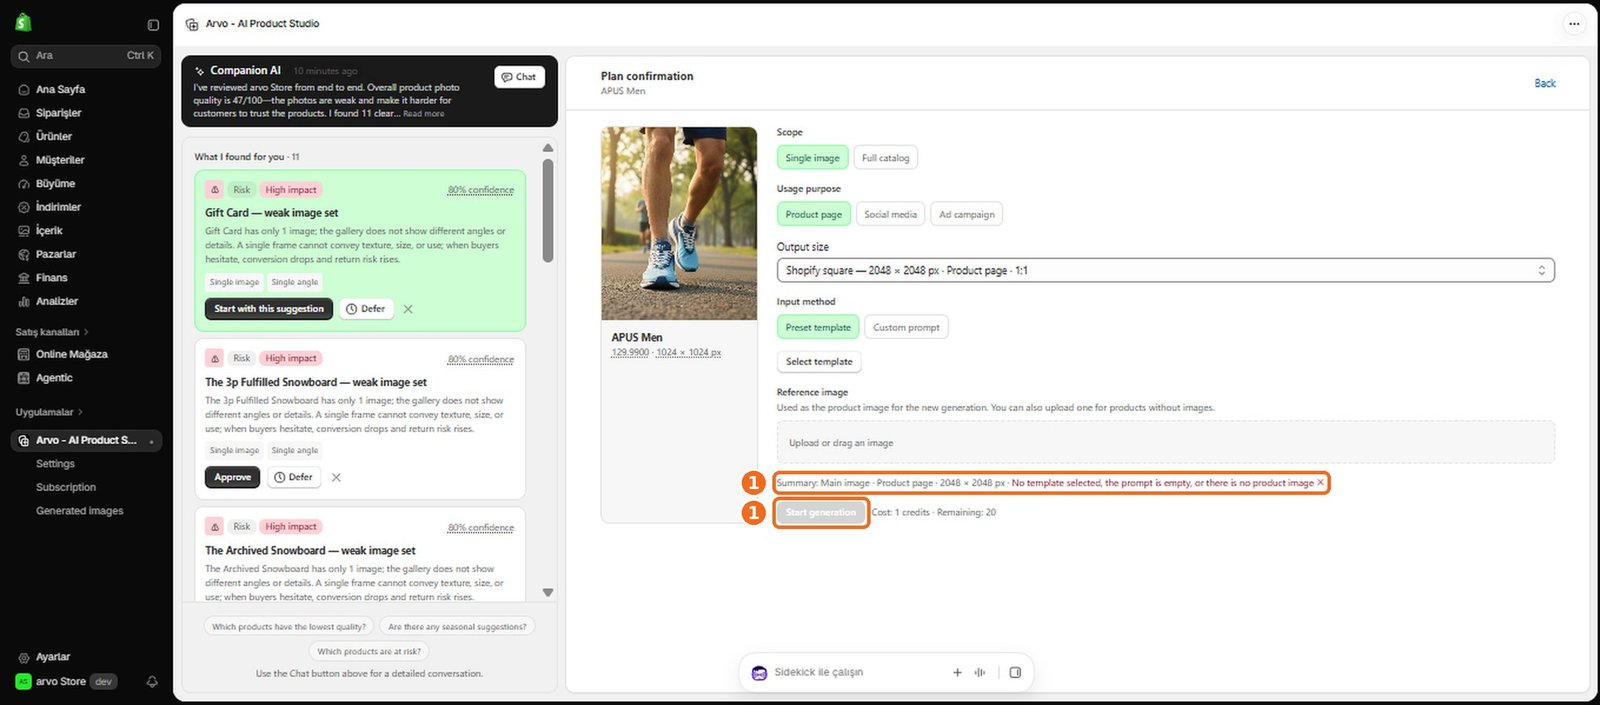
Review your choices and the credit requirement before starting.
4
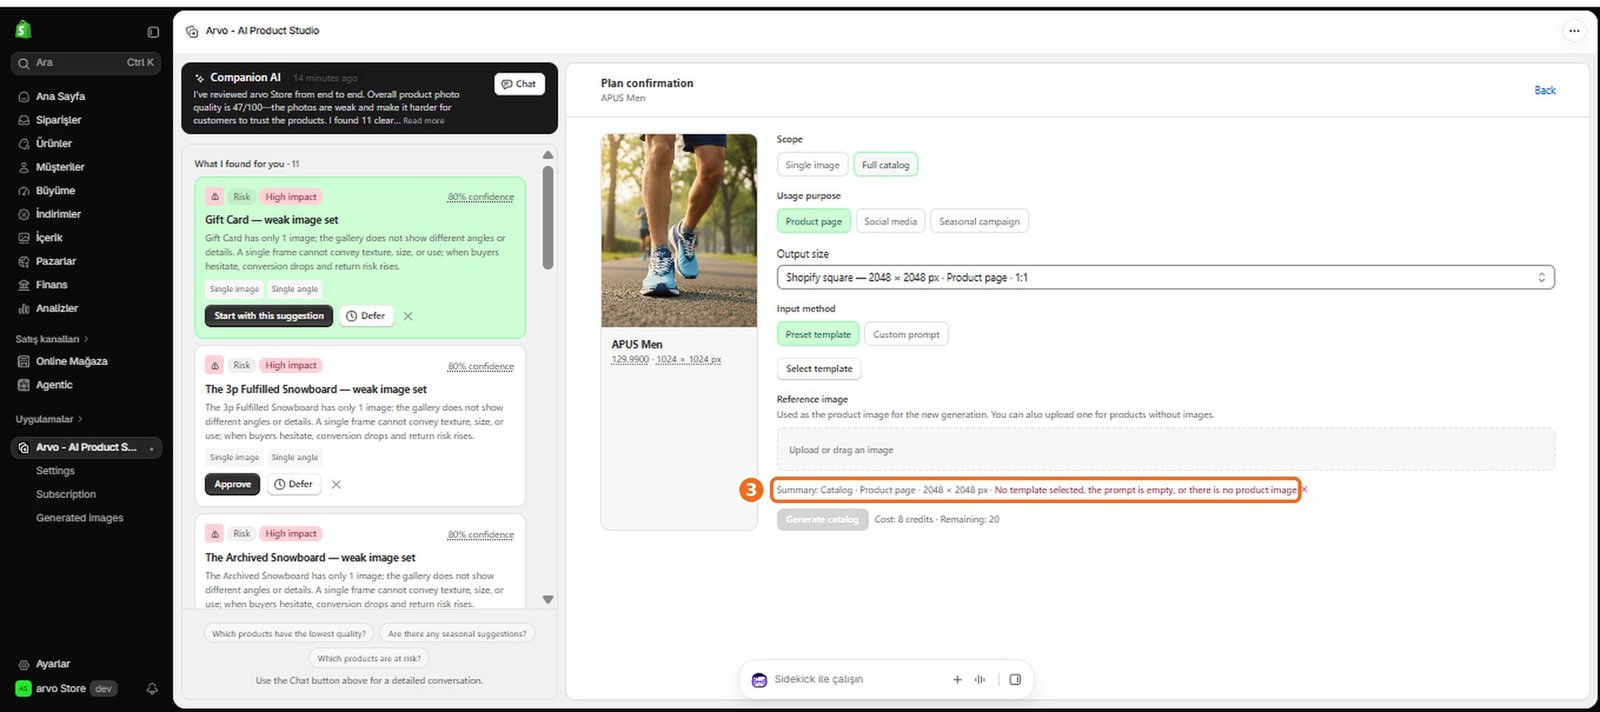
If a required selection is missing or a product image cannot be used, correct the highlighted item and try again.
5
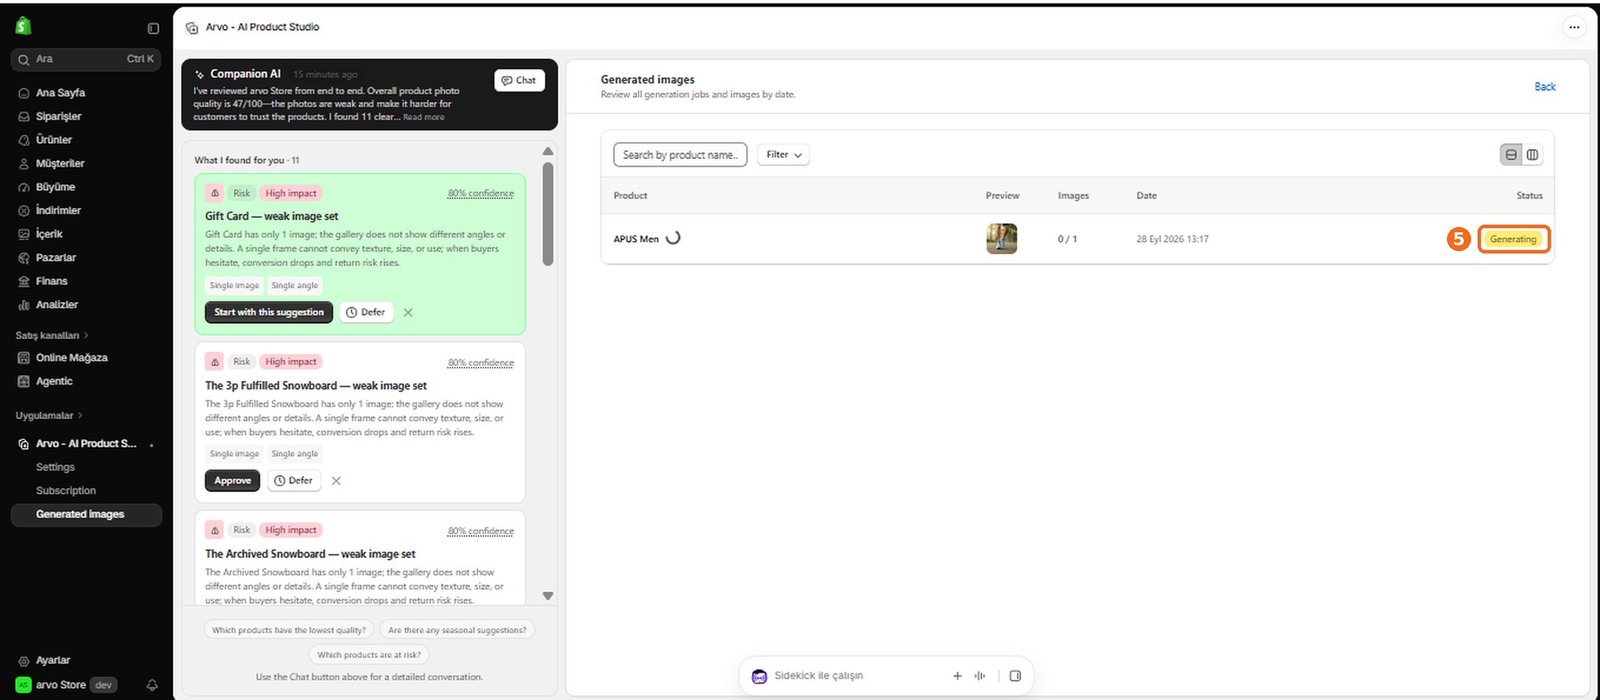
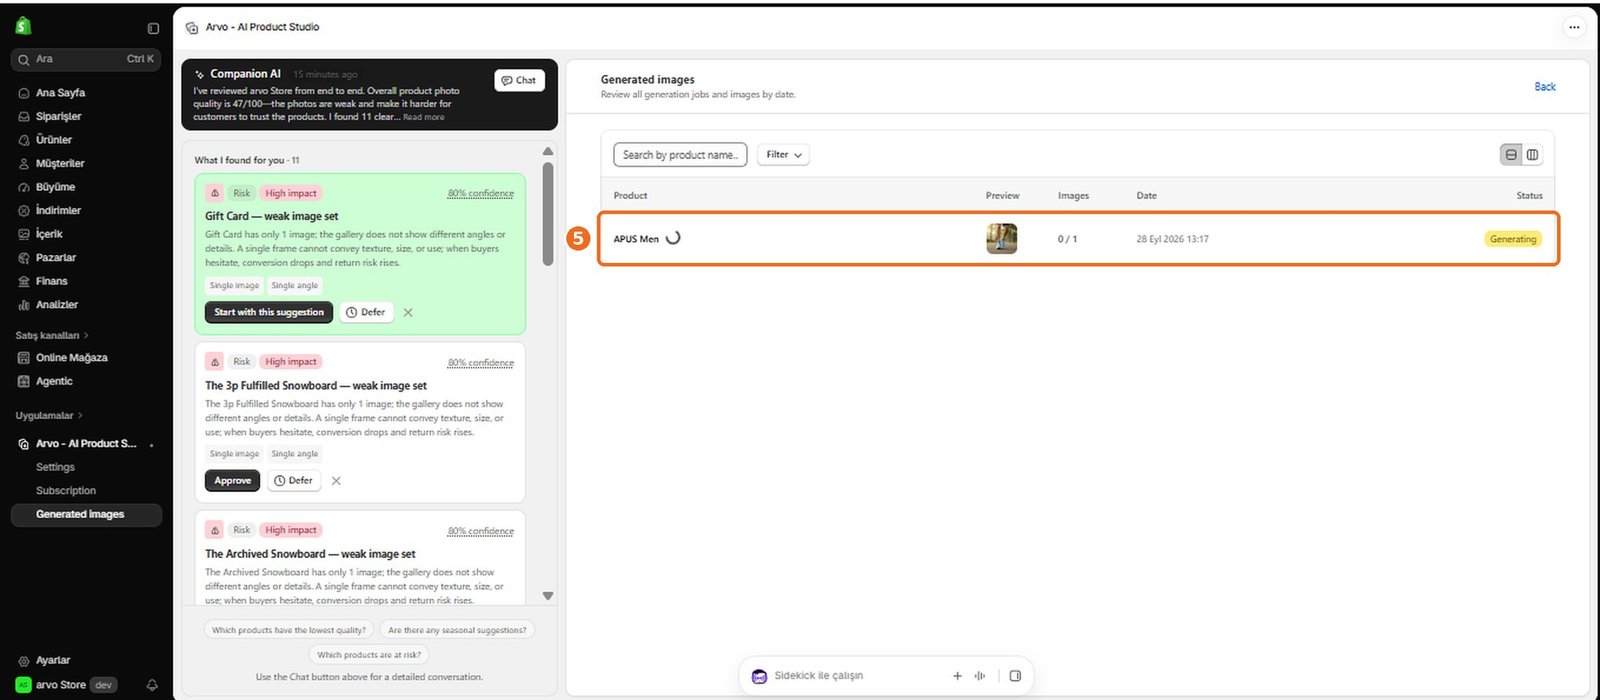
After generation begins, you can follow its status and find the completed visual in the Gallery.
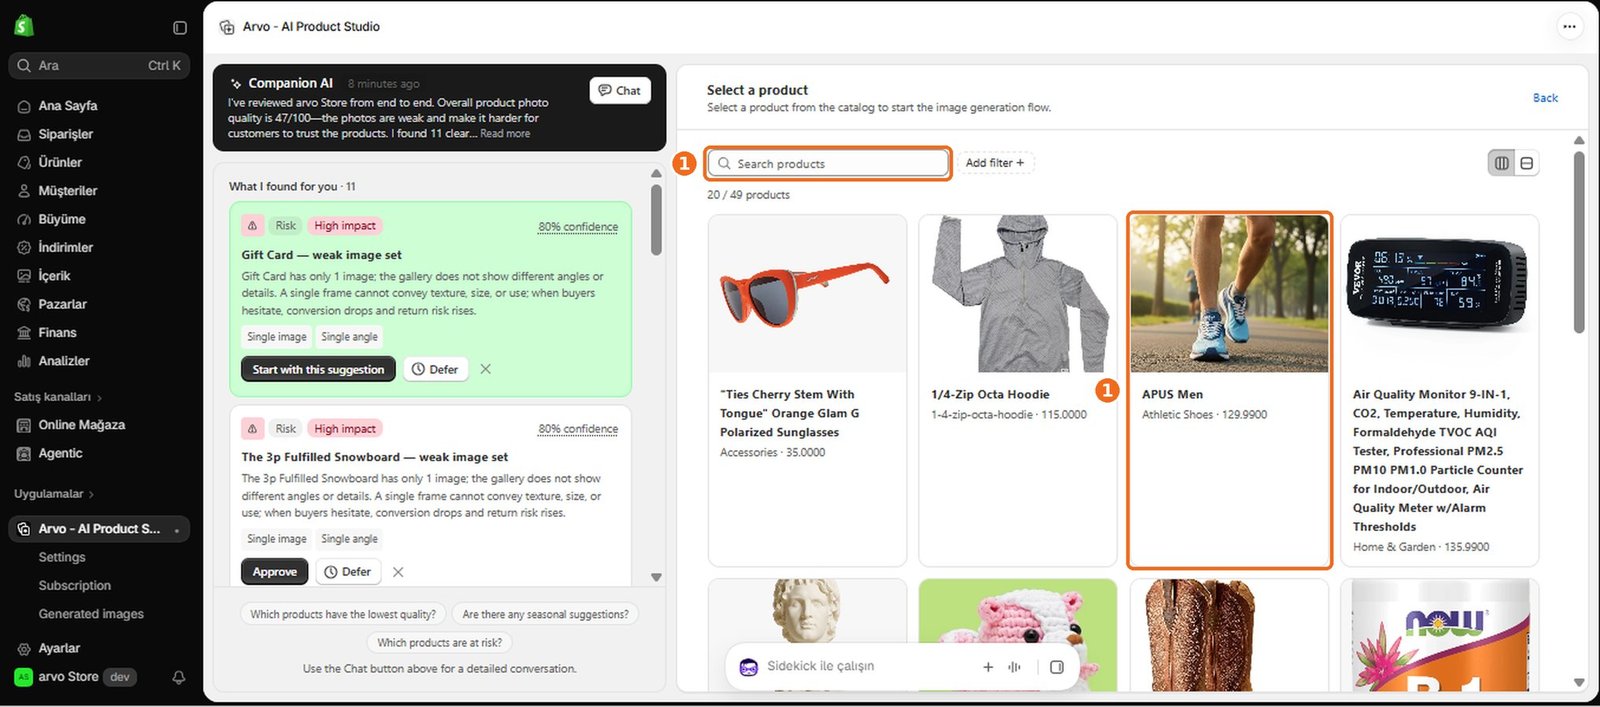
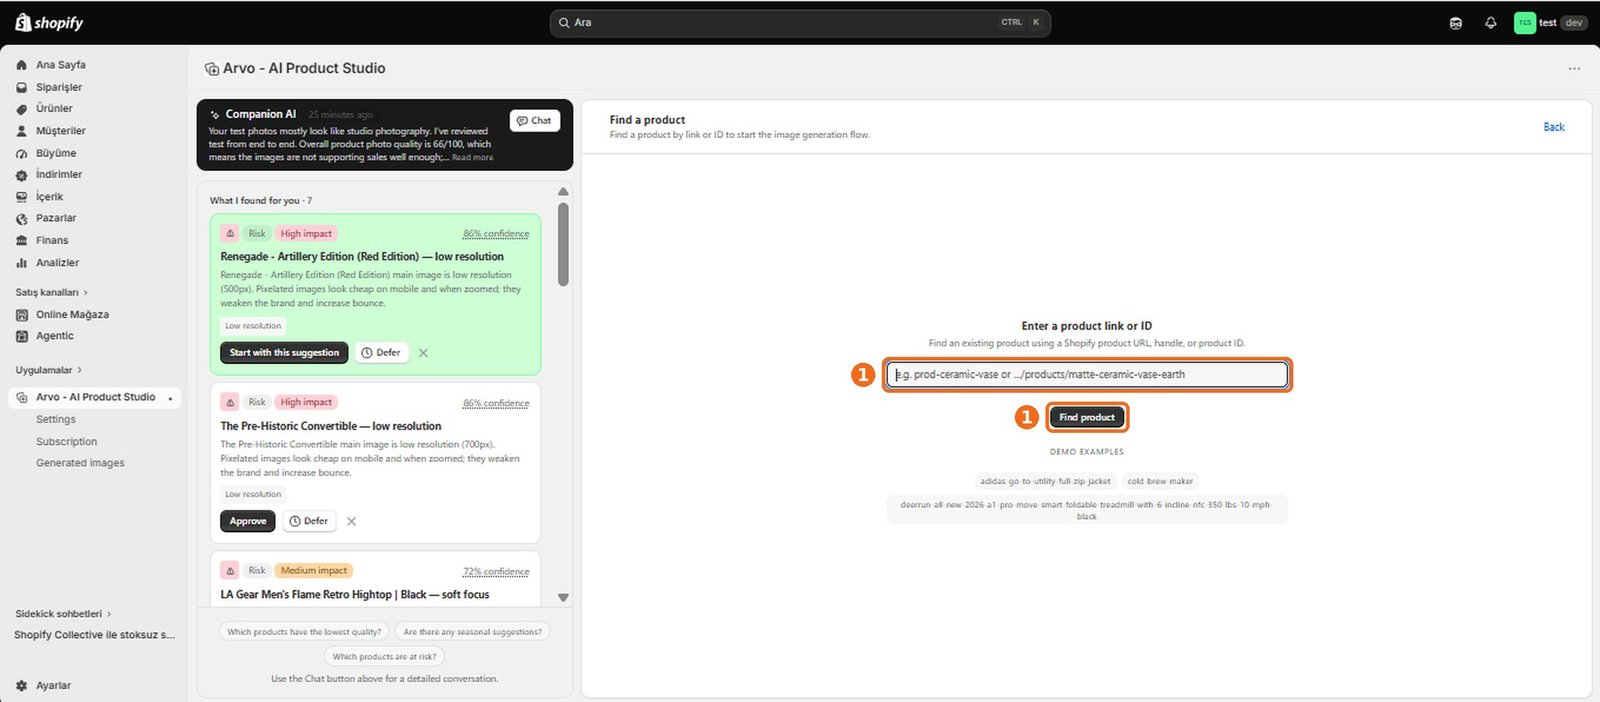
How do I select a product for image generation?
1
Choose a product from your connected Shopify store when setting up the visual.
2
The selected product gives Arvo AI the product information and existing imagery it needs to create a relevant result.
3
Make sure the intended product is available in Shopify and visible in Arvo AI before continuing.
4
If it does not appear or its image cannot be loaded, check the Shopify product and store connection, then try again.
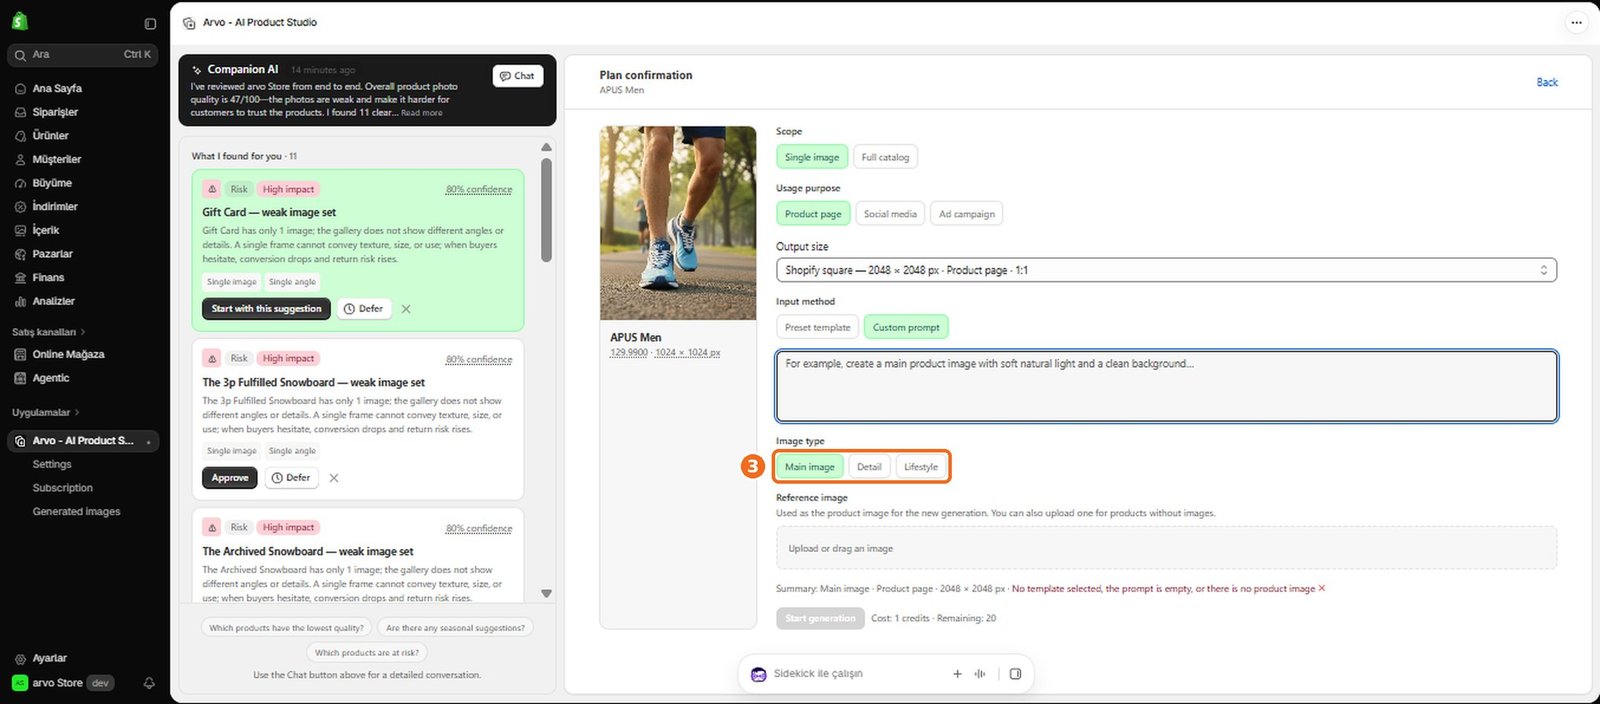
How do I choose an image type?
1
Choose the image type that matches the role the new visual will play.
2
A main image should present the product clearly, a detail image should emphasize a feature, a lifestyle image should show the product in context, and campaign, banner, or social options should support promotional use.
3
Select the type while configuring your generation, then review any related purpose, size, template, reference image, or prompt options.
4
The selected type guides the visual composition and intended result.
What image types are available?
Arvo AI Product Studio can create main or cover images, detail images, lifestyle images, campaign visuals, banners, and social media visuals. Each type serves a different merchandising or marketing purpose, from presenting a product clearly to placing it in a promotional setting.
The image types shown may depend on the workflow or product you selected.
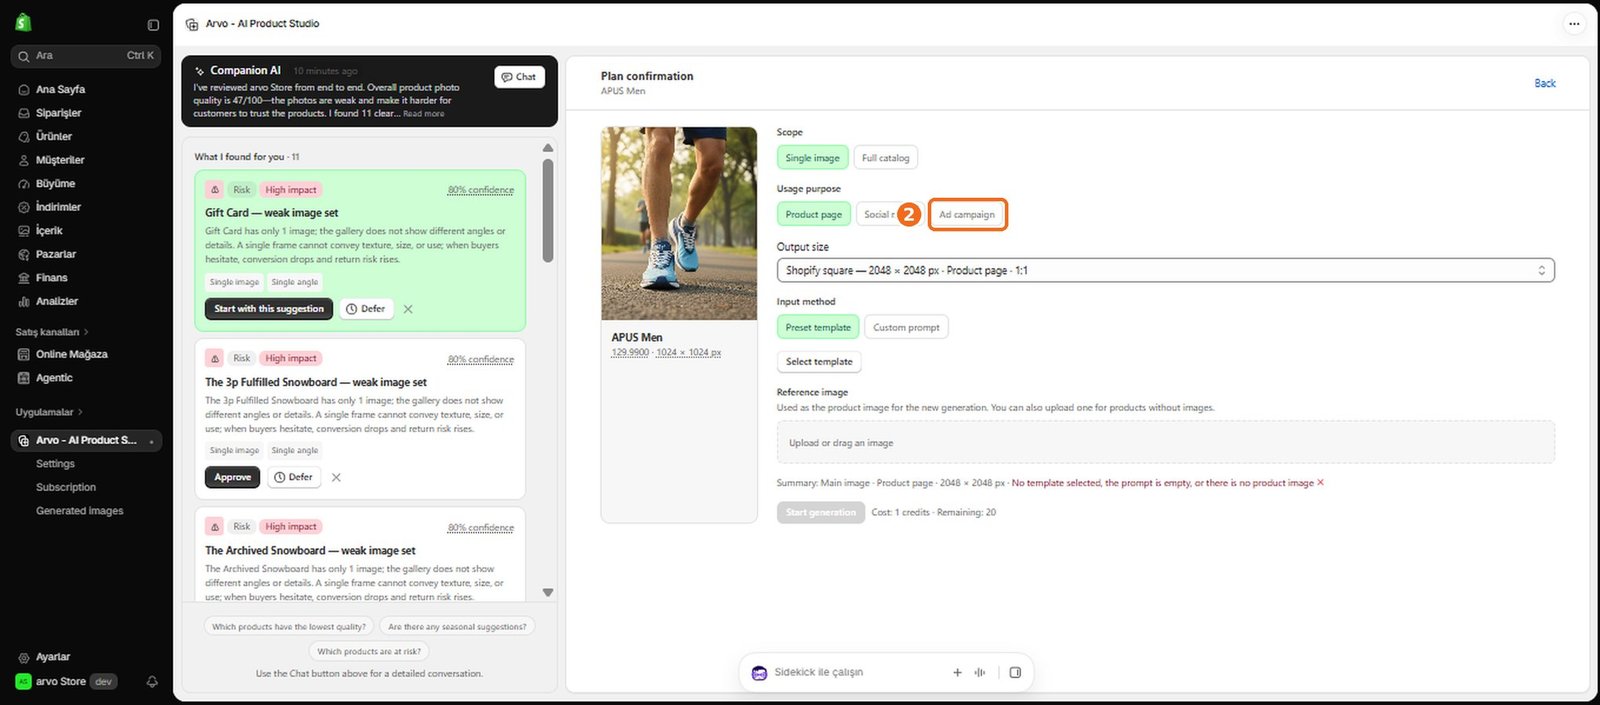
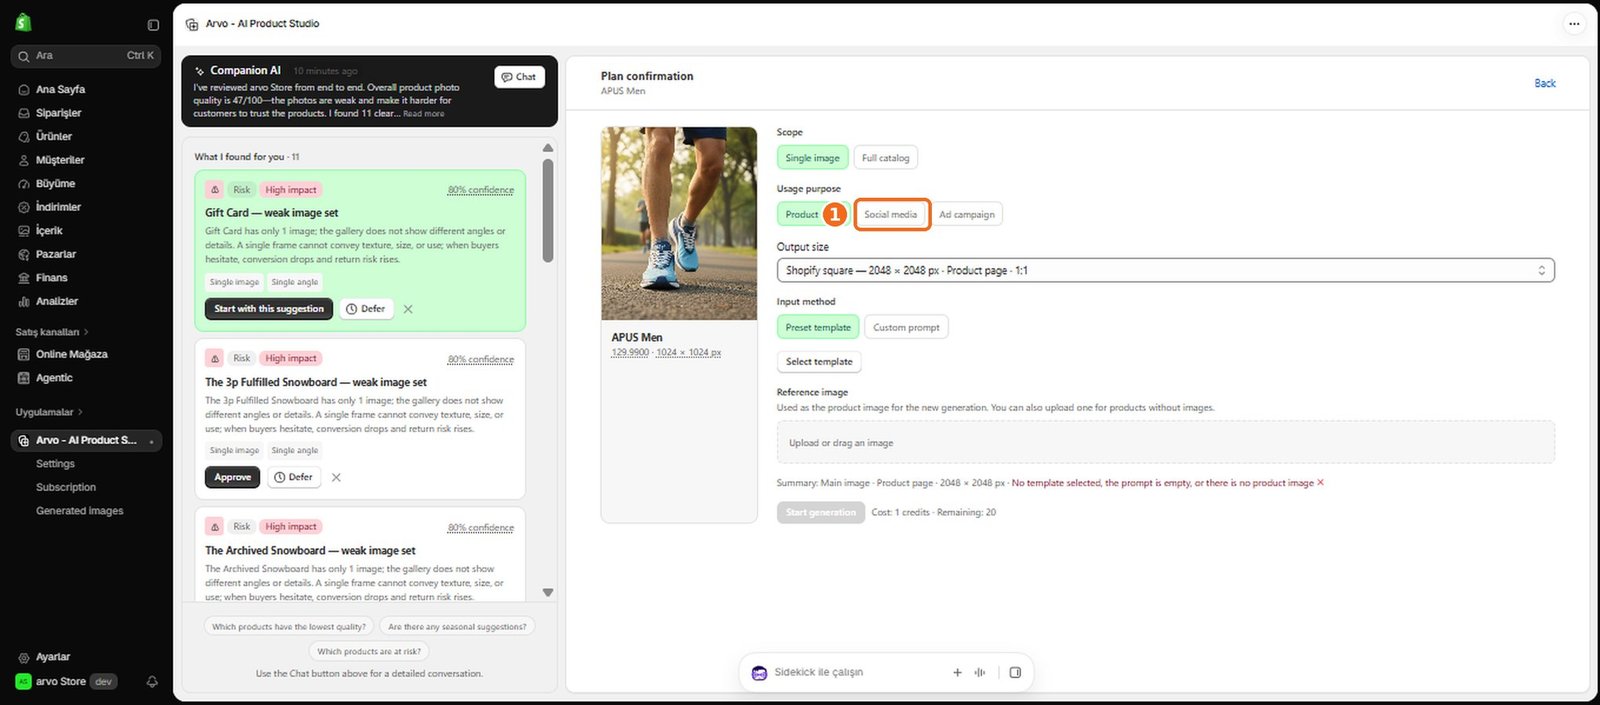
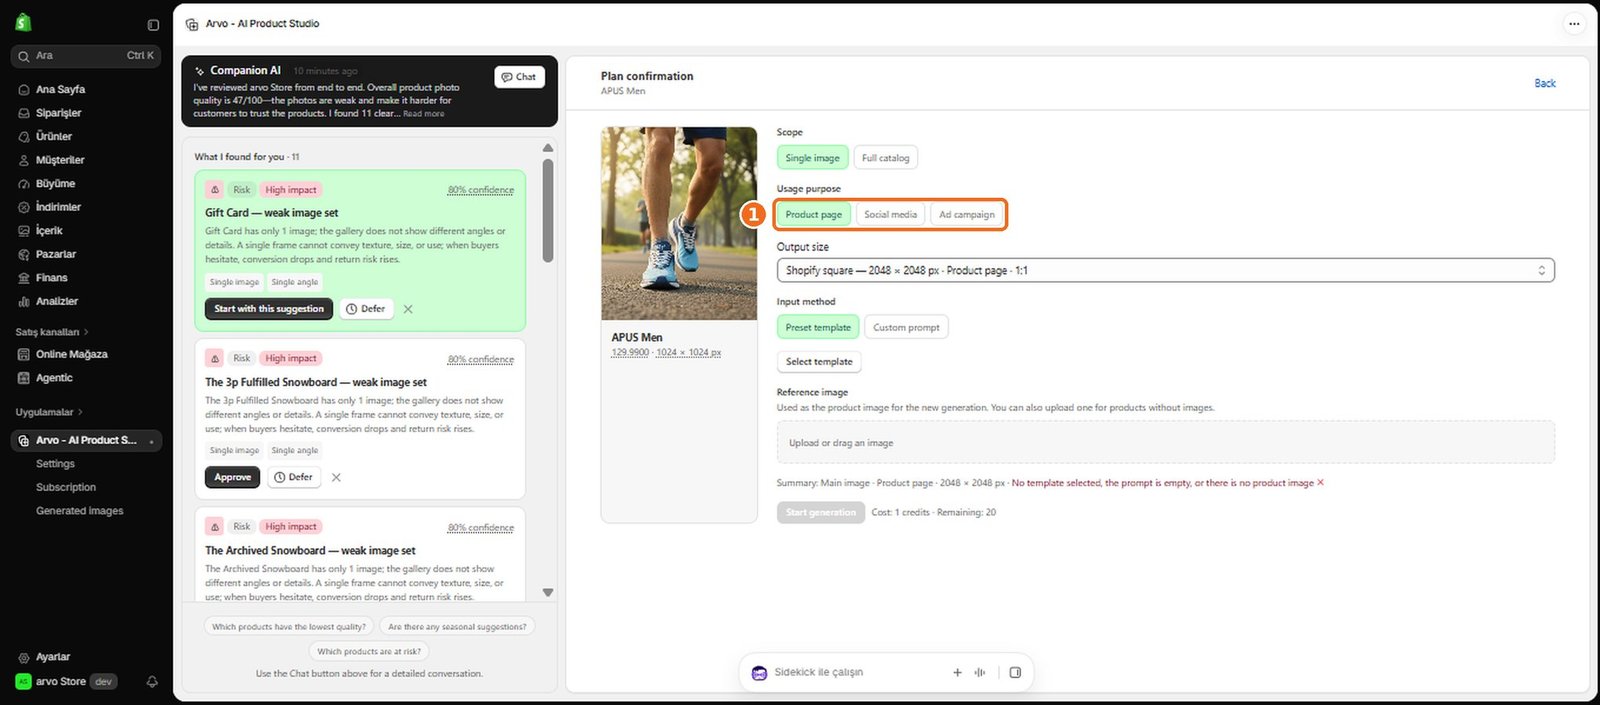
How do I choose the usage purpose?
1
Choose the purpose that best describes where and how you plan to use the image, such as on a product page, in a campaign, in a banner, or on social media.
2
This helps Arvo AI shape the visual for its intended context.
3
Consider the space the image must fill, the message it should communicate, and whether the product or campaign should be the main focus.
4
If you are unsure, choose the purpose closest to the final placement and clarify your goal with a template, reference image, or custom prompt.
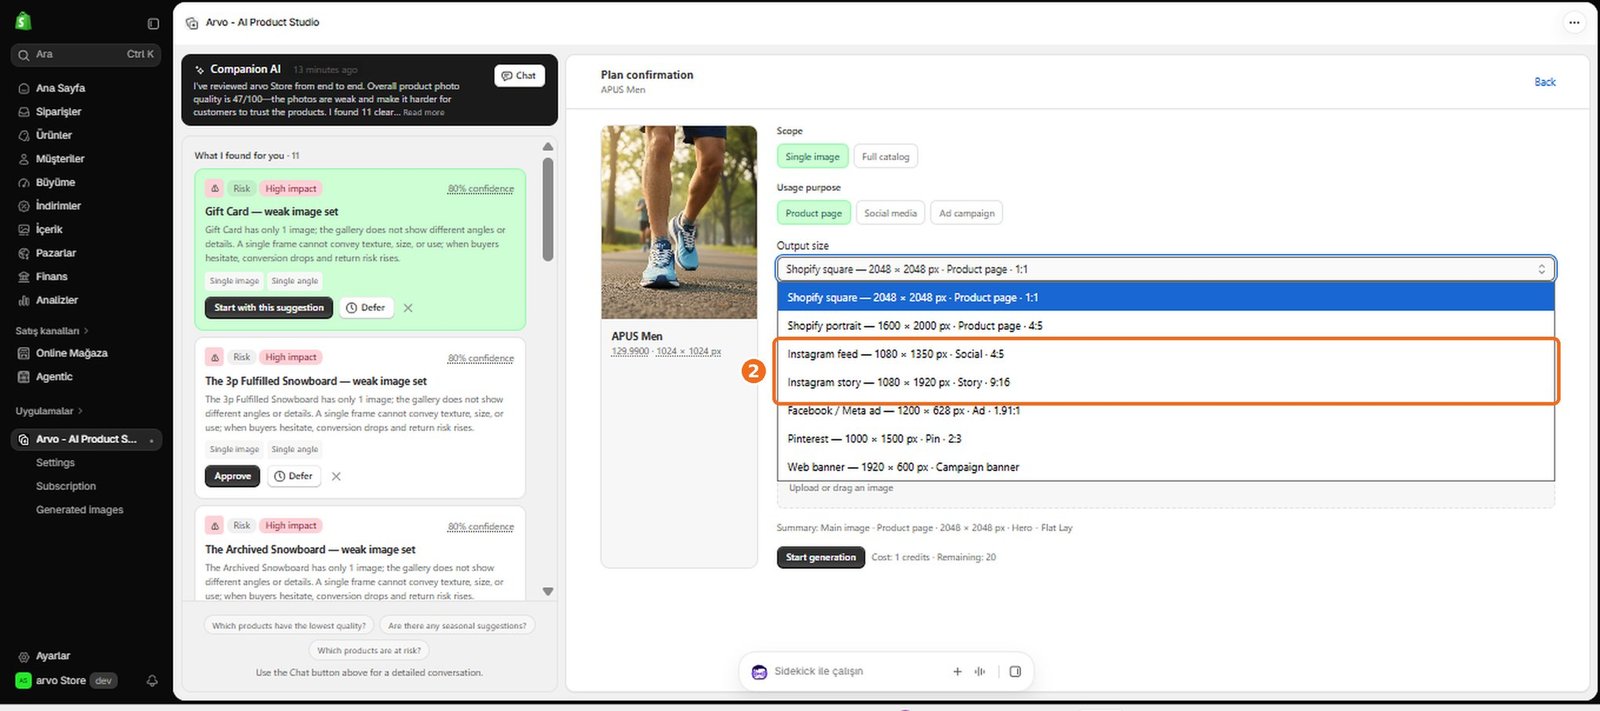
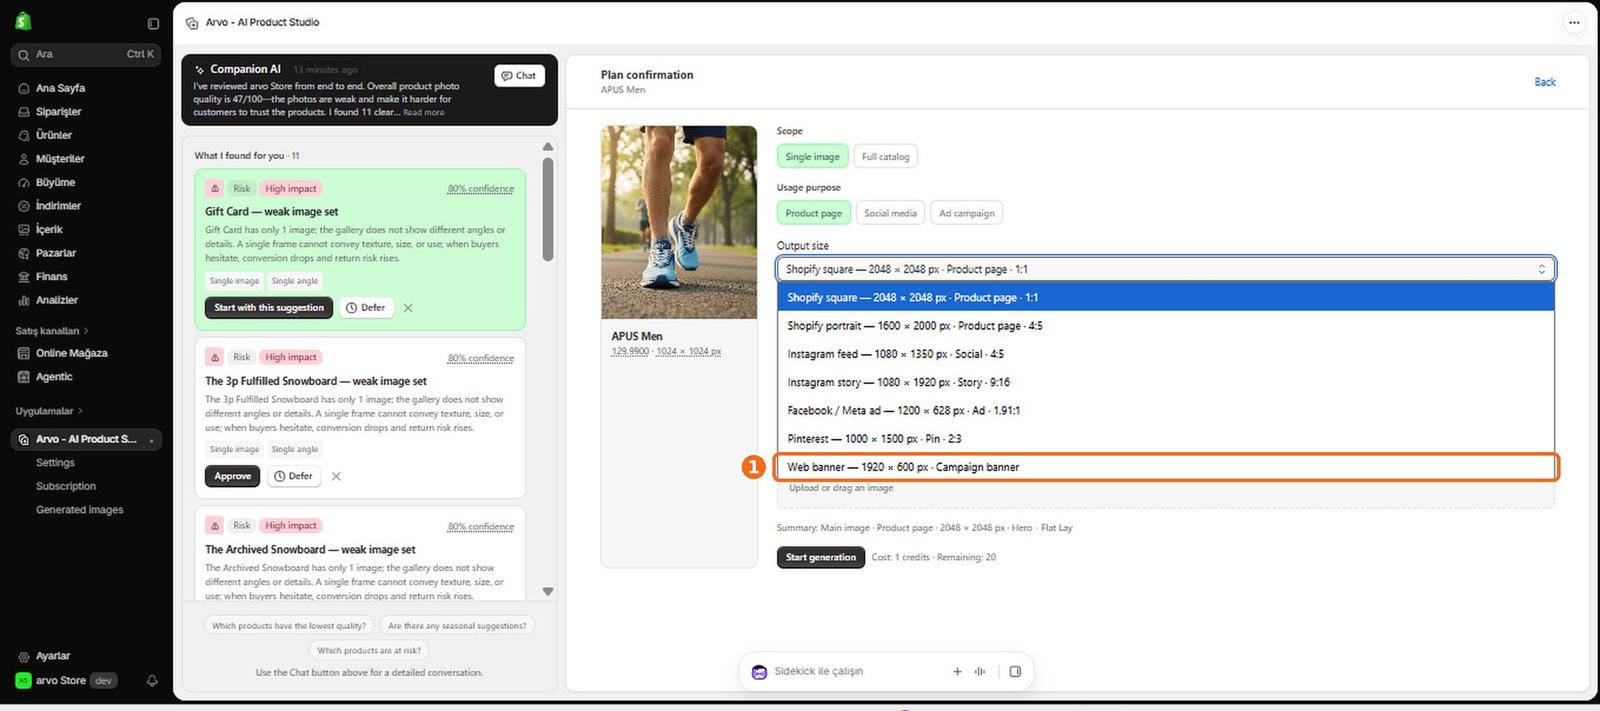
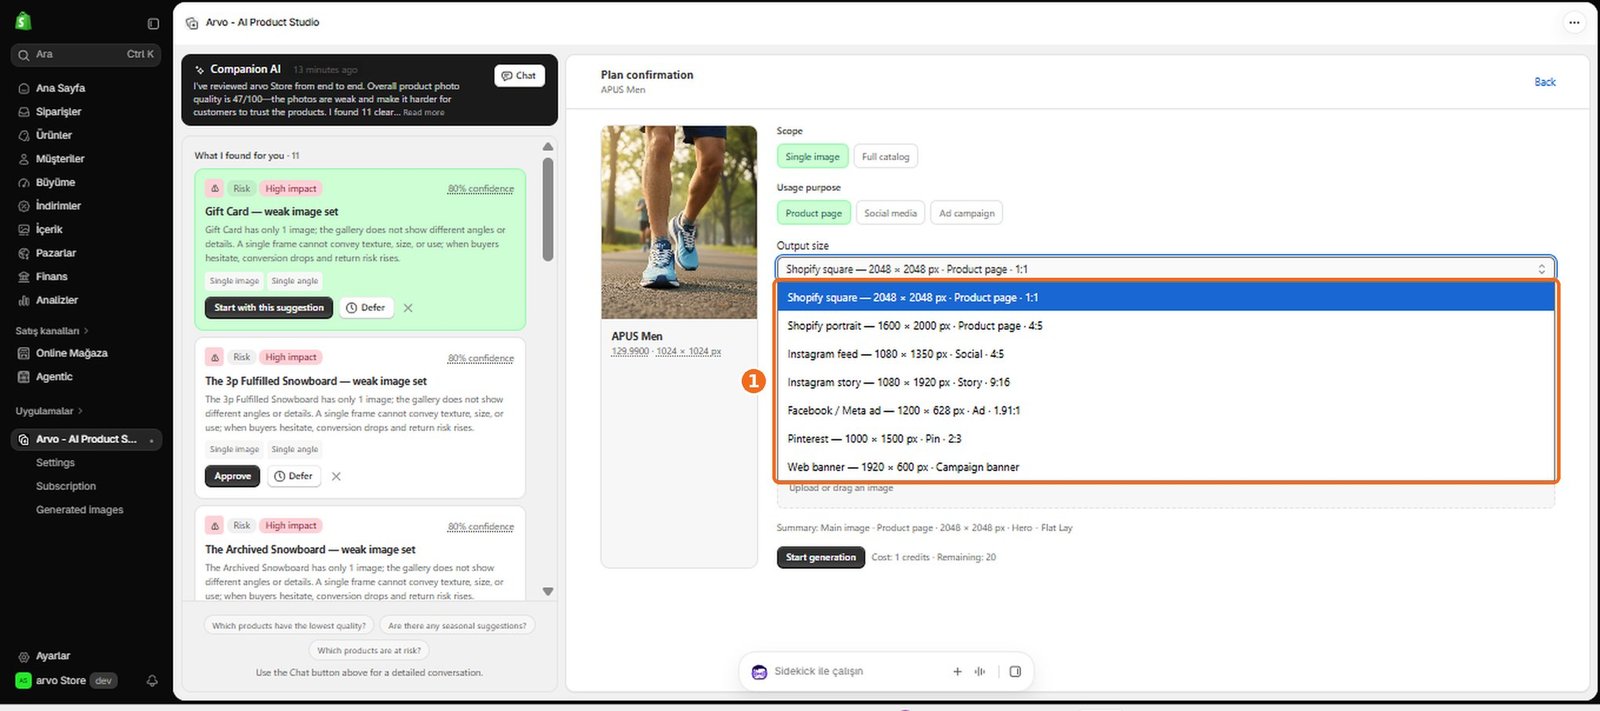
How do I choose the output size?
1
Select an output size that suits the image's destination.
2
Product pages, banners, and social placements may need different proportions, so confirm the requirements of the channel where you will publish the visual before generating it.
3
Preview the selected size or proportions where available, especially when using a template with a fixed composition.
4
If the desired option is unavailable, choose a compatible layout or adjust your planned placement.
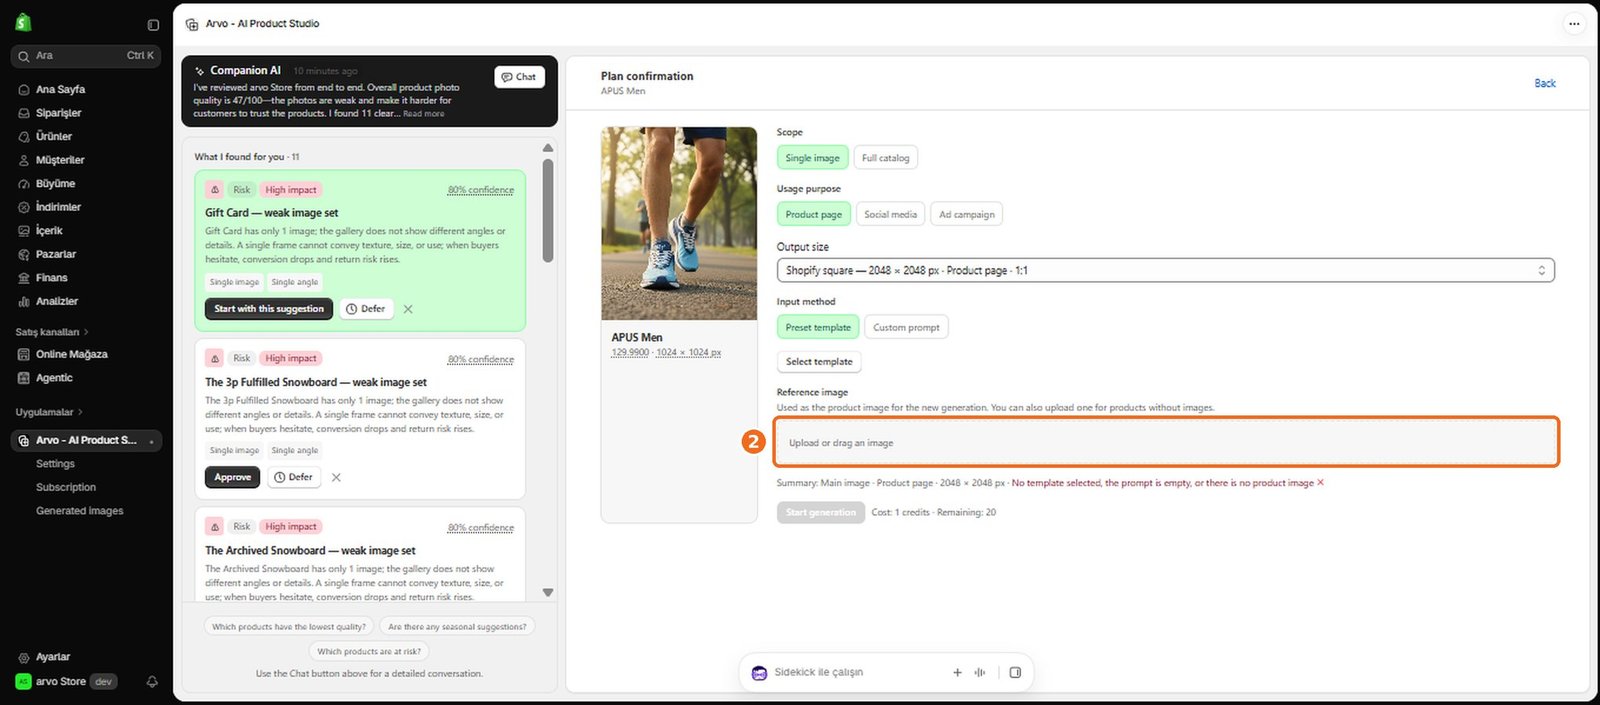
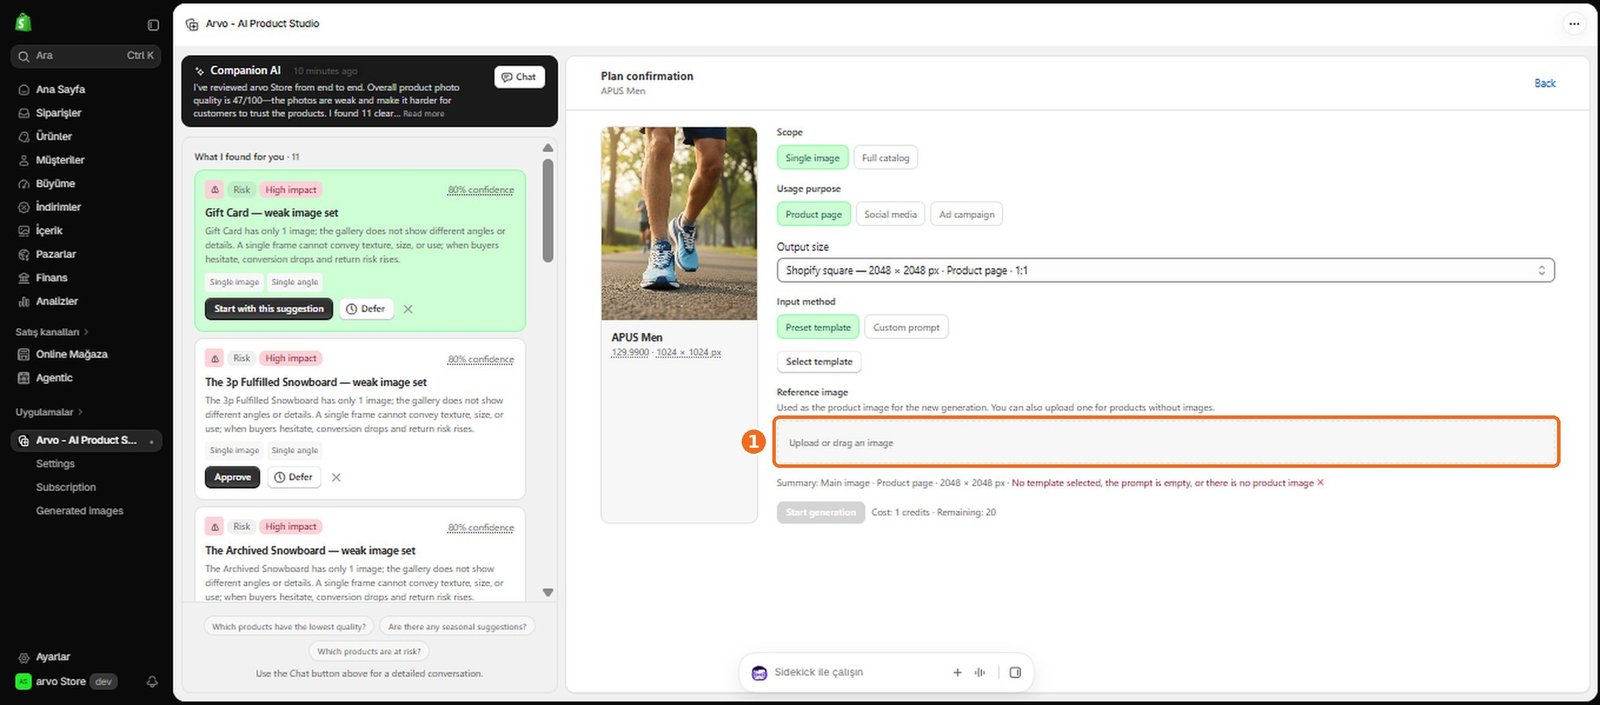
How do I add a reference image?
1
Add a reference image while configuring your generation when you want to guide the visual style, composition, setting, or other creative qualities.
2
Use a clear image that represents the direction you want while keeping the selected Shopify product as the subject of the new visual.
3
After adding it, review the preview and complete the remaining generation choices.
4
If the image cannot be accepted or analyzed, try another suitable file.
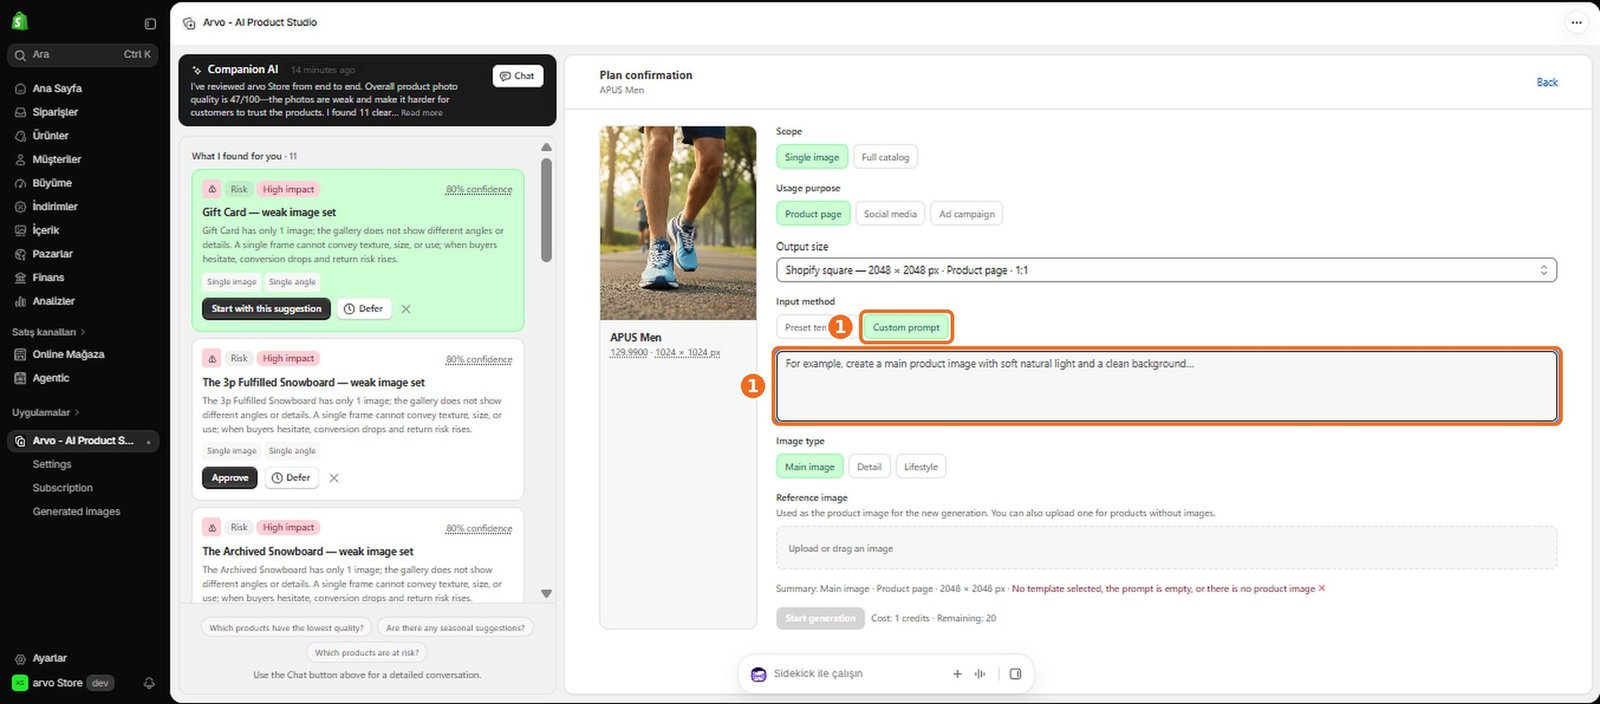
How do I use a custom prompt?
1
Enter a custom prompt during image setup to describe the scene and creative direction in your own words.
2
Include the setting, mood, lighting, colors, composition, and important details you want Arvo AI to consider.
3
Use the prompt together with the selected product and, when helpful, a template or reference image.
4
Review all inputs before generating; if the result does not match your intent, refine the description and generate again.
How do I write an effective custom prompt?
1
Describe the desired result clearly and specifically.
2
State where the product should appear, the surrounding environment, the mood, lighting, color palette, camera perspective, and intended use.
3
For example, describe a bright studio product image differently from a warm lifestyle scene or a bold promotional banner.
4
Keep instructions consistent and focus on visible details.
5
Avoid conflicting requests, and do not rely on vague terms when a concrete description would be clearer.
6
If the first result misses the goal, revise the most important details before trying again.
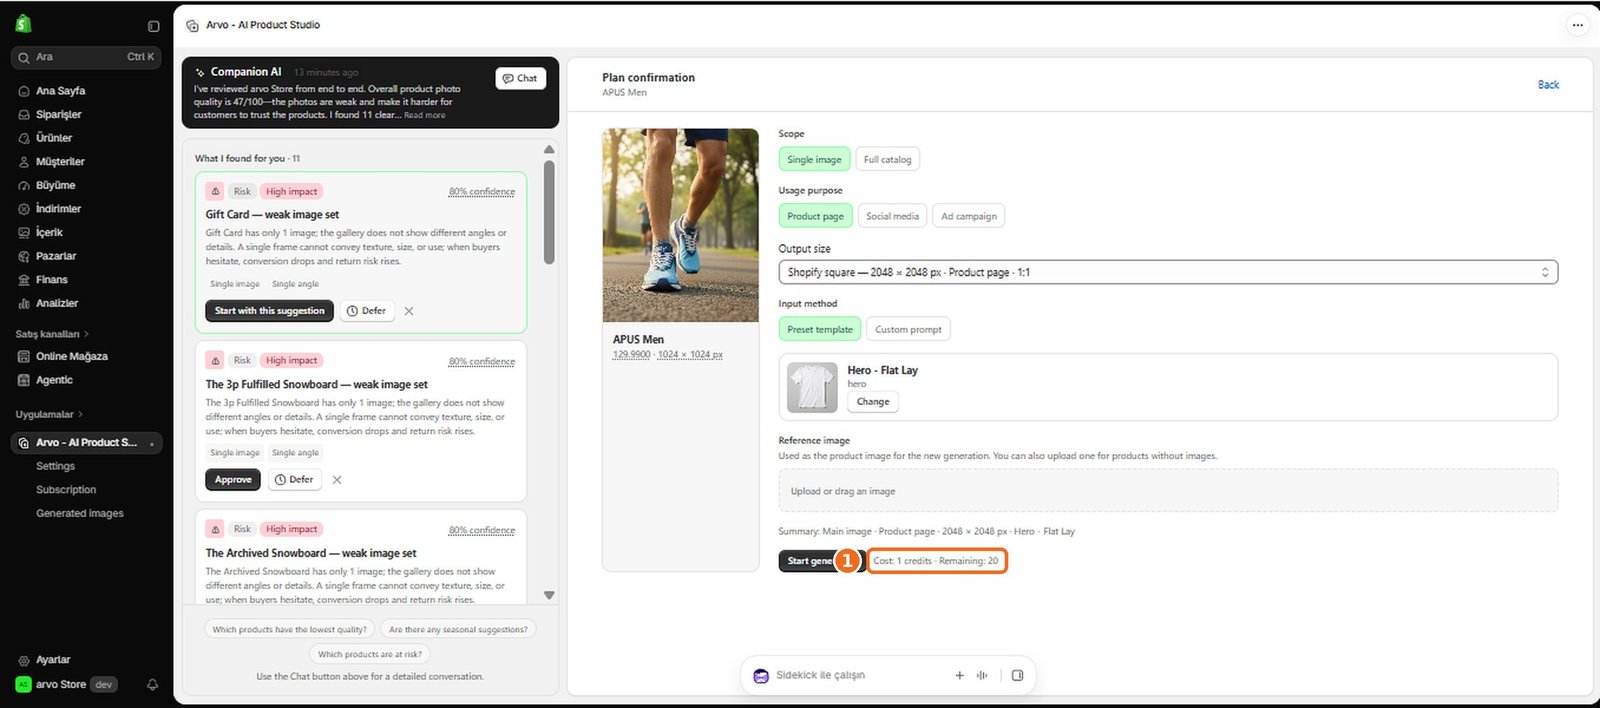
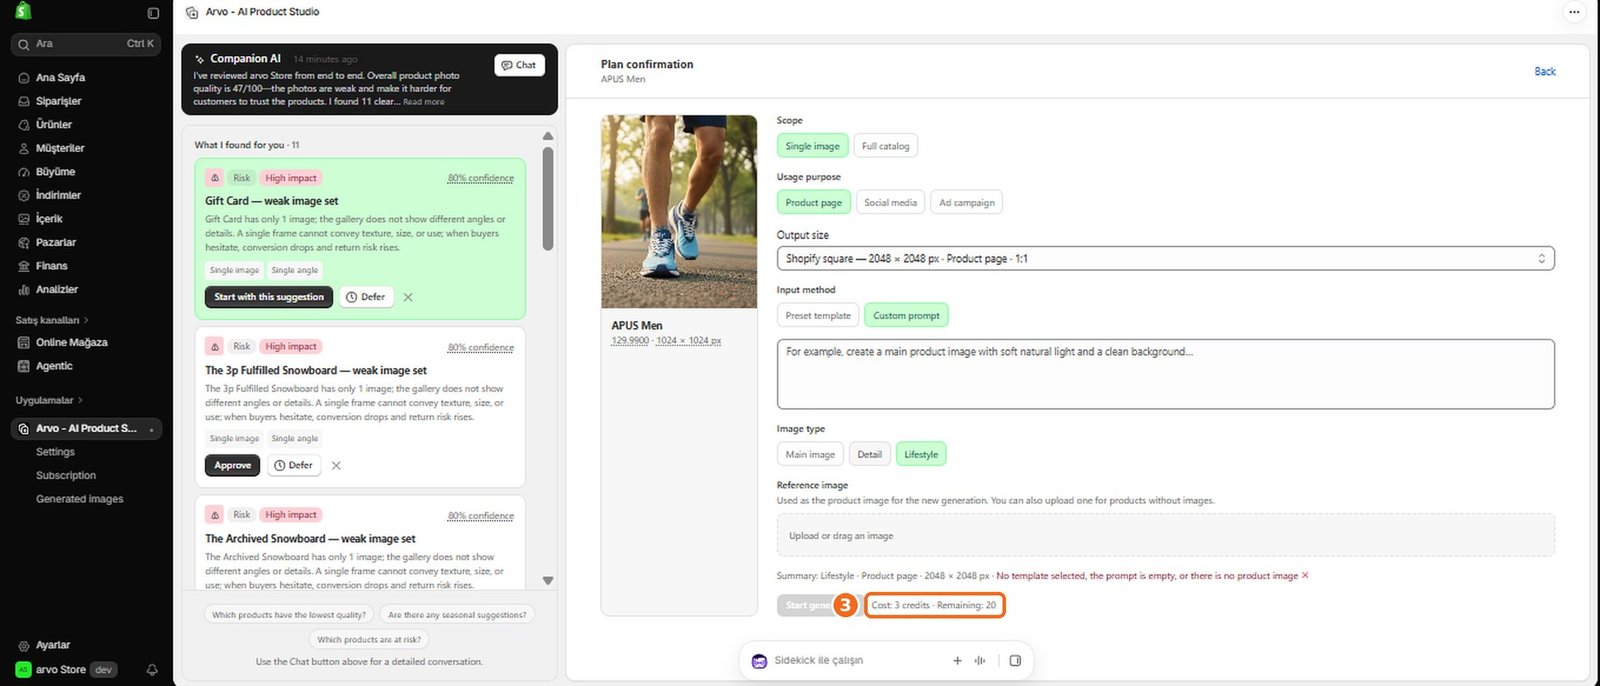
How does image generation use credits?
1
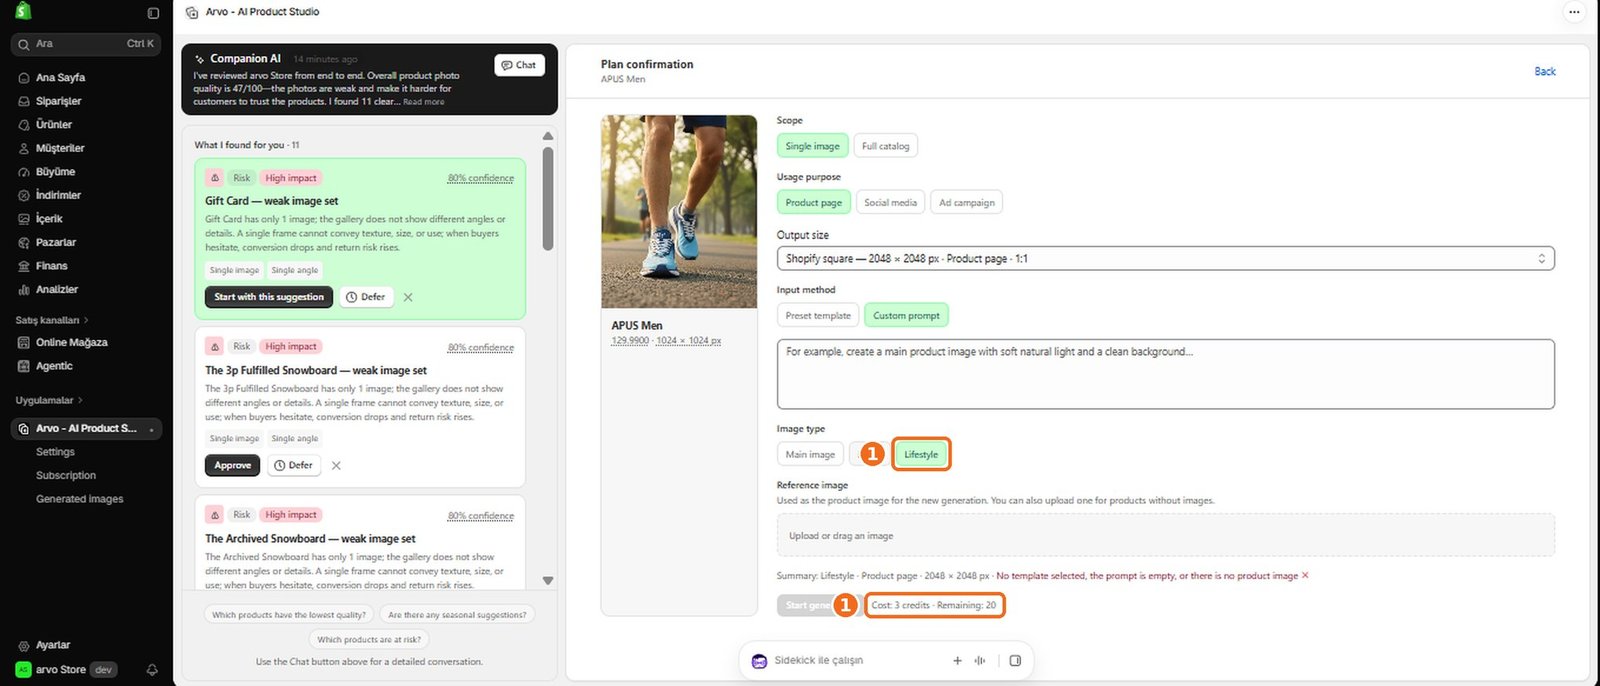
Each image uses a fixed number of credits based on its image type: main 1, detail 2, lifestyle, campaign, banner and social media 3, dimensions and infographic 6.
2
The total cost is shown before you confirm the generation, and credits are deducted when the generation starts.
3
If a generation fails because of a system error, the credits are refunded automatically.
4
Your balance must cover the full request. If it does not, buy extra credits or upgrade your plan. See section 8, Credits & Subscription.
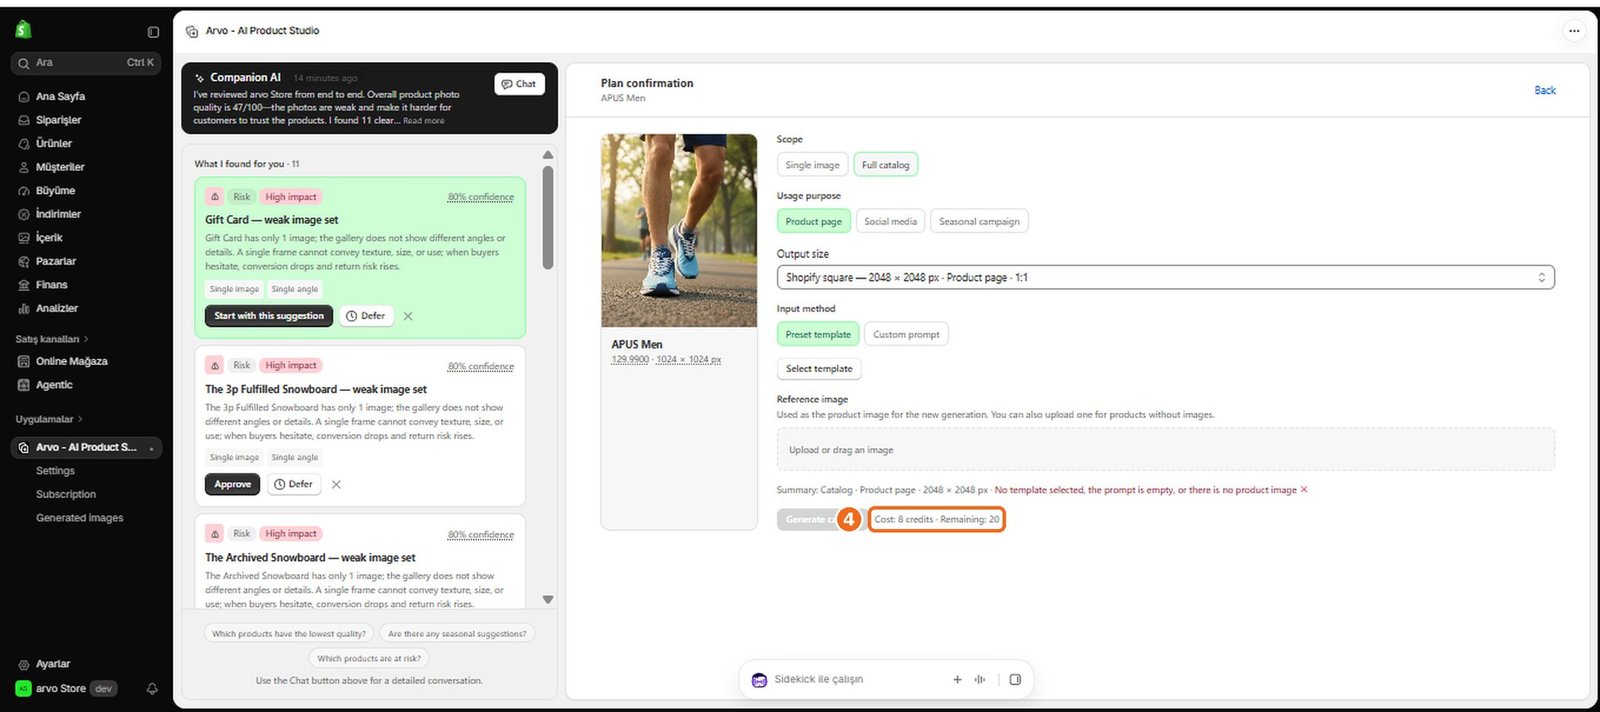
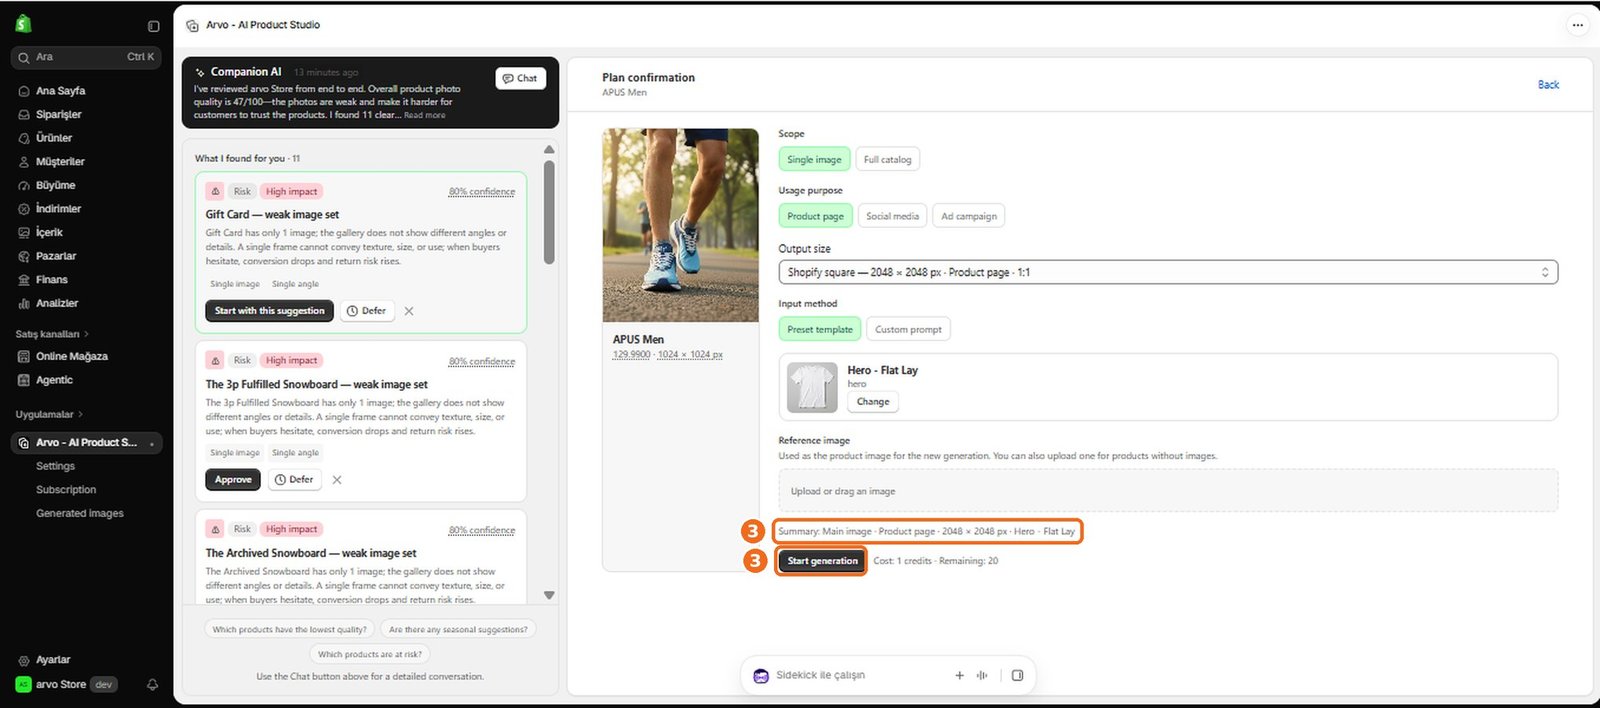
How do I check the credit cost before generation?
1
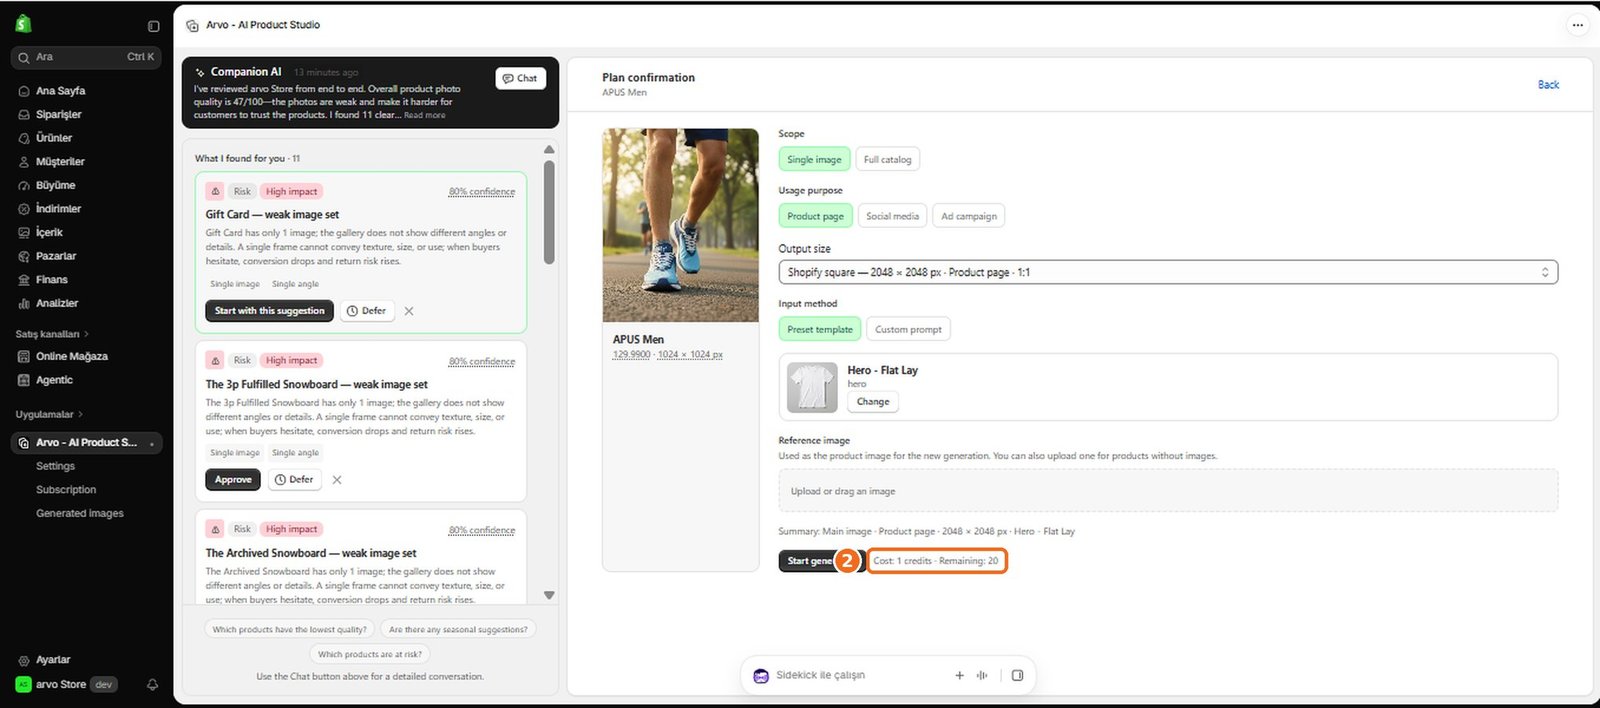
Review the generation summary before starting.
2
It should show the credit requirement alongside your selected product and creative settings, allowing you to confirm the request before credits are used.
3
If no cost is displayed or the amount is unclear, do not assume that the generation is free.
How do I start an image generation?
1
Complete the required setup by selecting a product, image type, usage purpose, and other relevant creative options.
2
You can guide the result with a preset or custom template, a reference image, or a custom prompt.
3
Review the configuration and credit requirement, then use the available action to begin.
4
If Arvo AI reports a missing input or insufficient credits, resolve that issue before trying again.
5
A successful request enters generation processing and later appears in the Gallery.
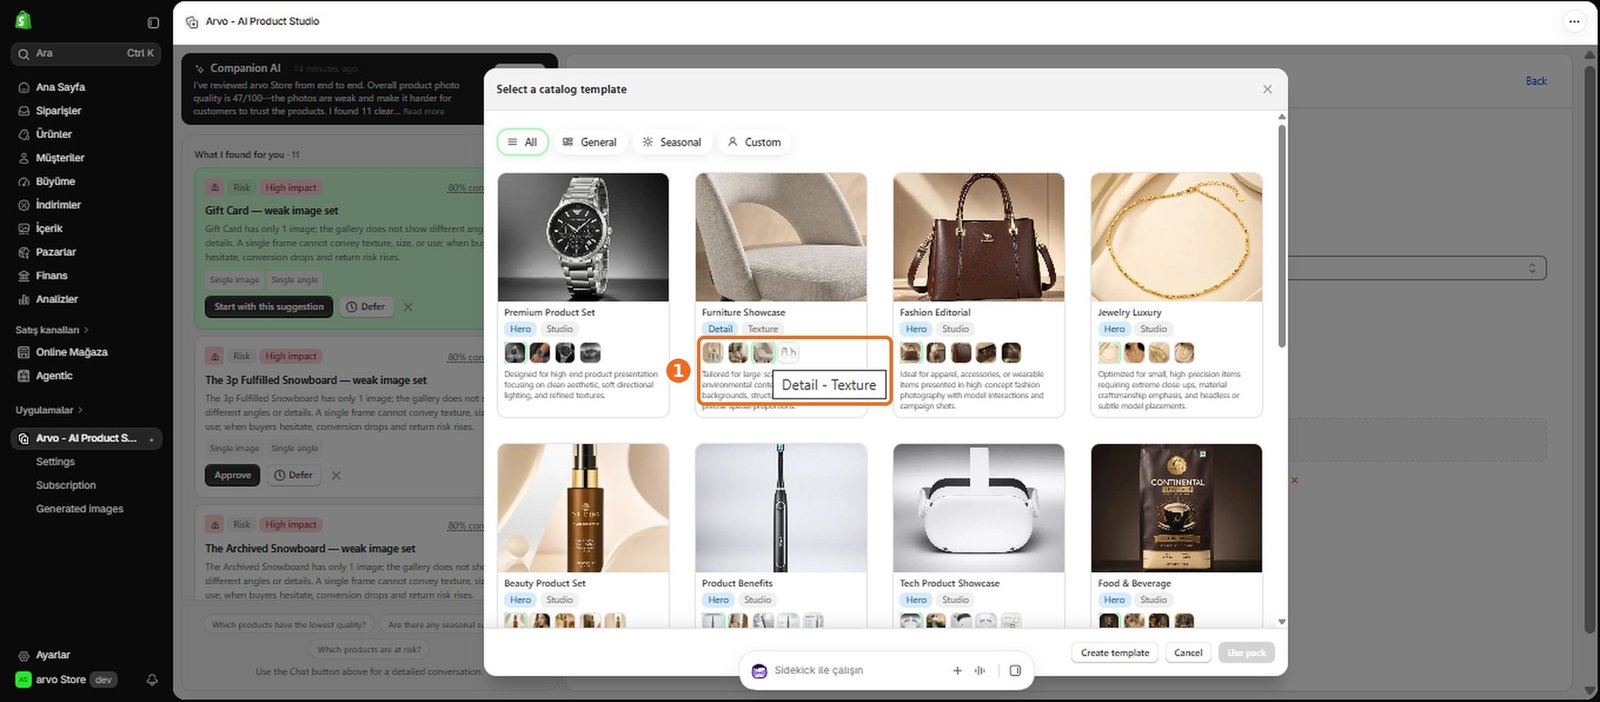
What are templates?
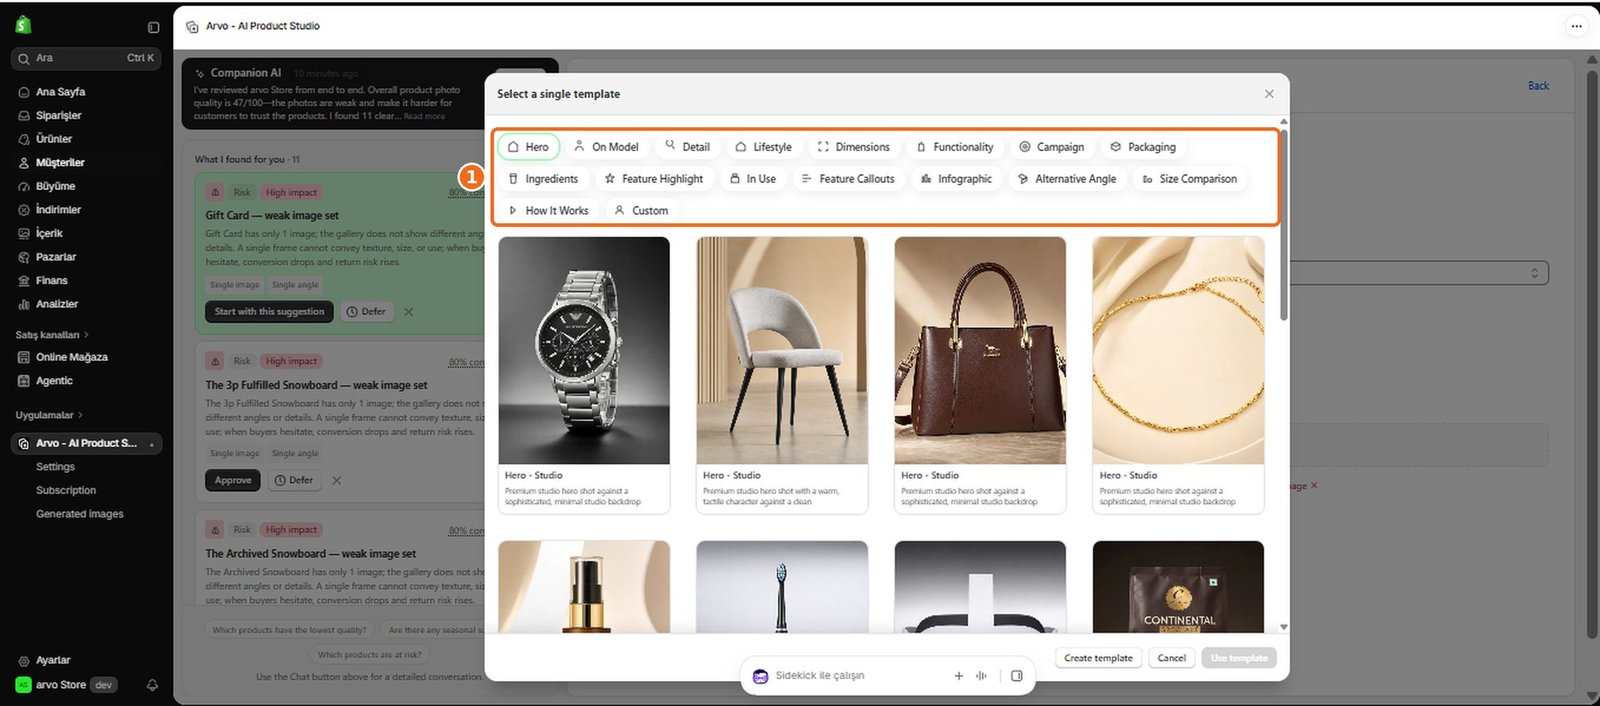
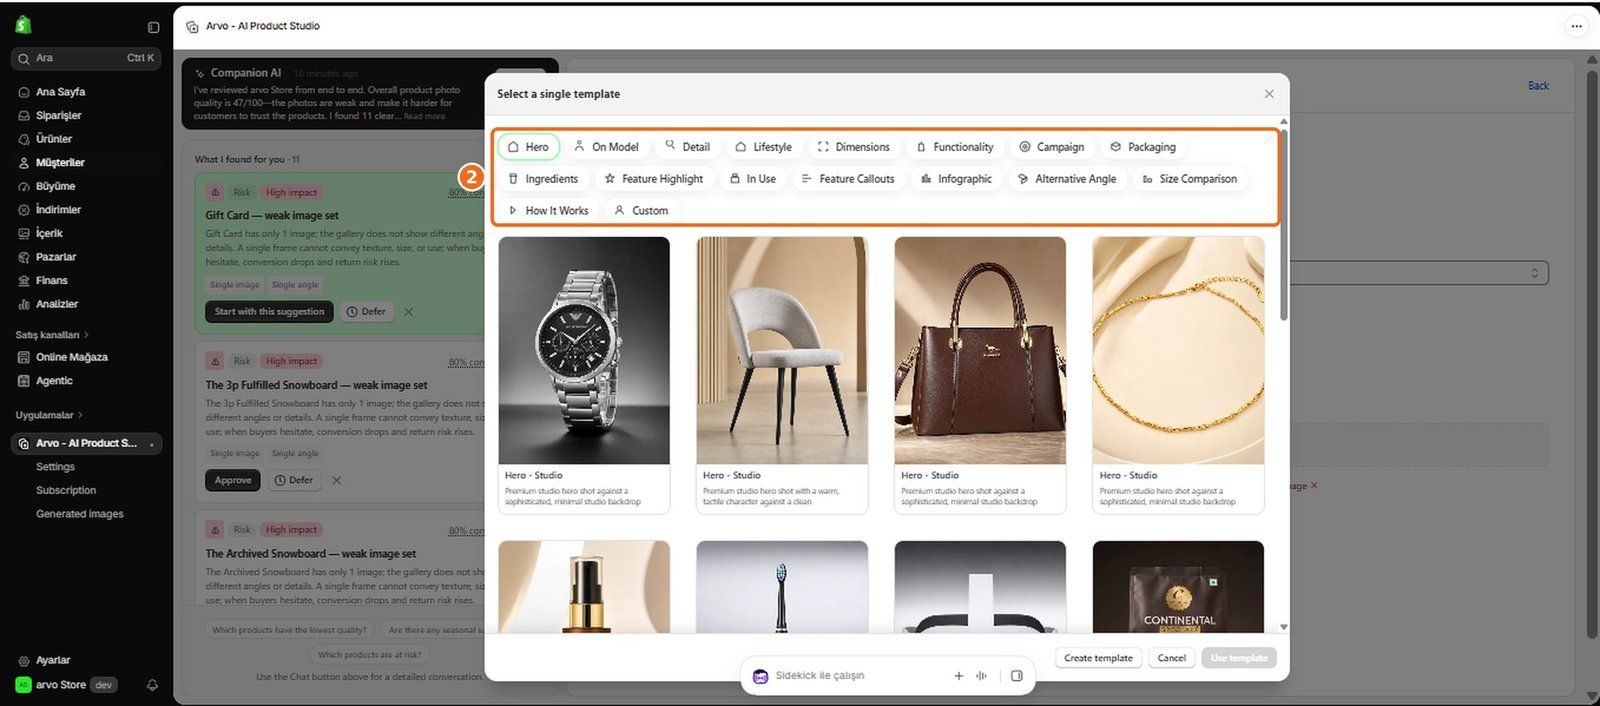
Templates are reusable creative starting points for image generation. They help define the visual structure, style, or intended use of an image while leaving room for Arvo AI to adapt the result to the selected Shopify product.
You can use a preset template for a ready-made direction or a custom template for a look tailored to your store. Templates can make repeated generations more consistent and reduce the amount of direction you need to enter each time.
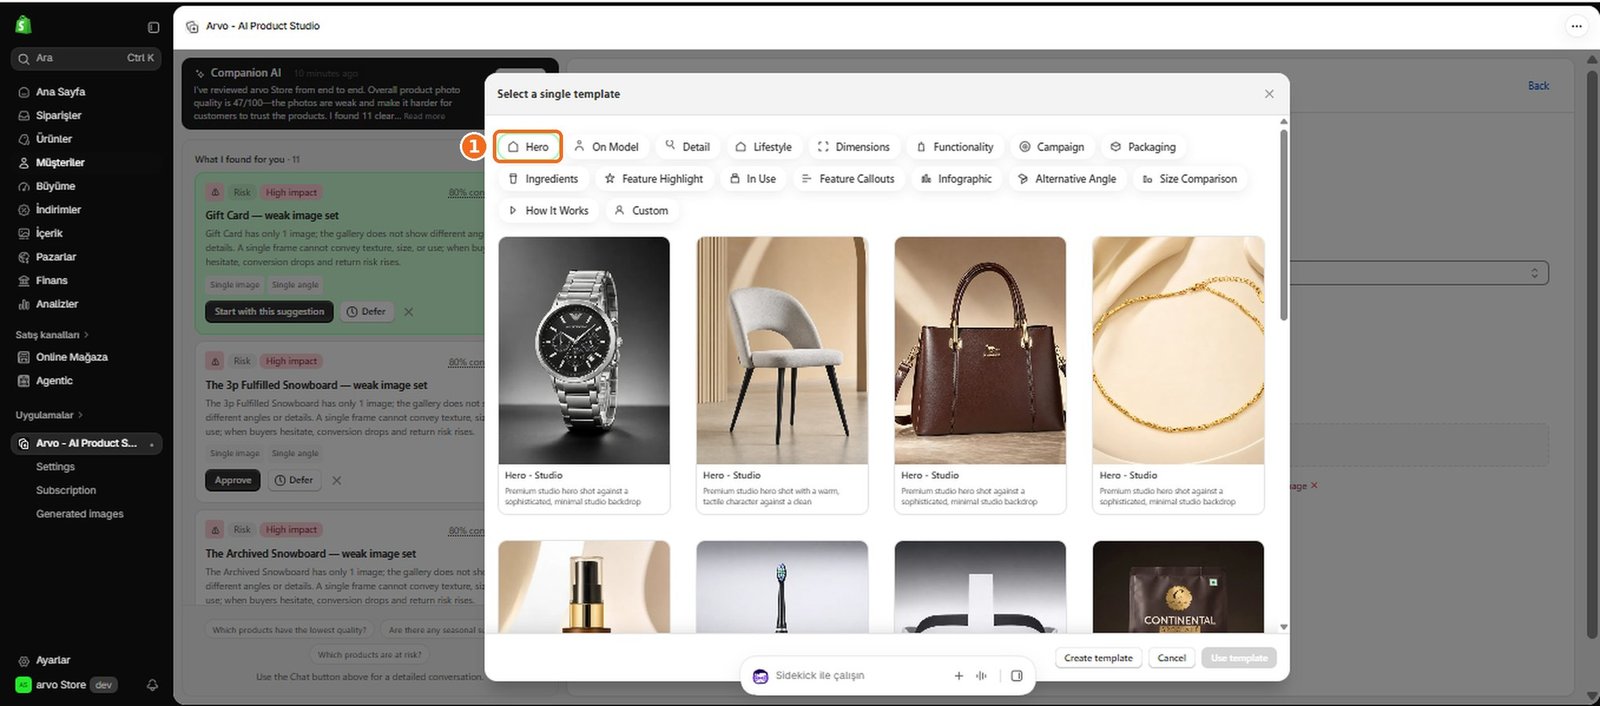
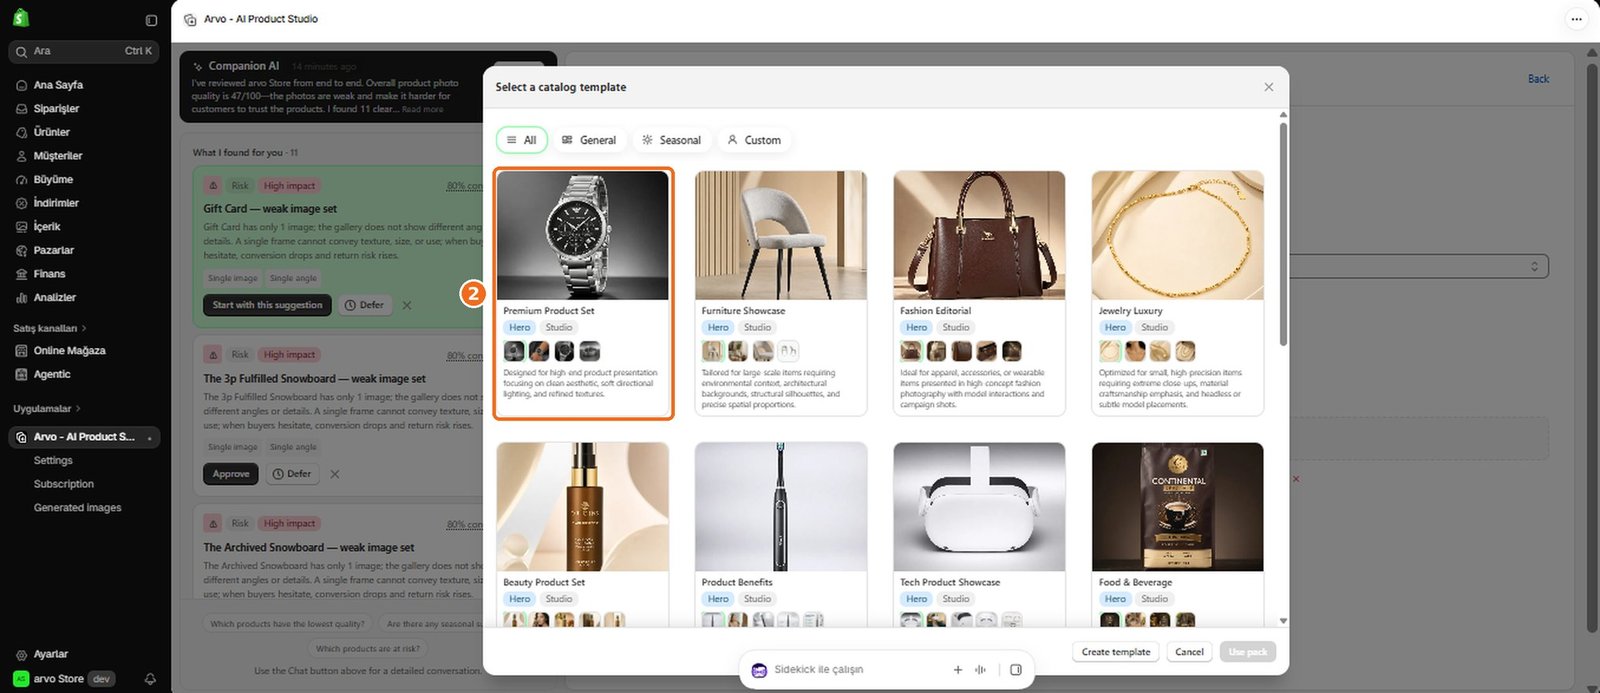
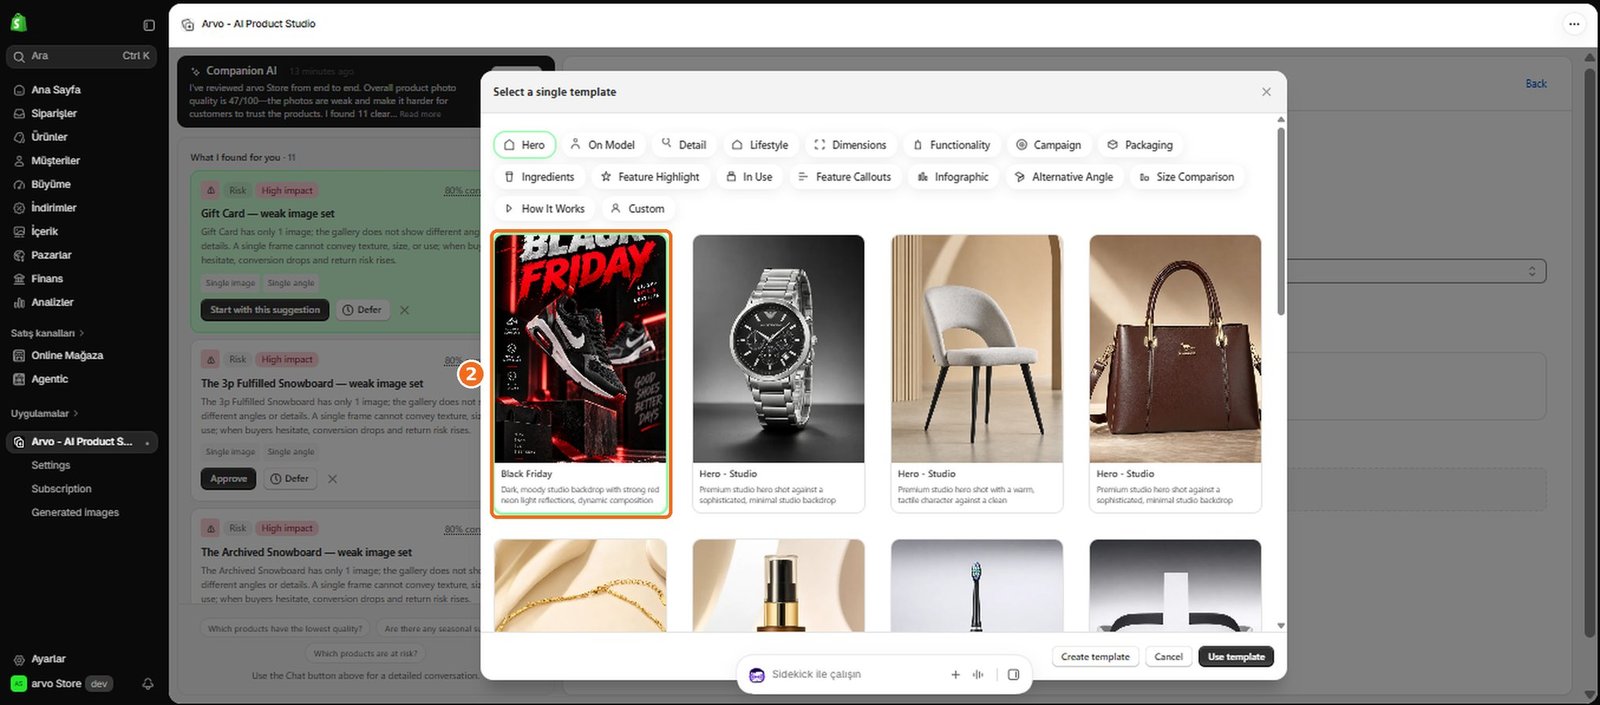
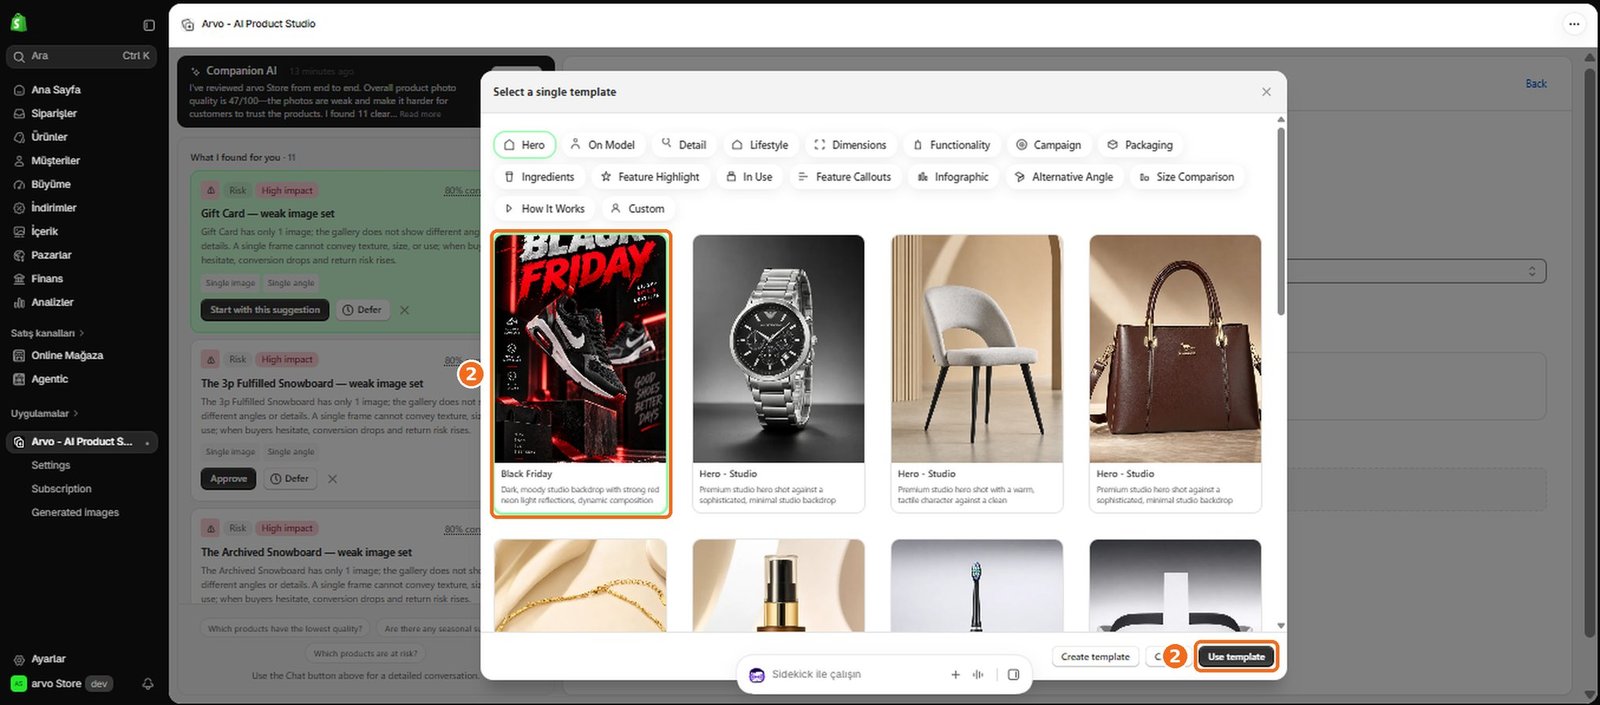
How do I use a preset template?
1
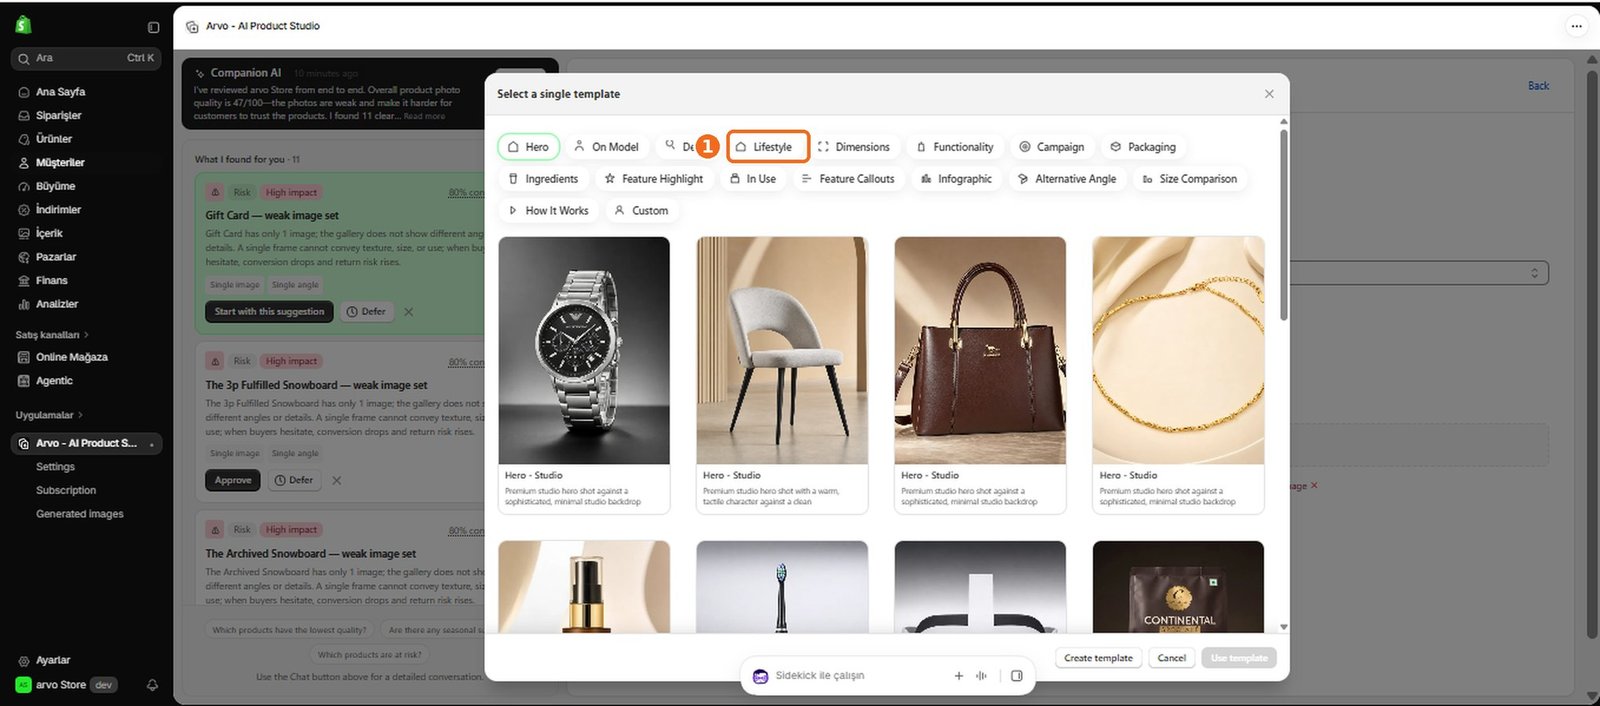
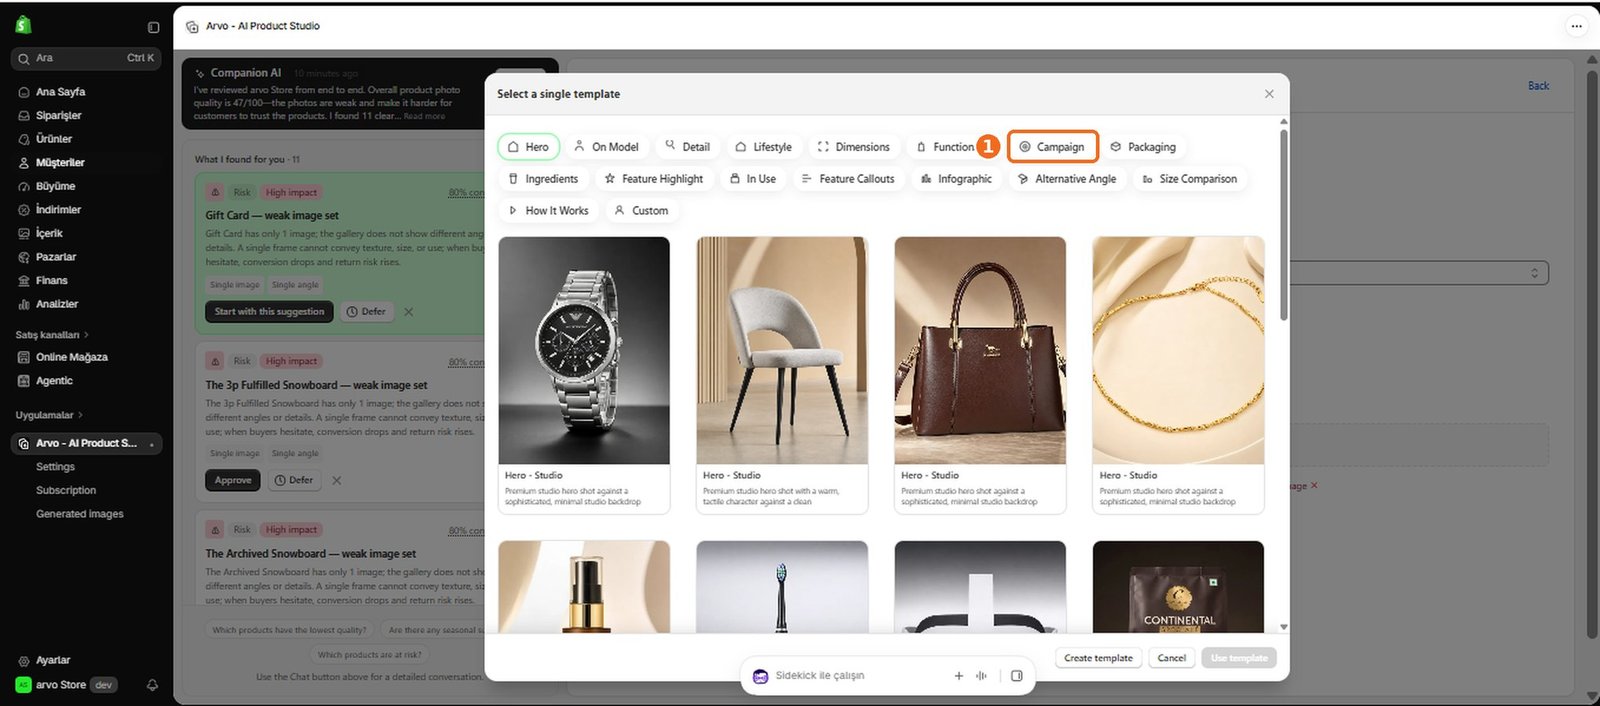
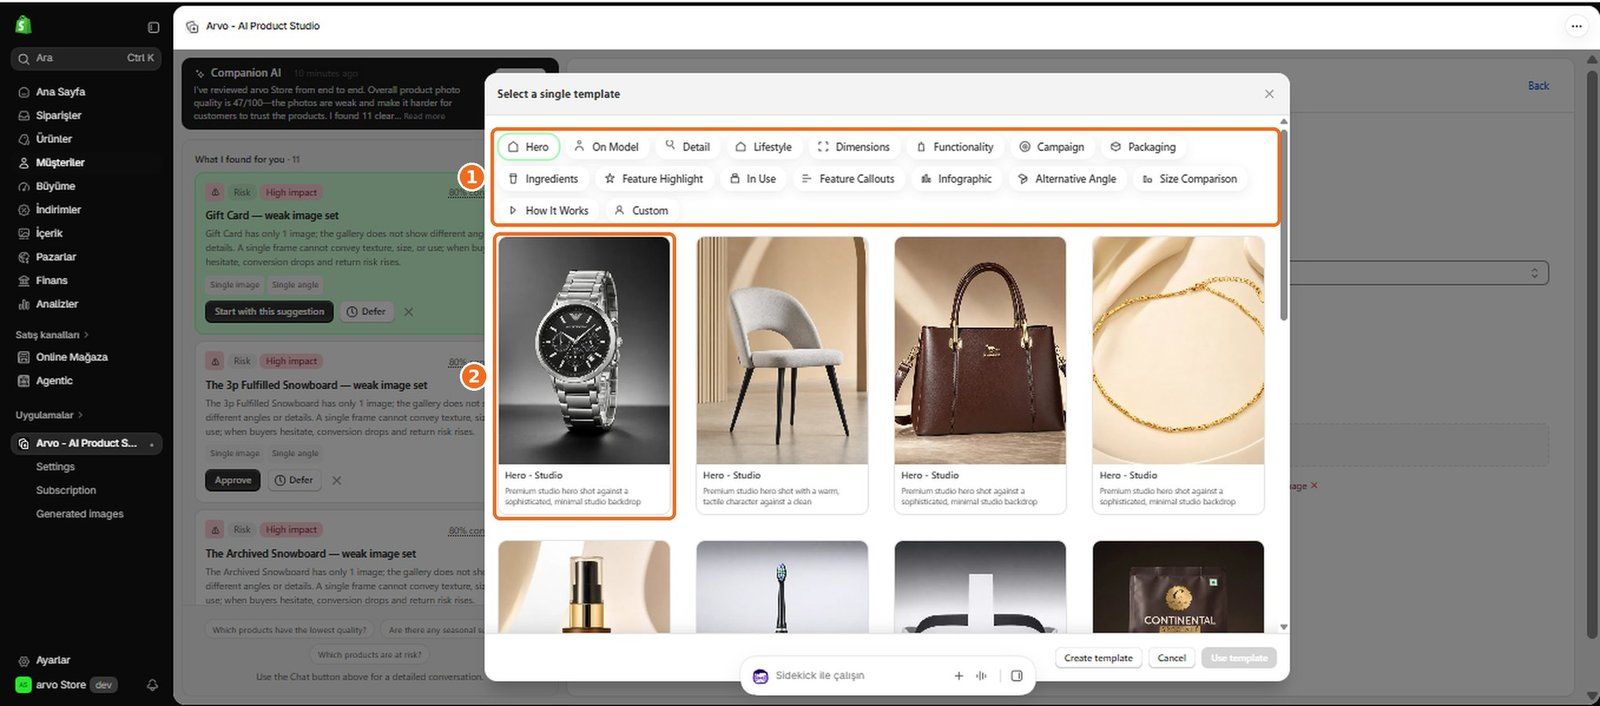
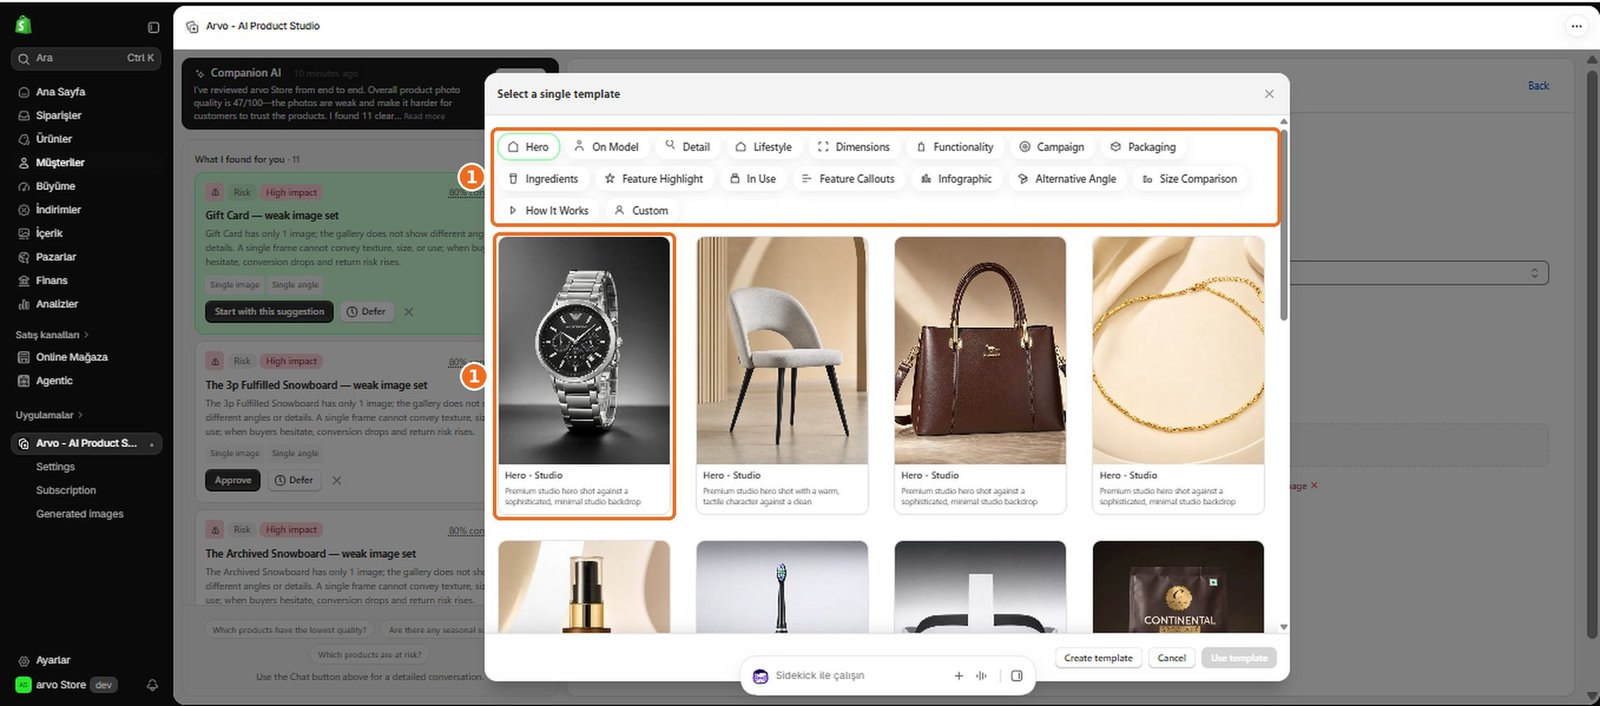
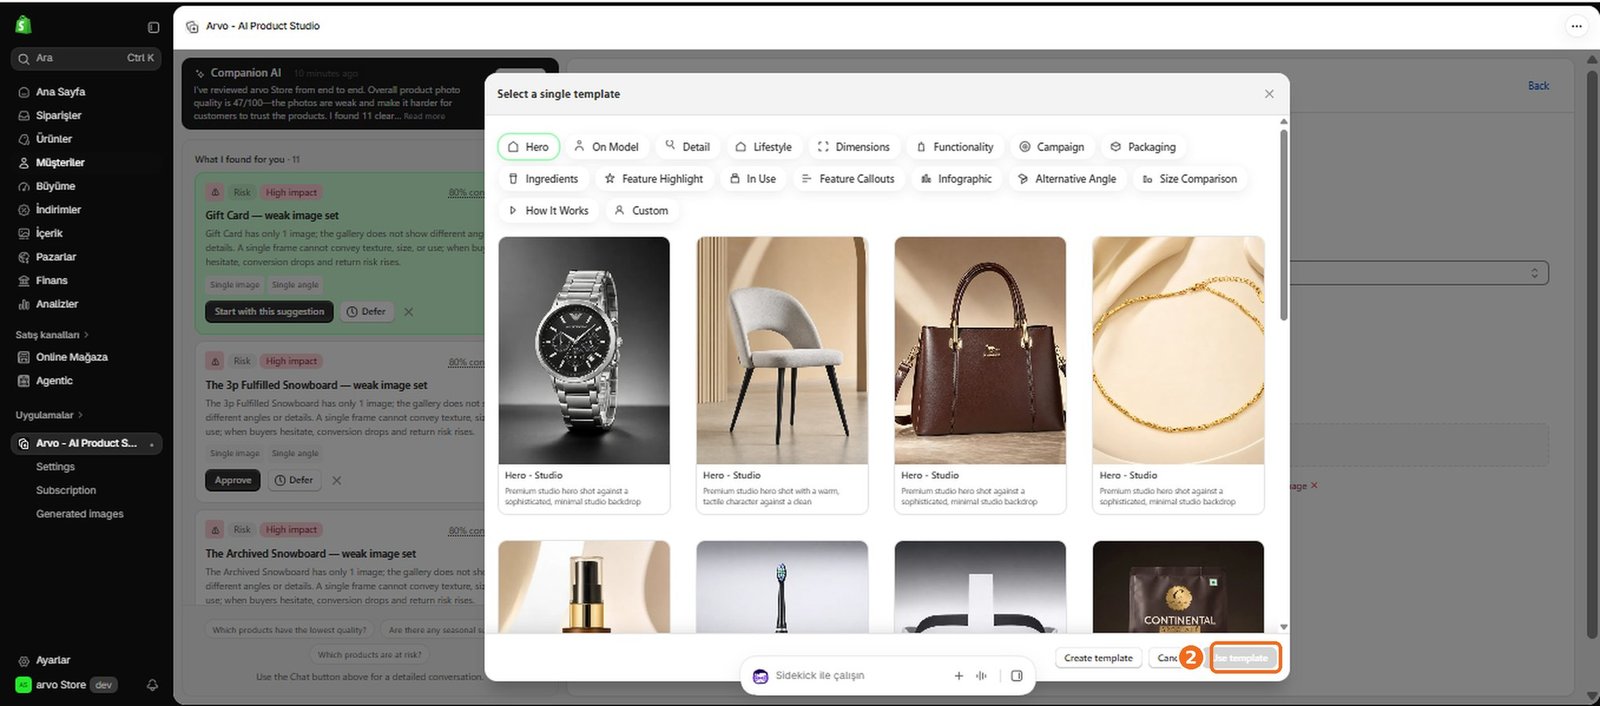
While setting up a generation, browse the available preset templates and choose one that matches your desired image type and purpose.
2
Preview the template where possible, select the Shopify product, and complete any required options before generating.
3
The template guides the result, while your product, reference image, prompt, and other choices can provide additional context.
4
If a template is unavailable or does not fit the selected setup, choose another compatible option.
How do I choose the right template?
1
Start with the image's purpose.
2
Choose a template whose composition and style suit the destination, whether you need a clear product image, a detail-focused visual, a lifestyle scene, or campaign, banner, or social content.
3
Also consider your product's shape, existing brand style, available imagery, and the space needed for visual elements.
4
Preview the expected layout where available, and use a custom template when the presets do not provide the direction you need.
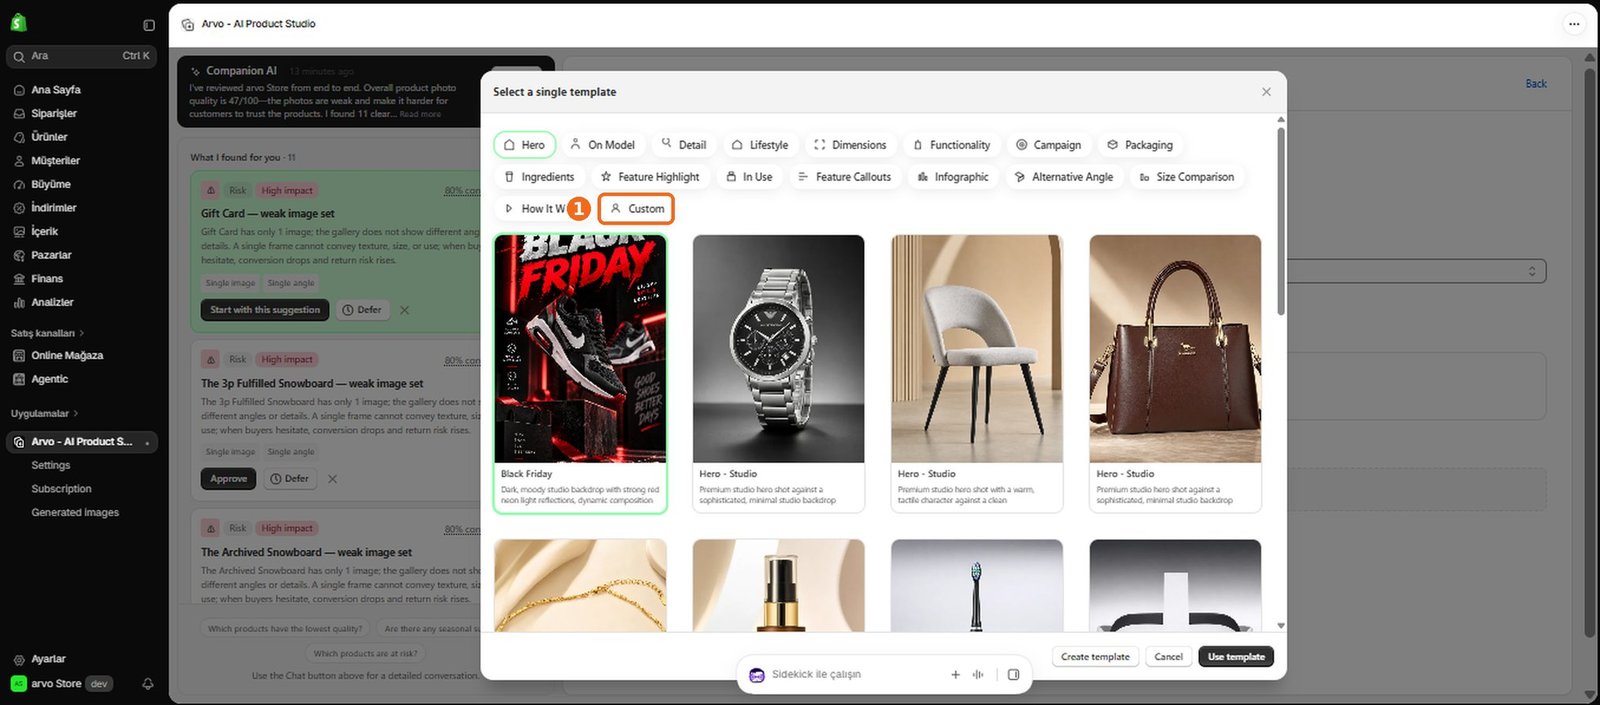
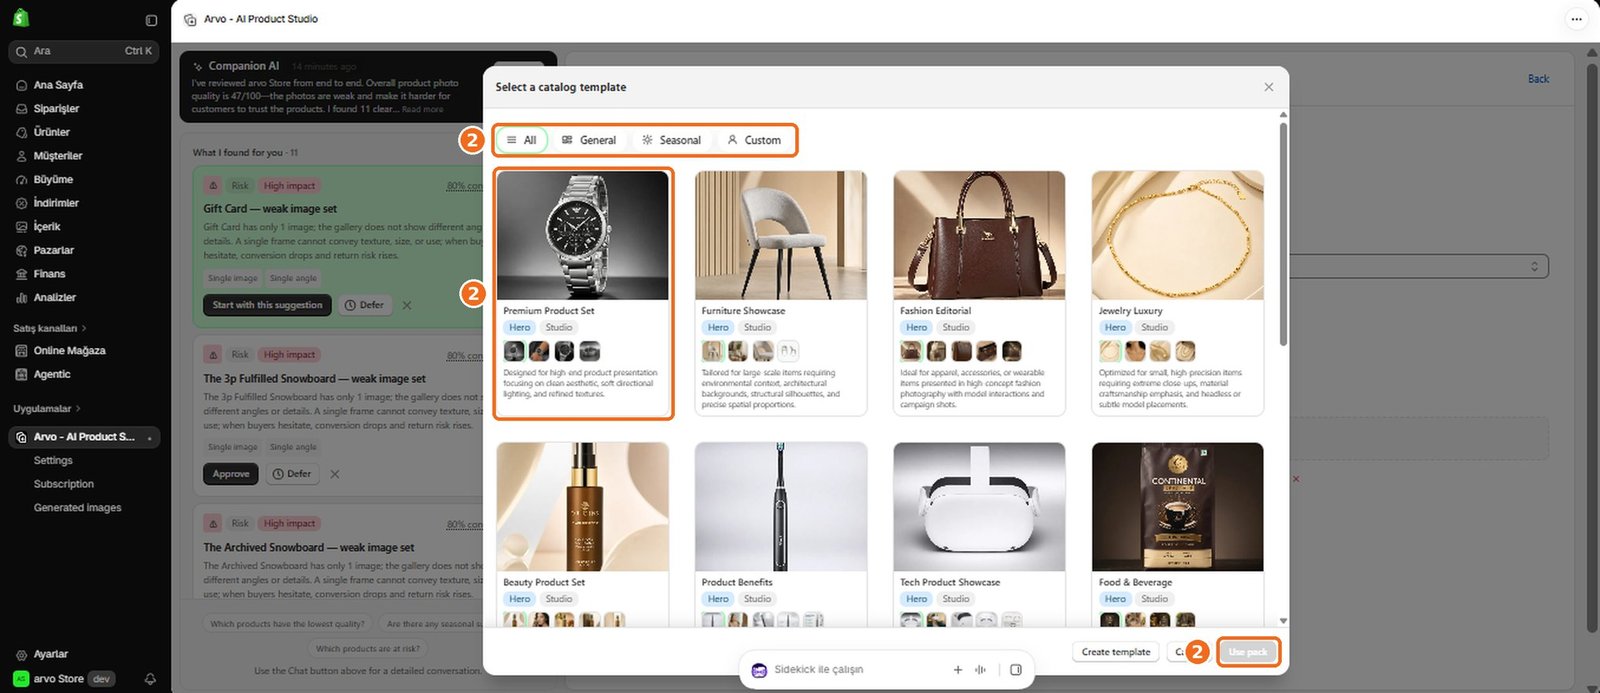
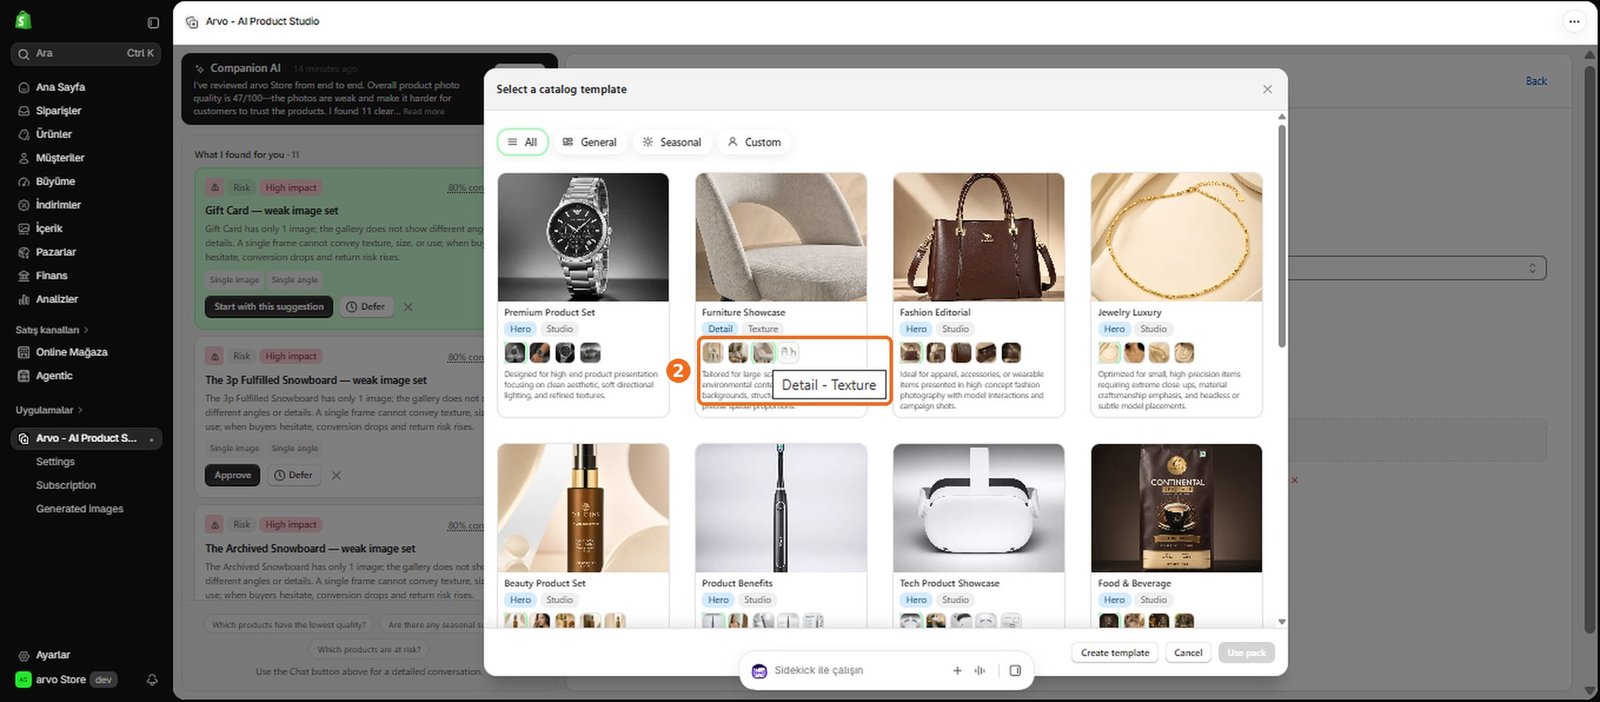
What template categories are available?
Templates may be organized by the kind of visual they are intended to create, helping you find options for product presentation, lifestyle use, or promotional content. Choose a category that matches your generation goal, then compare the templates within it.
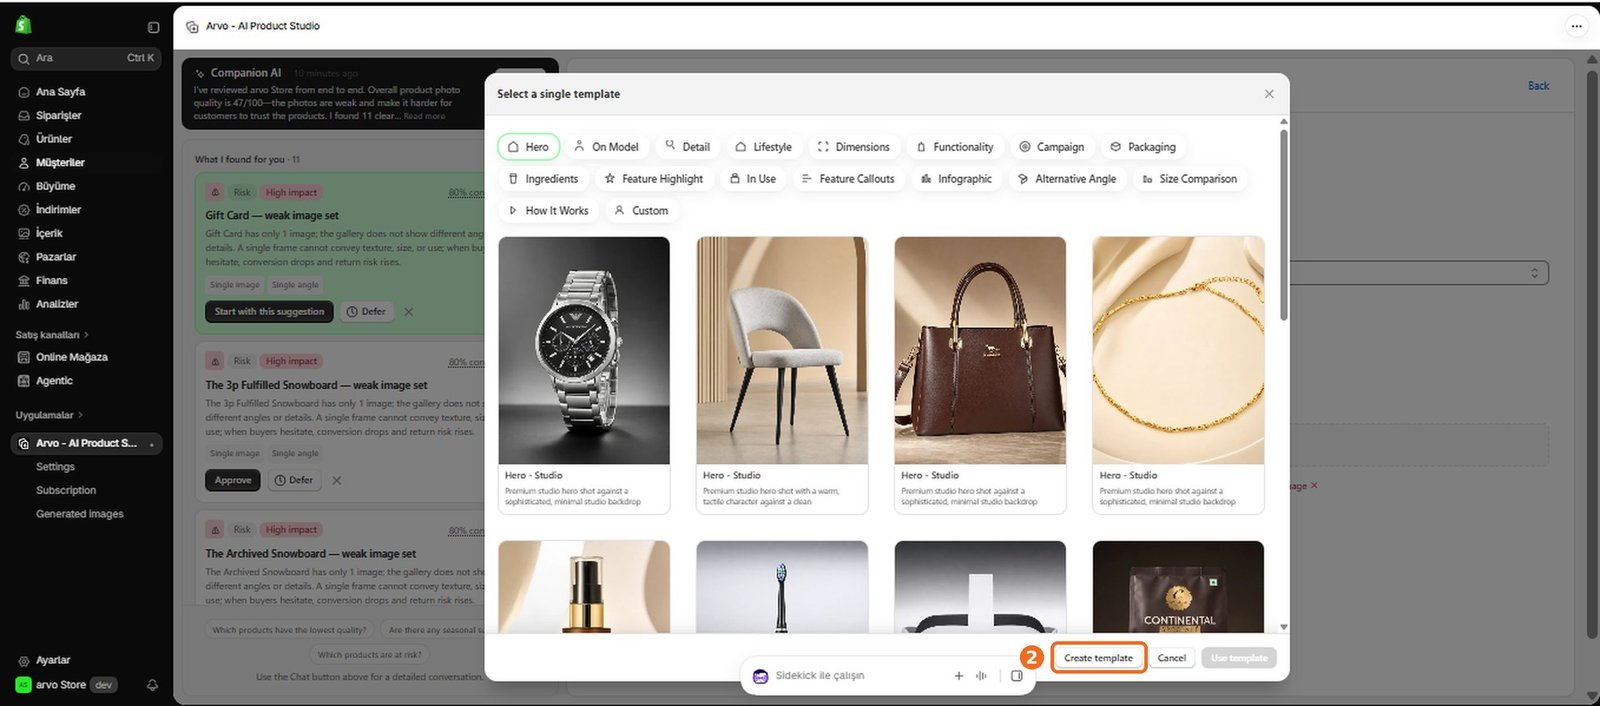
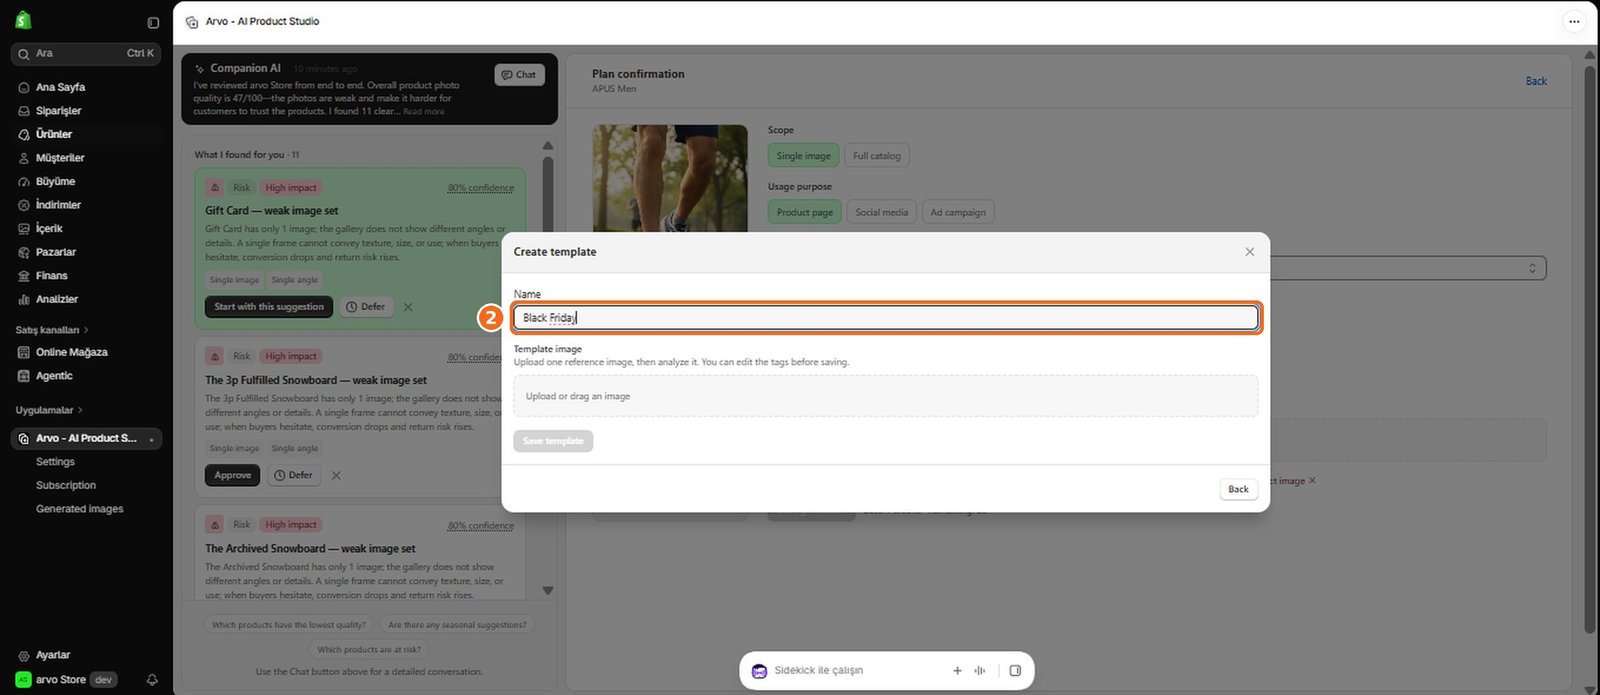
How do I create a custom template?
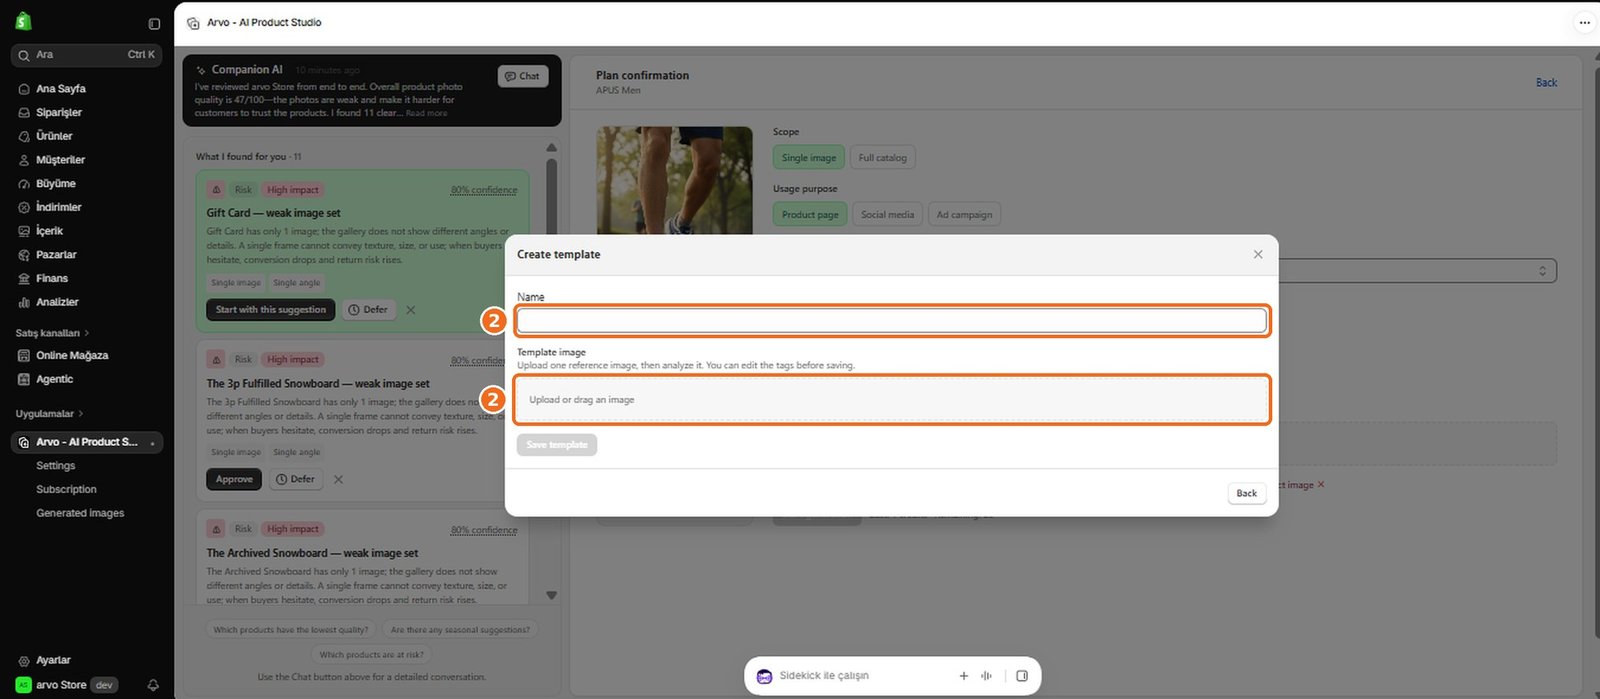
1
Create a custom template when you want a reusable visual direction that is not covered by a preset.
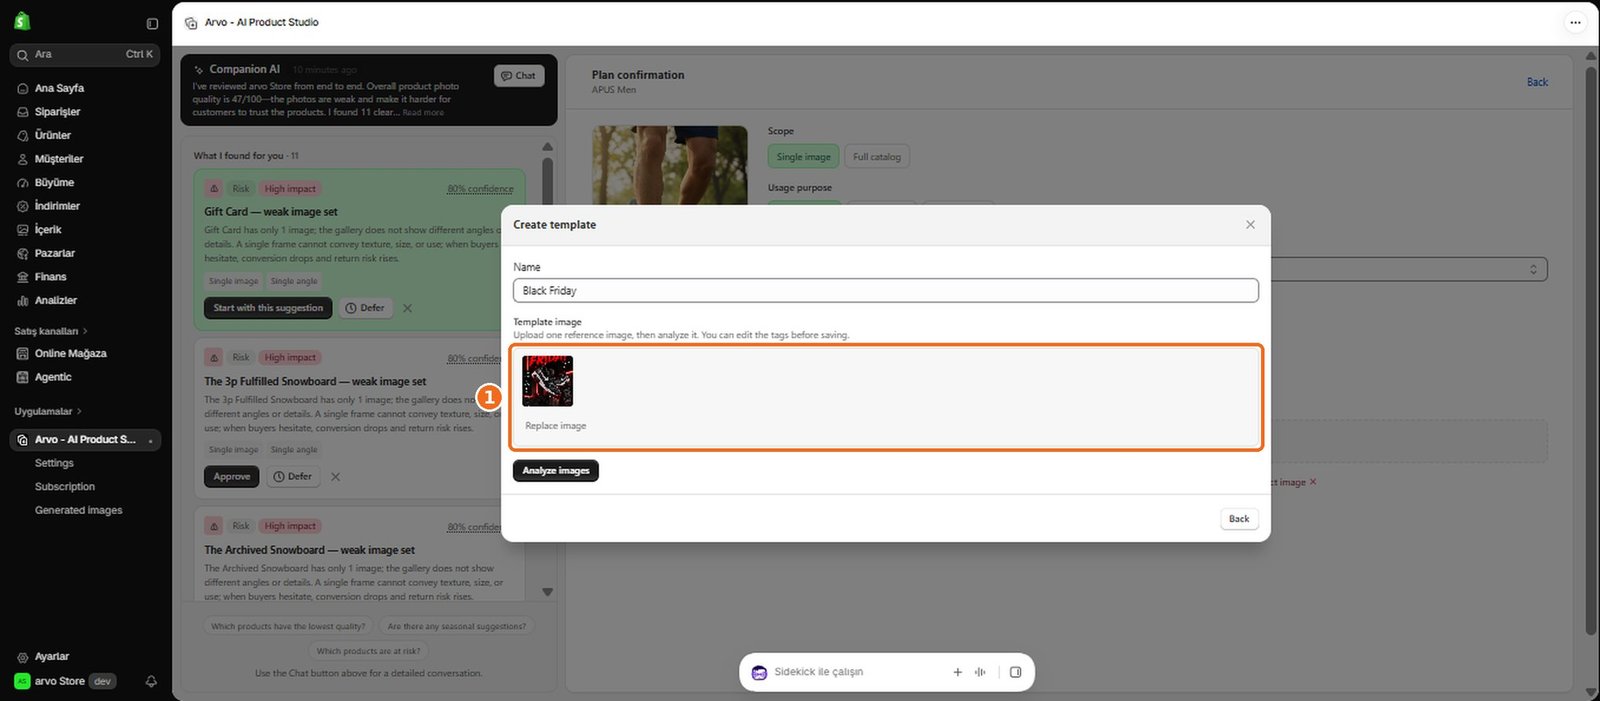
2
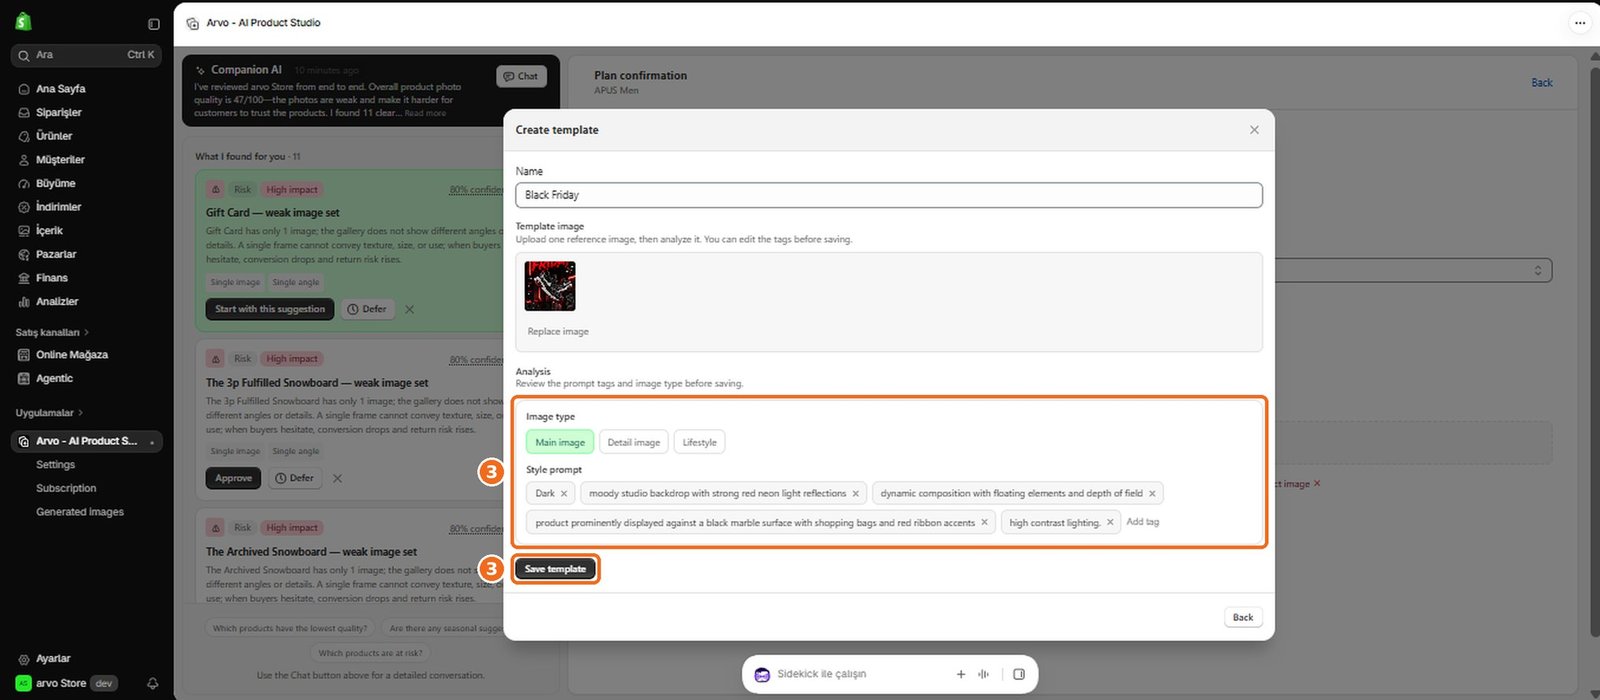
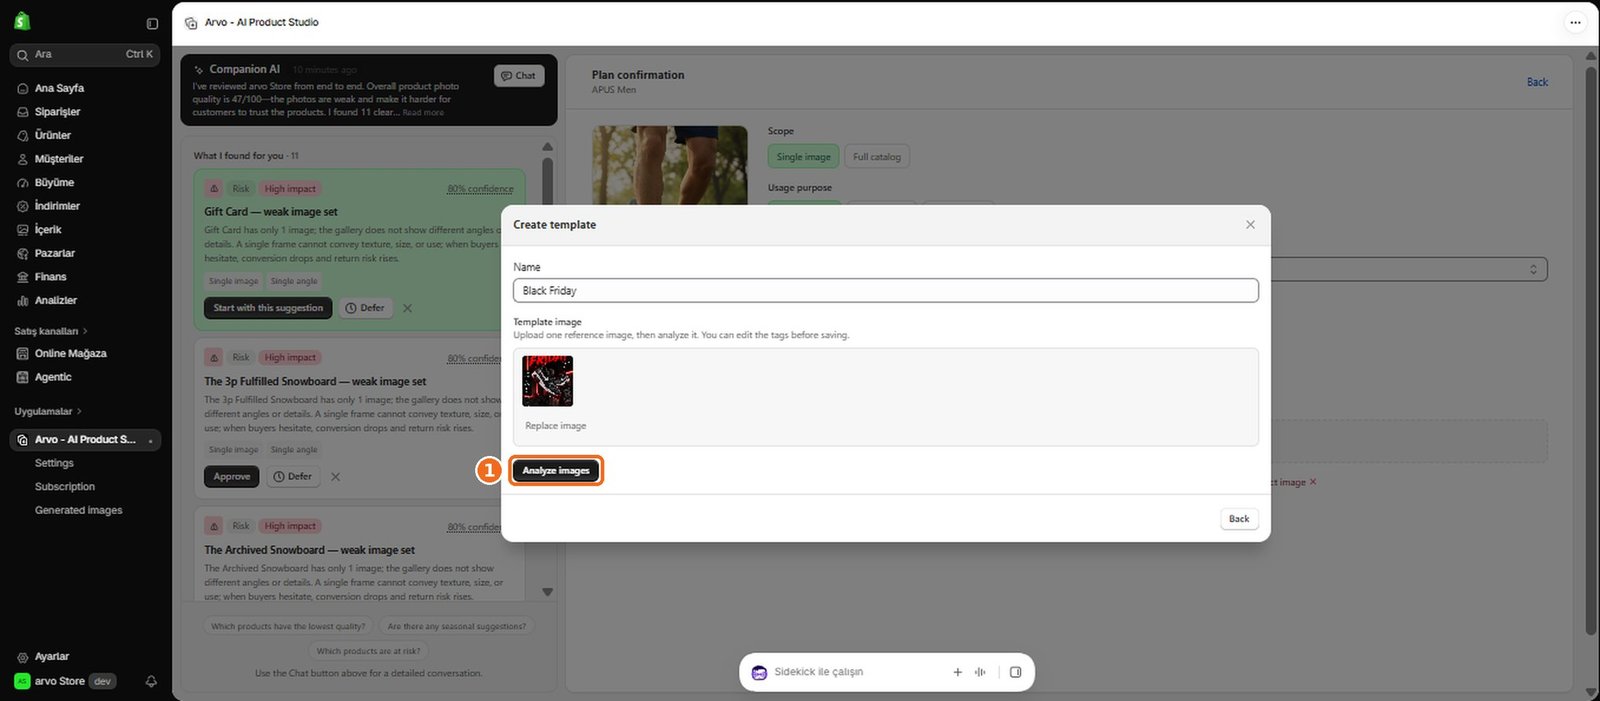
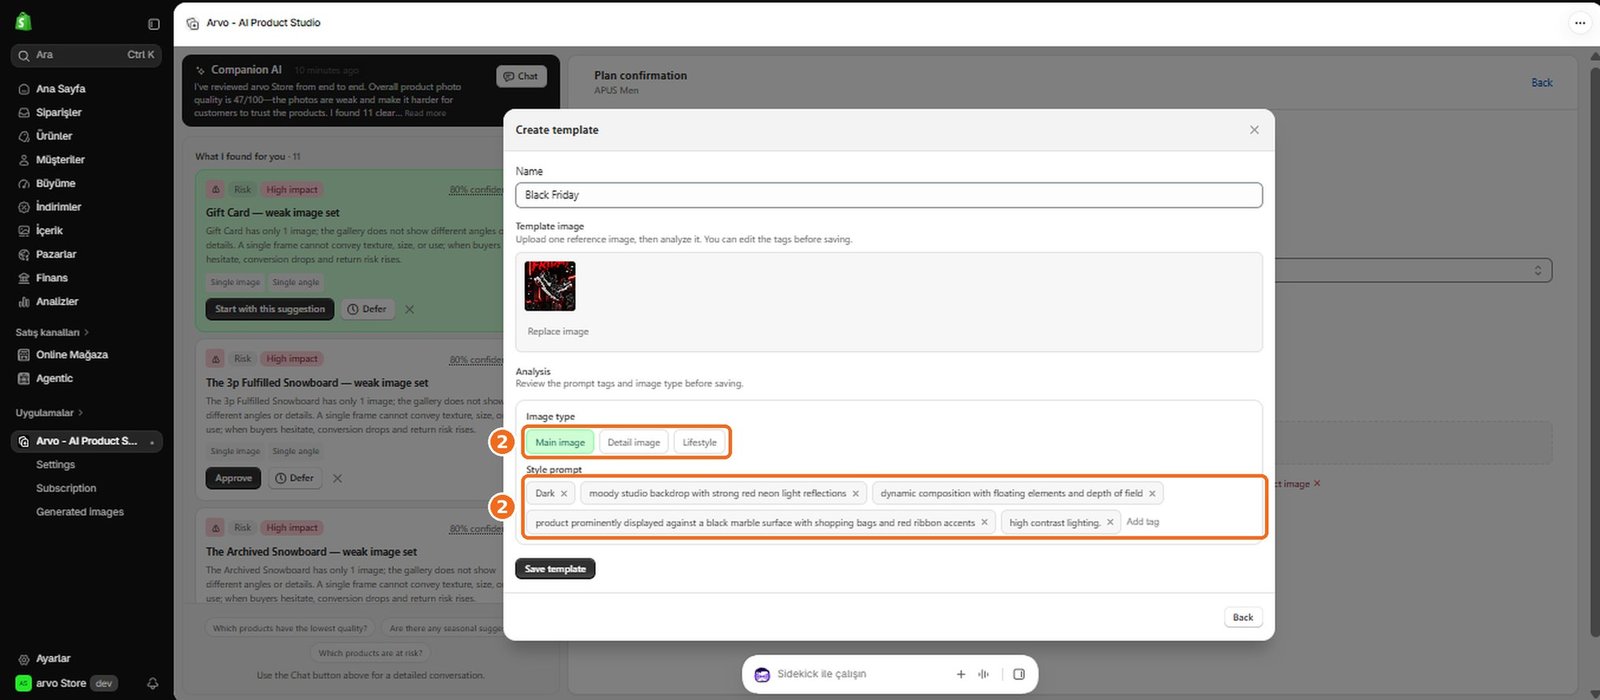
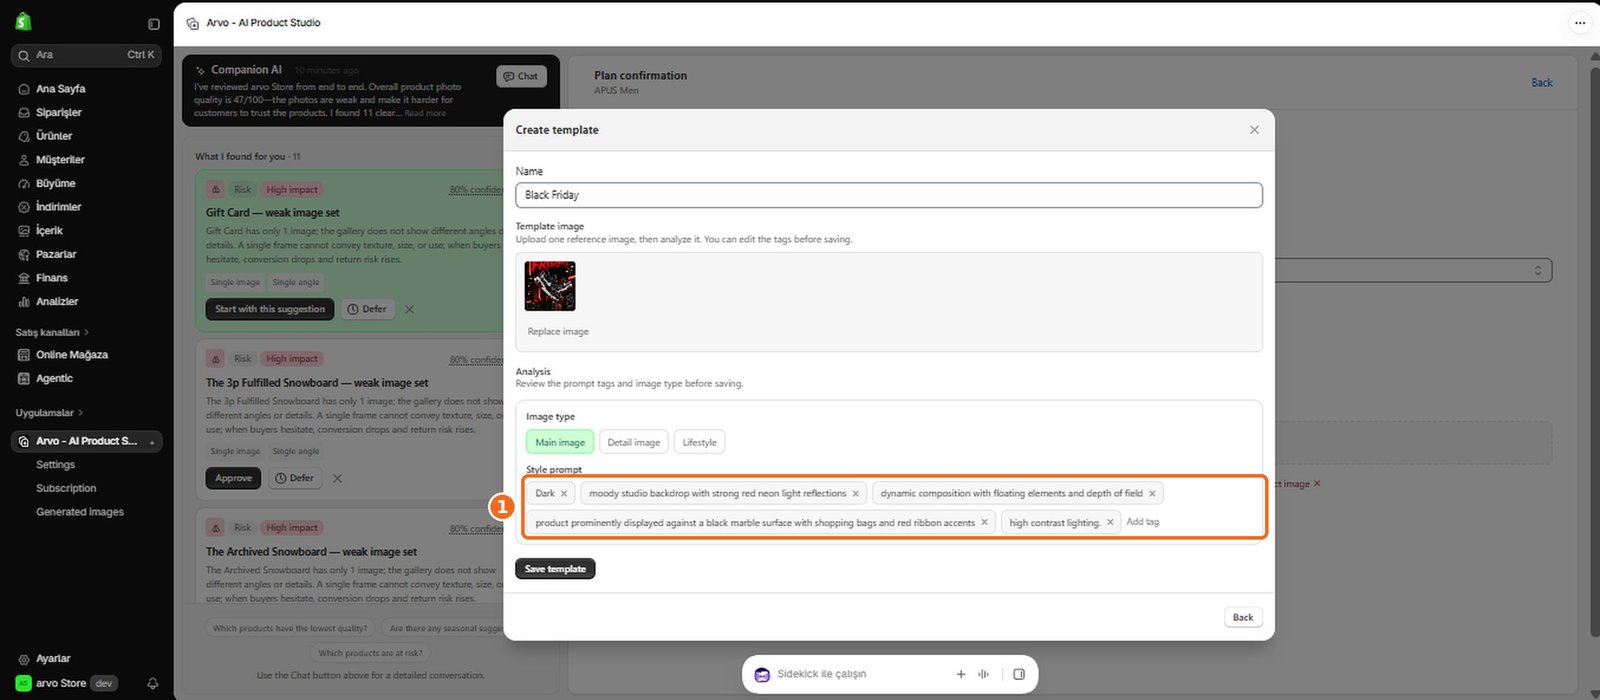
Begin from the template area, provide the visual references or guidance needed to describe the layout and style, and review the analyzed result before saving it.
3
Make sure the template is clear enough to work with future products and that any required areas are configured.
4
If analysis fails or required information is missing, revise the source material and try again.
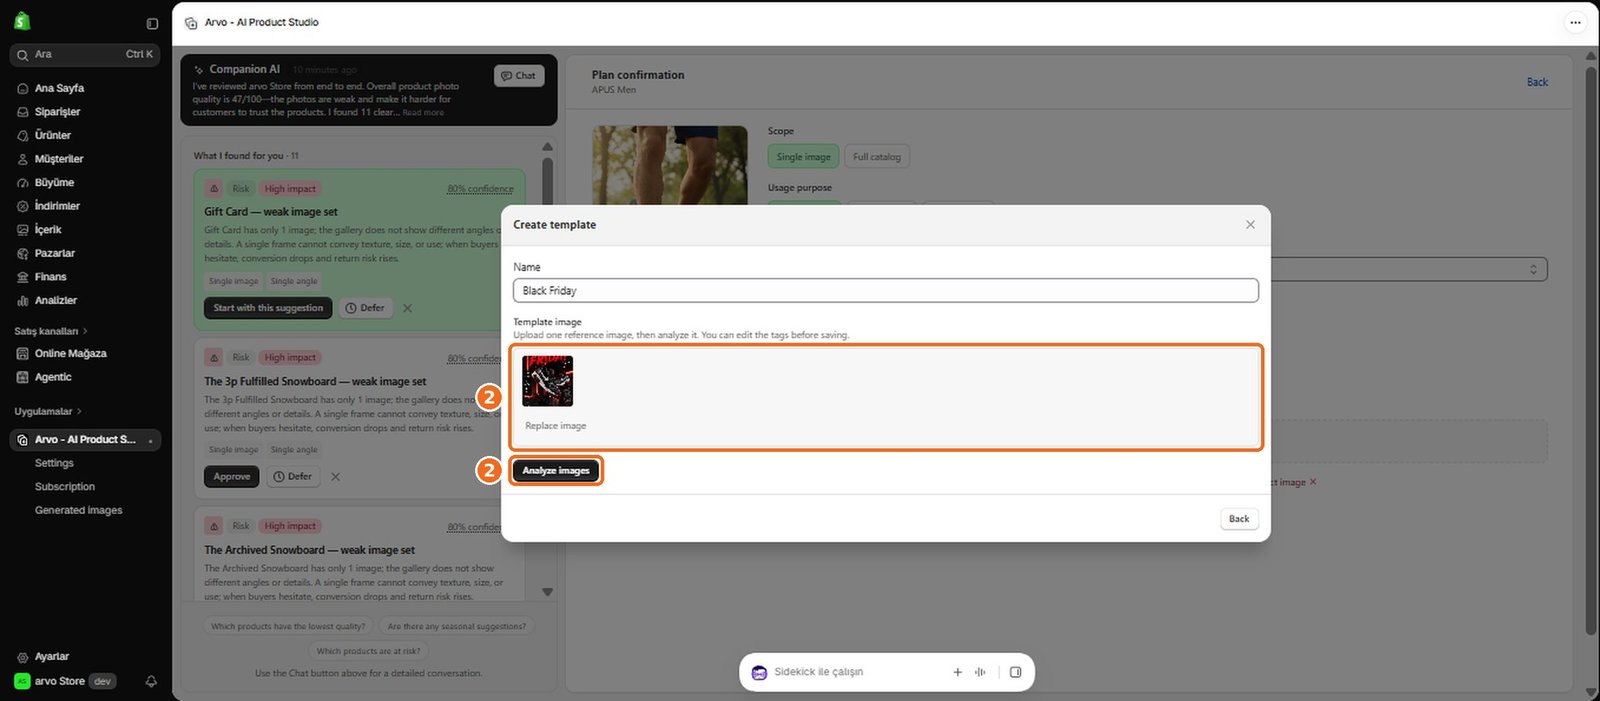
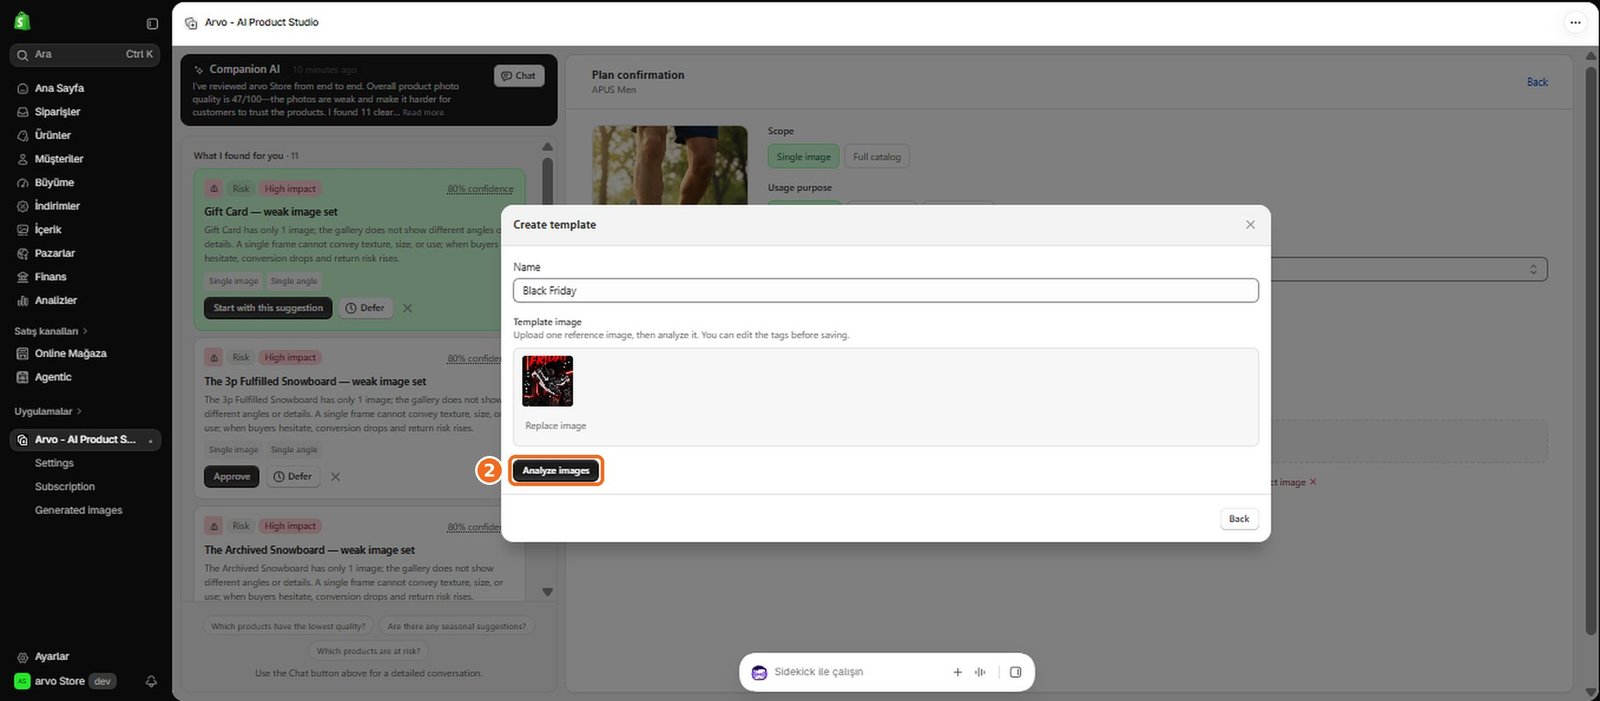
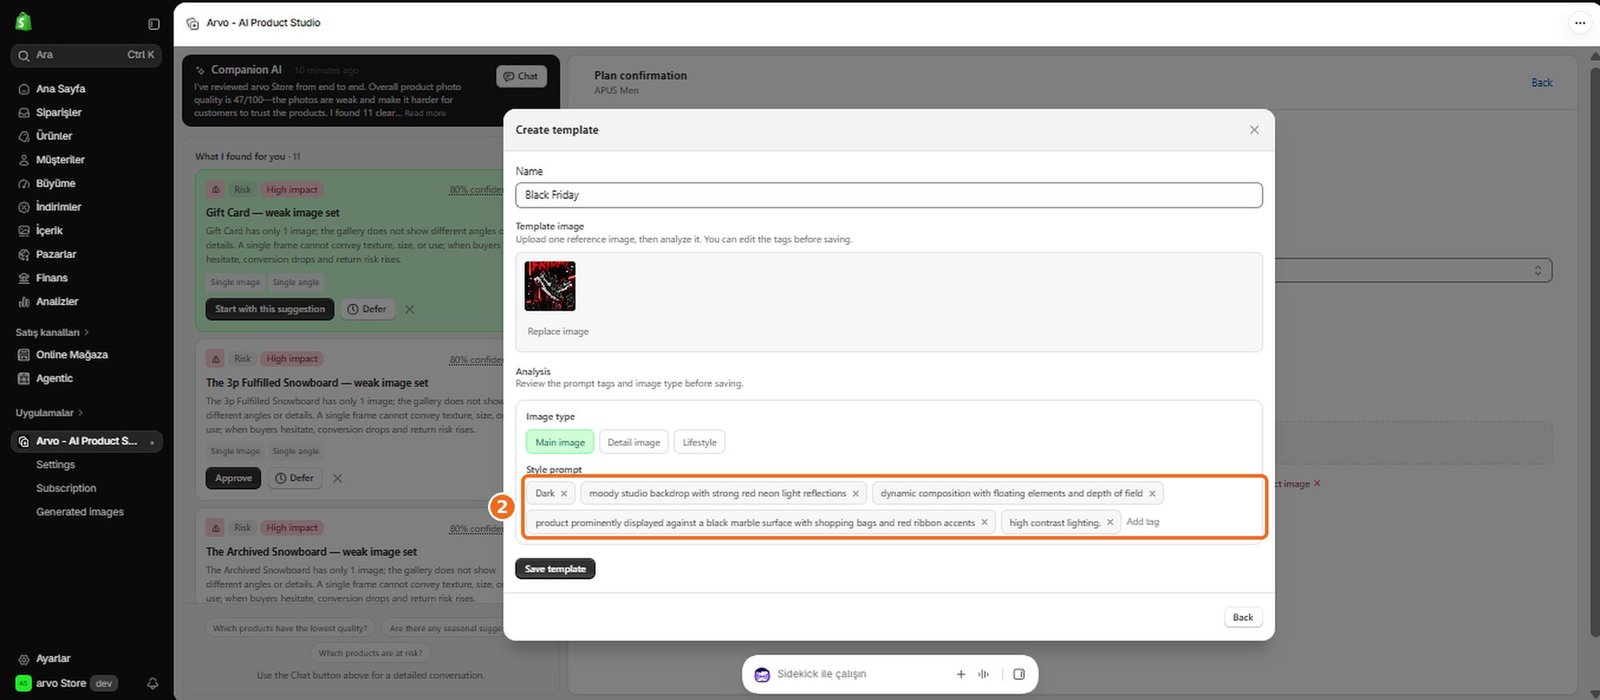
How does AI analyze a template?
1
Arvo AI examines the template's visual structure and creative cues so they can guide future image generation.
2
This may include understanding the composition, placement areas, setting, and overall style while allowing the selected product to be incorporated into a new result.
3
Review the analysis before saving or using the template, because unclear or unsuitable source material may produce an inaccurate interpretation.
How do I edit a custom template?
1
Open the custom template you want to update and change the available creative guidance, reference material, or configured areas.
2
Review the updated template before saving so it remains suitable for the products and visual purposes you intend to use.
3
If the template is already being used in a generation, changes may not affect that existing request.
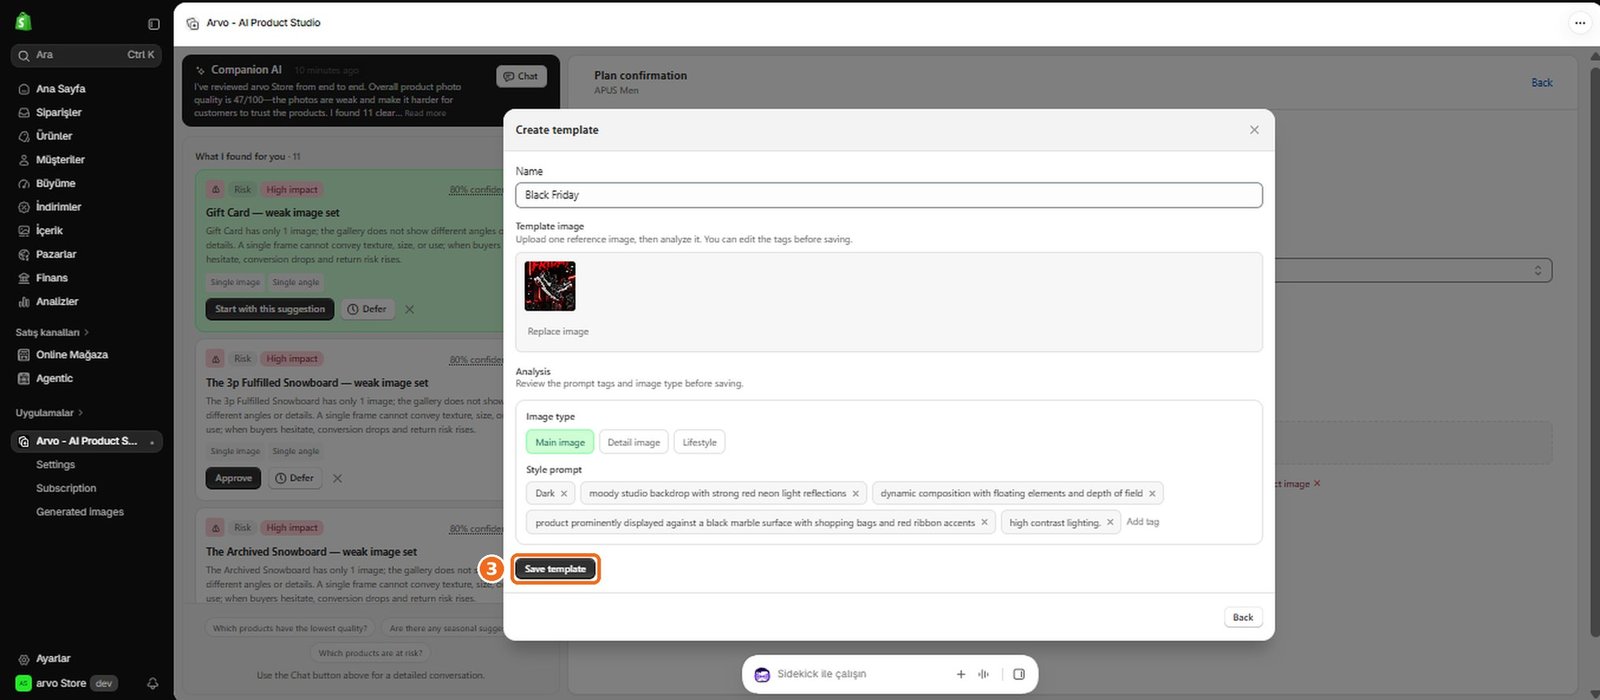
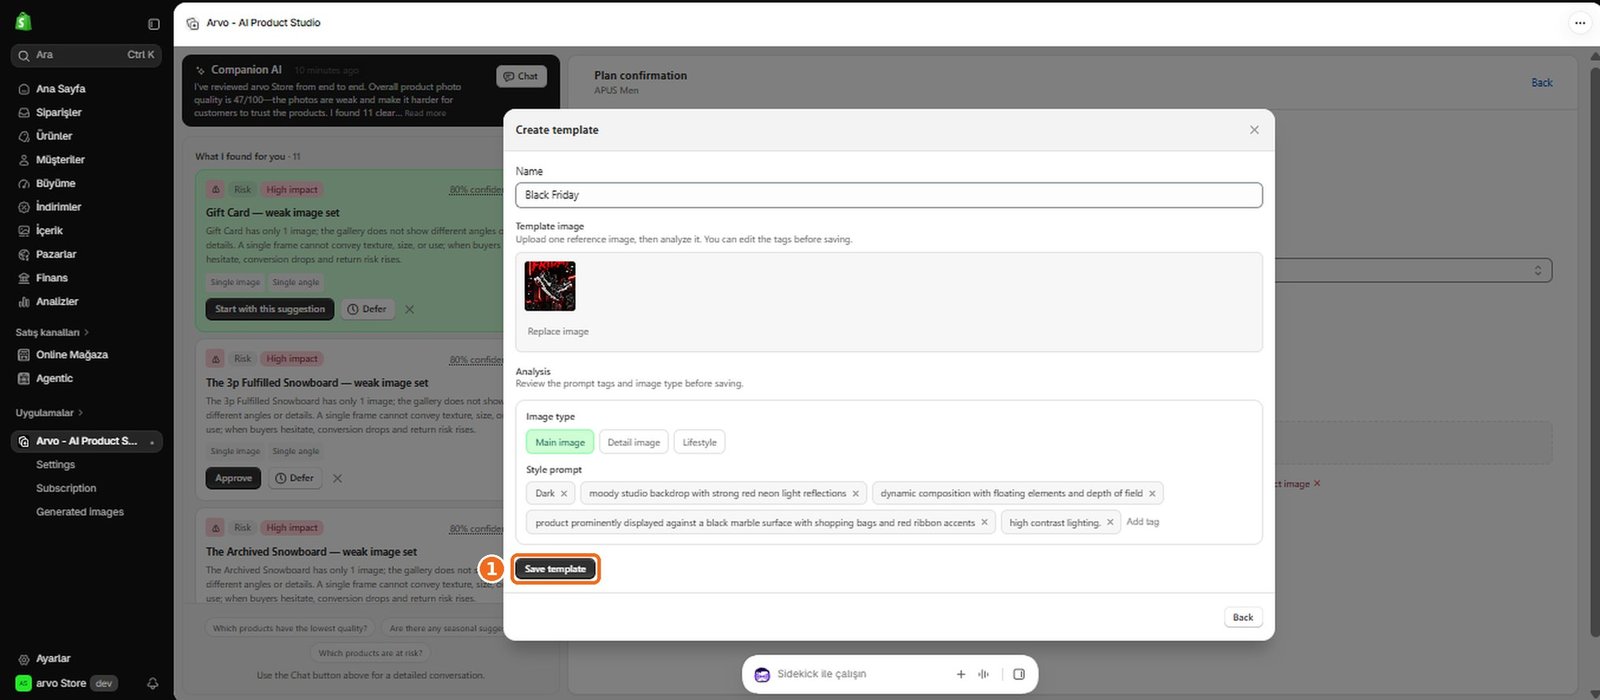
How do I save a custom template?
1
After creating or editing a custom template, review its visual guidance and required configuration, then use the available save action.
2
A successfully saved template should become available for later image generations.
3
If it cannot be saved, check for missing required information or an incomplete analysis and try again.
How do I manage my templates?
1
Use the template area to review your saved custom templates and the templates available for generation.
2
Open a template to inspect it and use the available management options when you need to update or organize your reusable creative directions.
3
Be careful when changing a template that supports an active workflow.
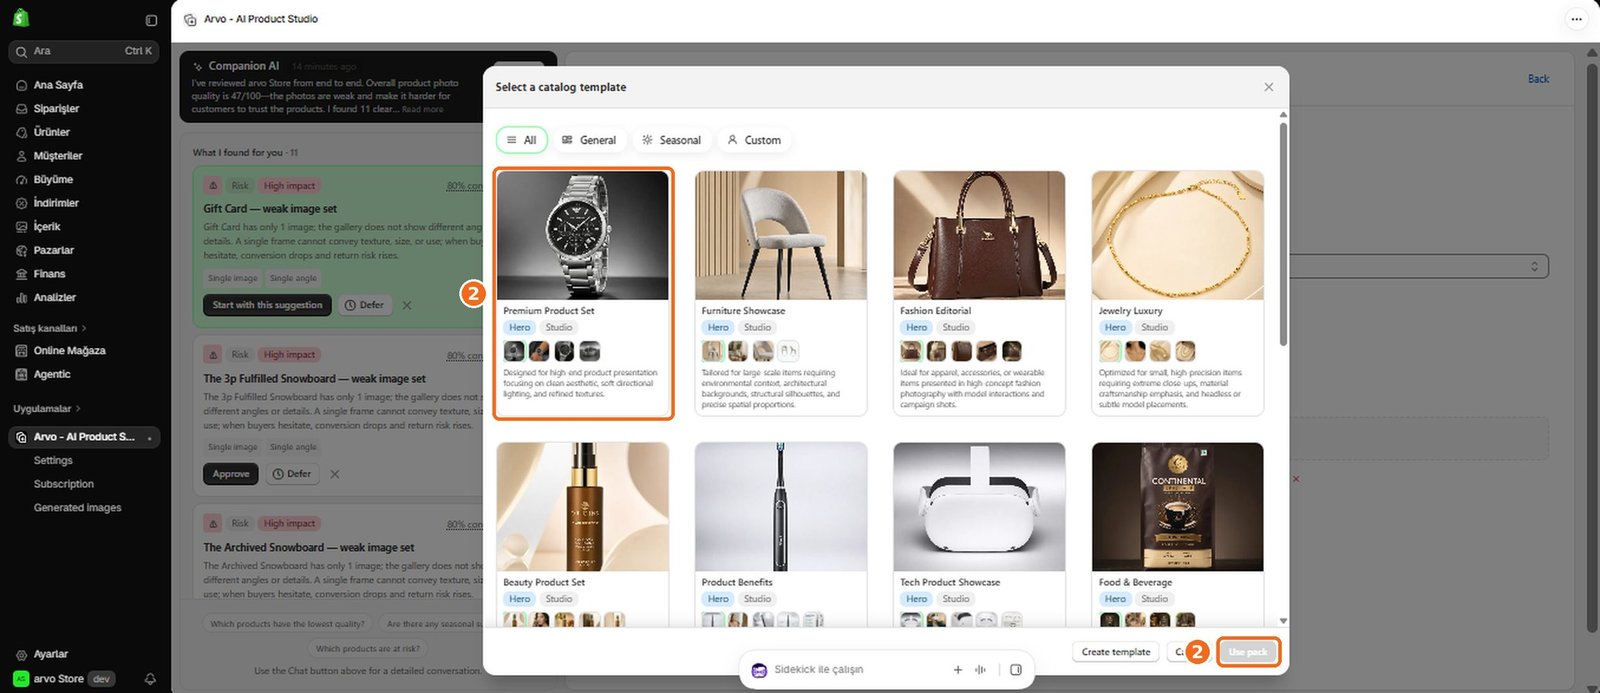
How do I use a catalog template?
1
Choose a catalog template when you want a consistent visual approach across multiple products.
2
Select the template as part of the catalog generation flow, choose the relevant Shopify products, and review how each product will fit the shared creative direction before starting.
3
The completed images should follow a coordinated structure while adapting to each product.
4
Products with missing or unsuitable source information may need attention before generation.
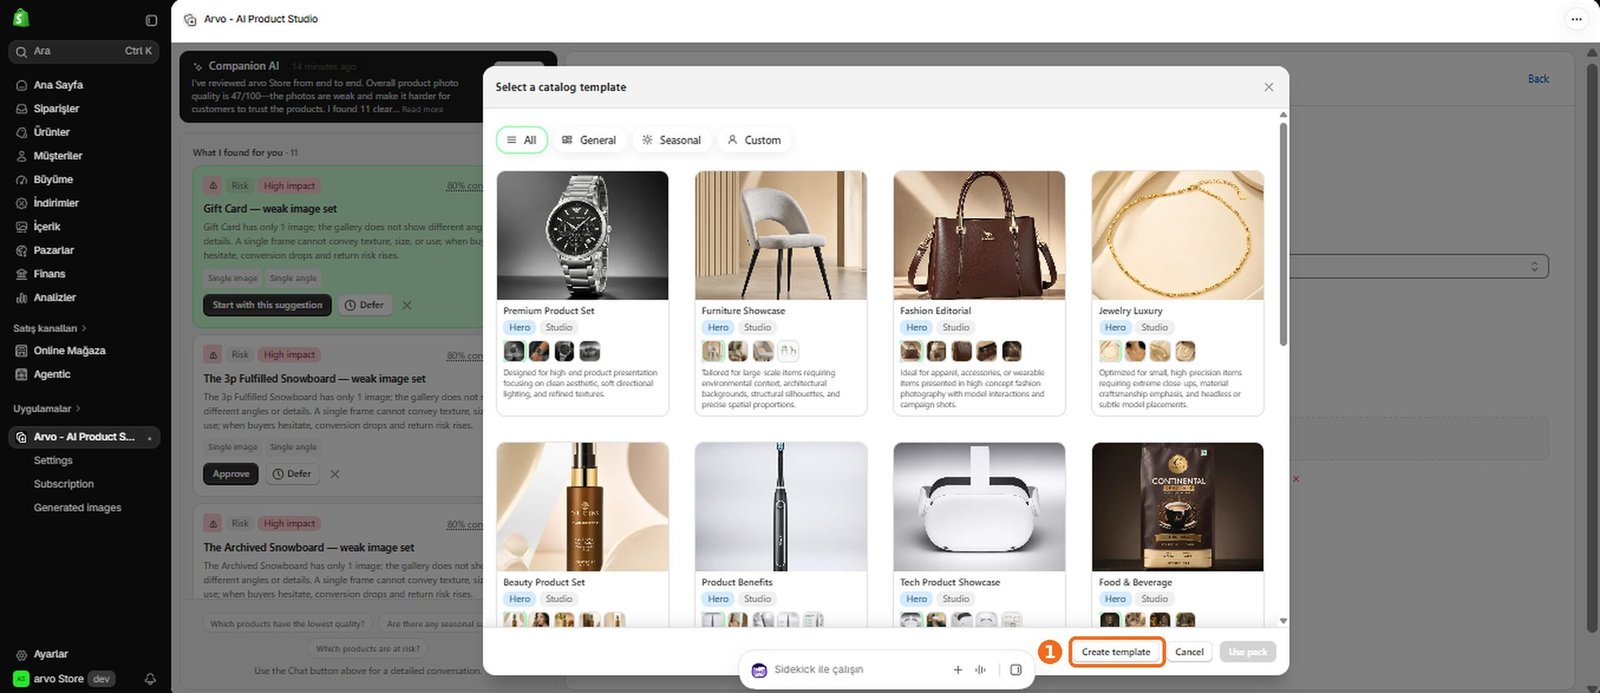
How do I create a catalog template?
1
Create a catalog template by defining a reusable visual direction intended for a group of products.
2
Provide the needed creative guidance or references, configure the areas where products should appear, and review the template before saving it for catalog use.
3
The template should be flexible enough to accommodate the selected products while keeping the catalog visually consistent.
How do I add reference images to a template?
1
Add reference images while creating or editing a template to communicate the composition, setting, or style you want it to follow.
2
Choose clear examples that support one consistent creative direction, then allow Arvo AI to analyze them and review the resulting template guidance.
3
If a reference cannot be added or analyzed, replace it with another suitable image.
How do template slots work?
Template slots represent areas in a template that are intended for products, images, or other visual content. They help Arvo AI understand where content belongs while preserving the template's overall composition.
When configuring a template, make sure each required slot has a clear role and can accommodate the intended product.
How do I use my custom template for future generations?
1
Save the completed custom template so it is available in later generation workflows.
2
When creating another visual, choose the saved template, select the Shopify product, and complete any additional options before starting generation.
3
Review the template each time to make sure it still suits the product and intended placement.
4
If it is unavailable or incompatible with the current setup, update it or choose another template.
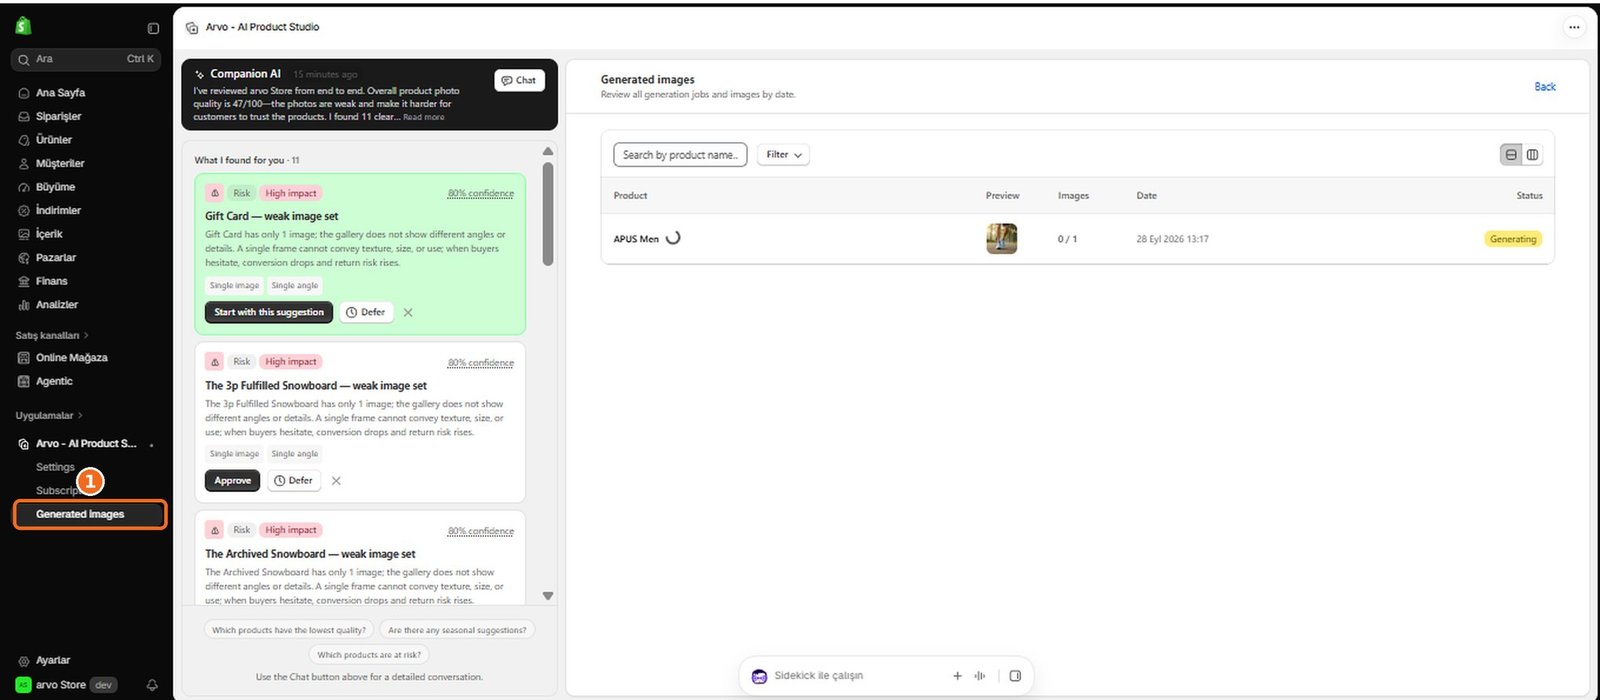
Where can I find my generated images?
1
Generated images are stored in the Gallery.
2
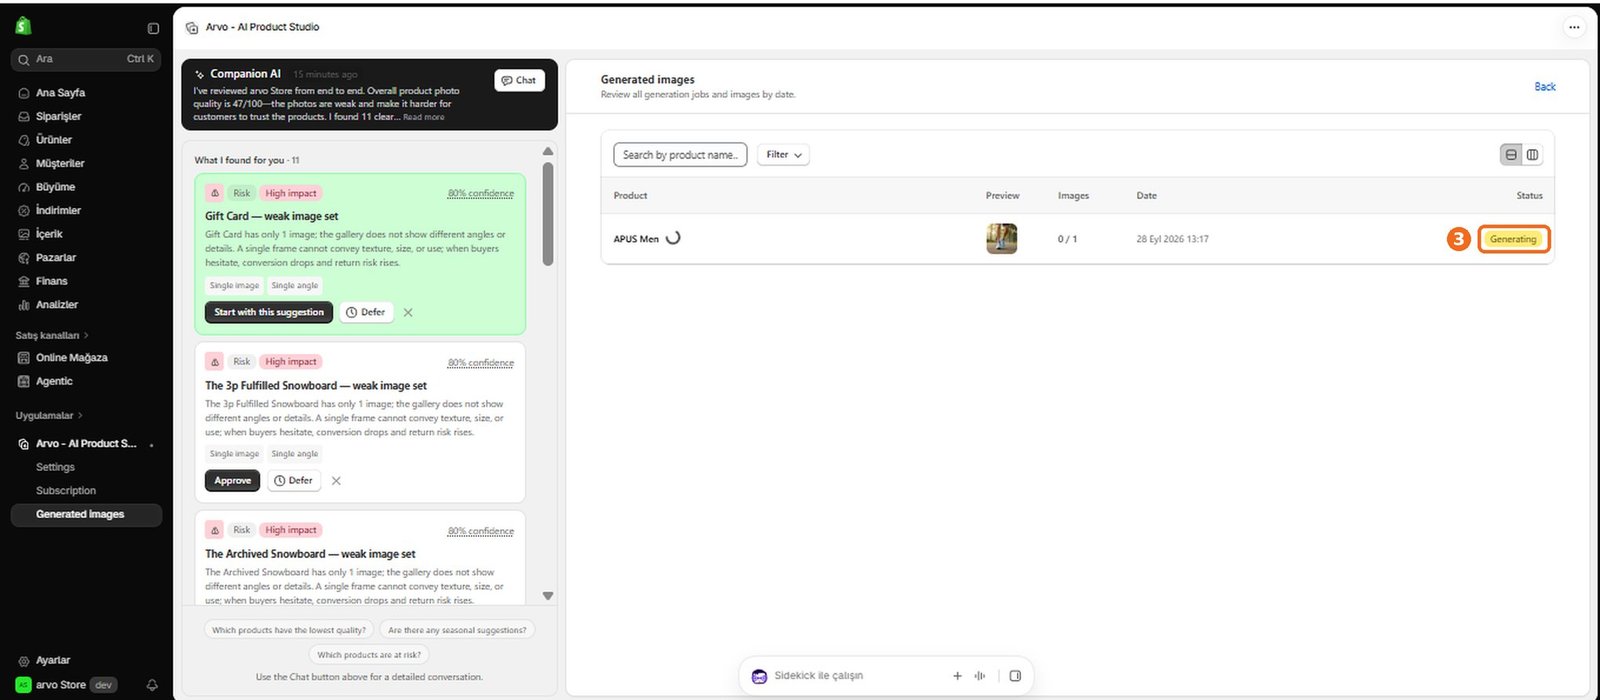
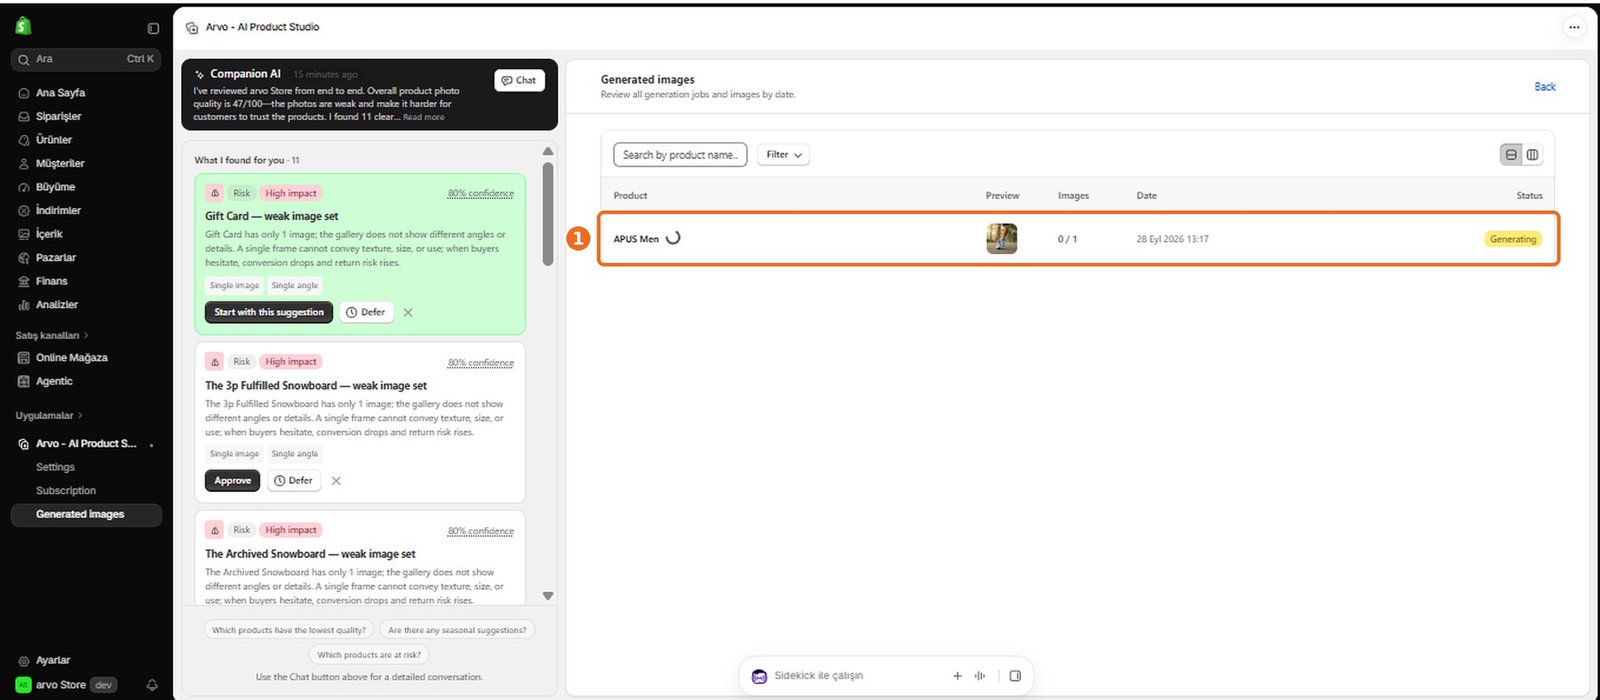
Use it to return to completed visuals, review generation status, and continue working with results after leaving the original generation flow.
3
If an expected image is not visible, check whether its generation is still processing or failed, and confirm that you are viewing the correct store or account context.
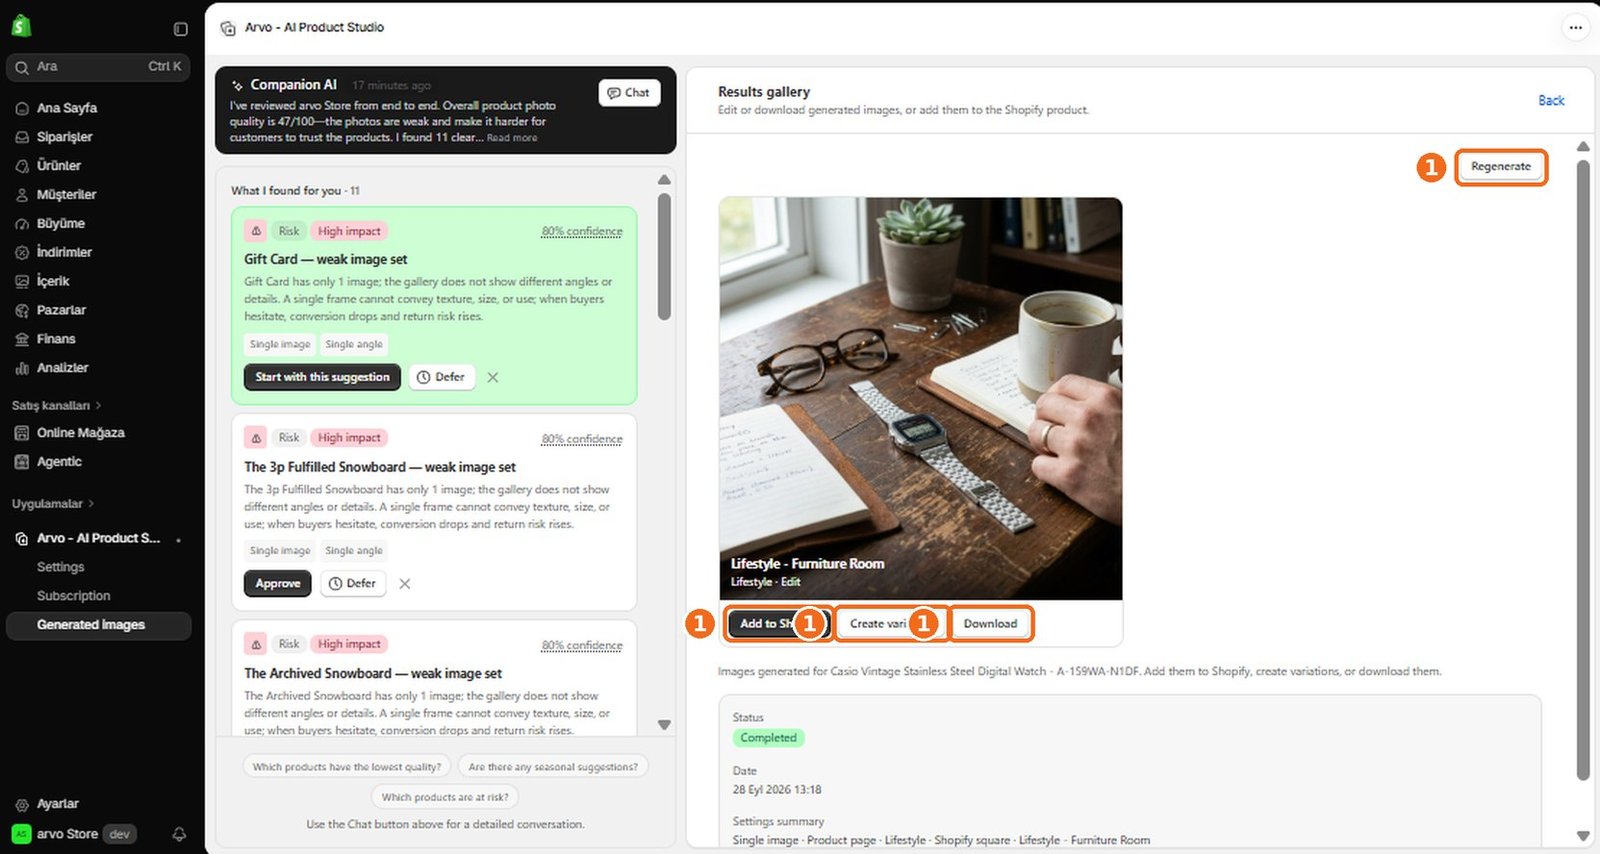
How do I use the Results Gallery?
1
The Results Gallery is the central place for viewing and managing generated visuals.
2
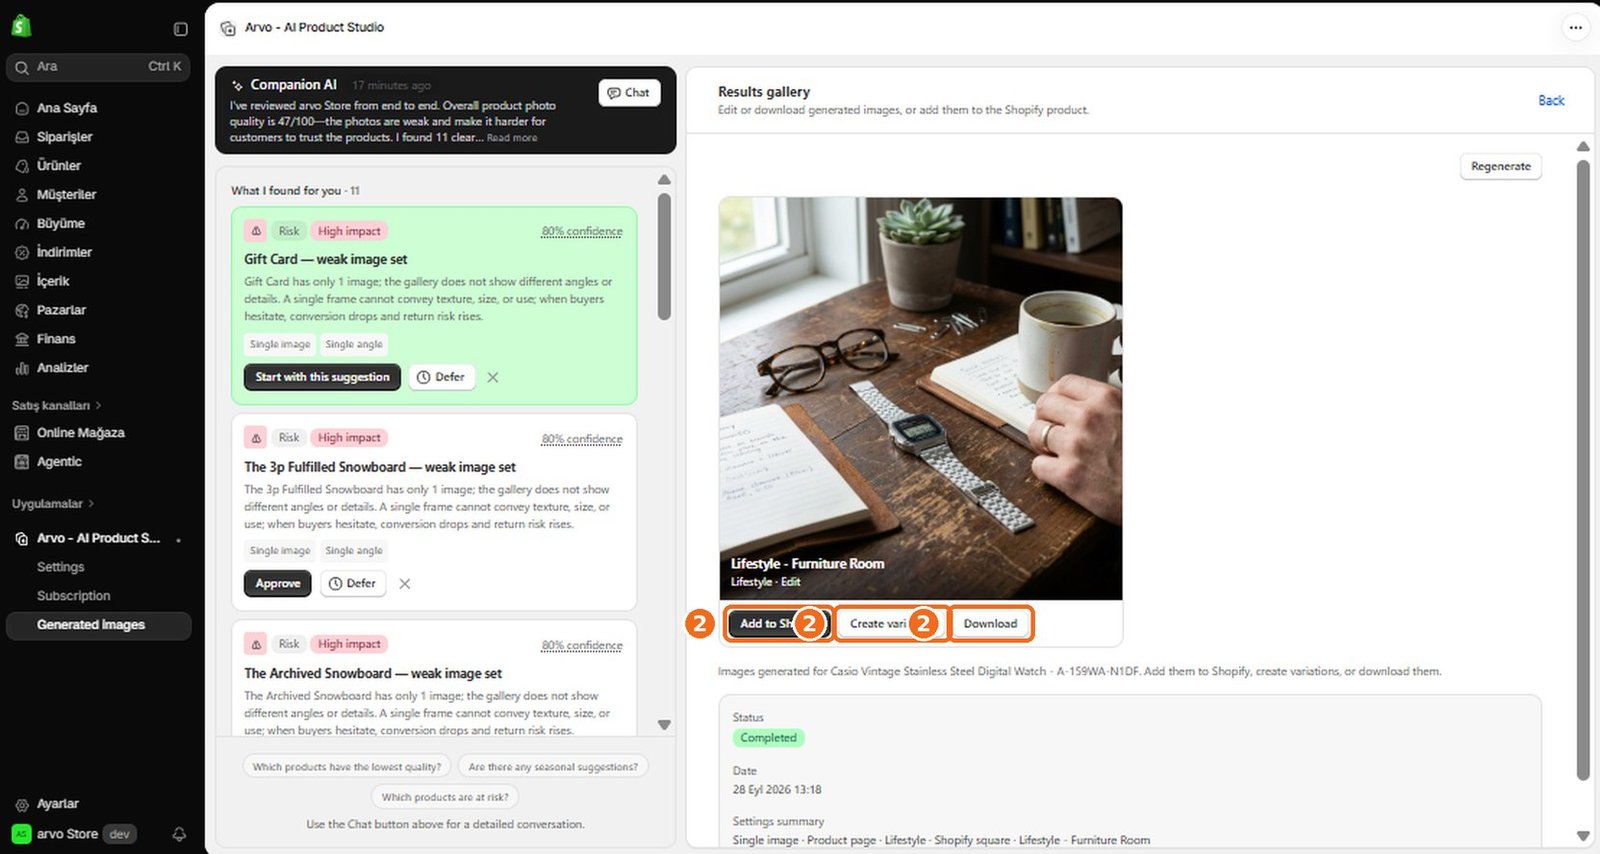
Open a result to preview it and use the available actions to download it, create another version, or add it to Shopify.
3
Results may include different processing states, so check an item's status before acting on it.
4
If a result failed or is incomplete, review the available error information and try the generation again when appropriate.
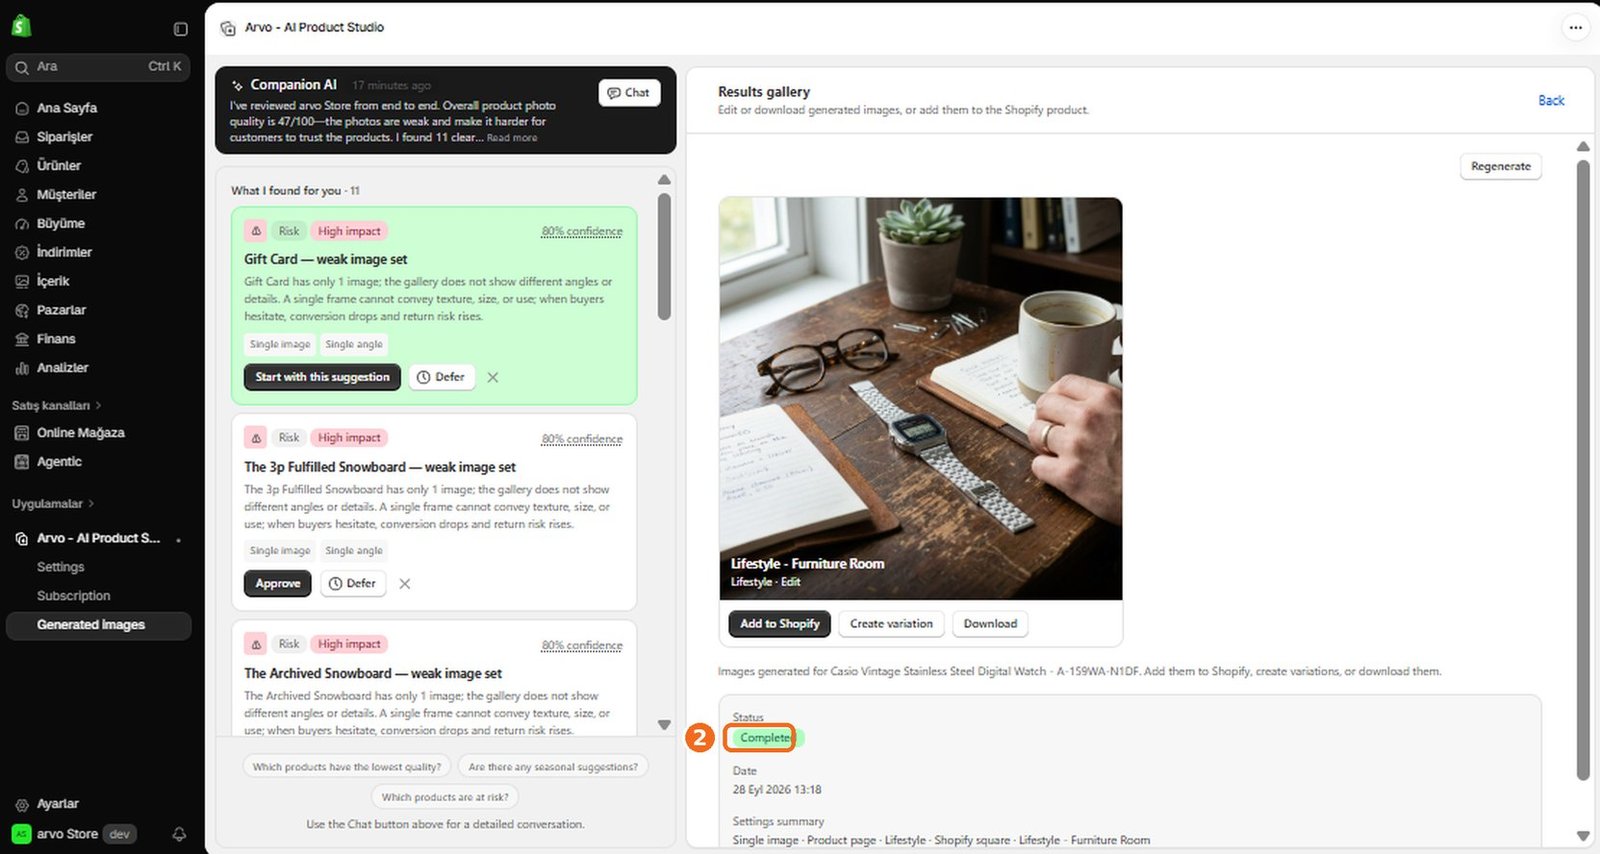
How do I preview a generated image?
1
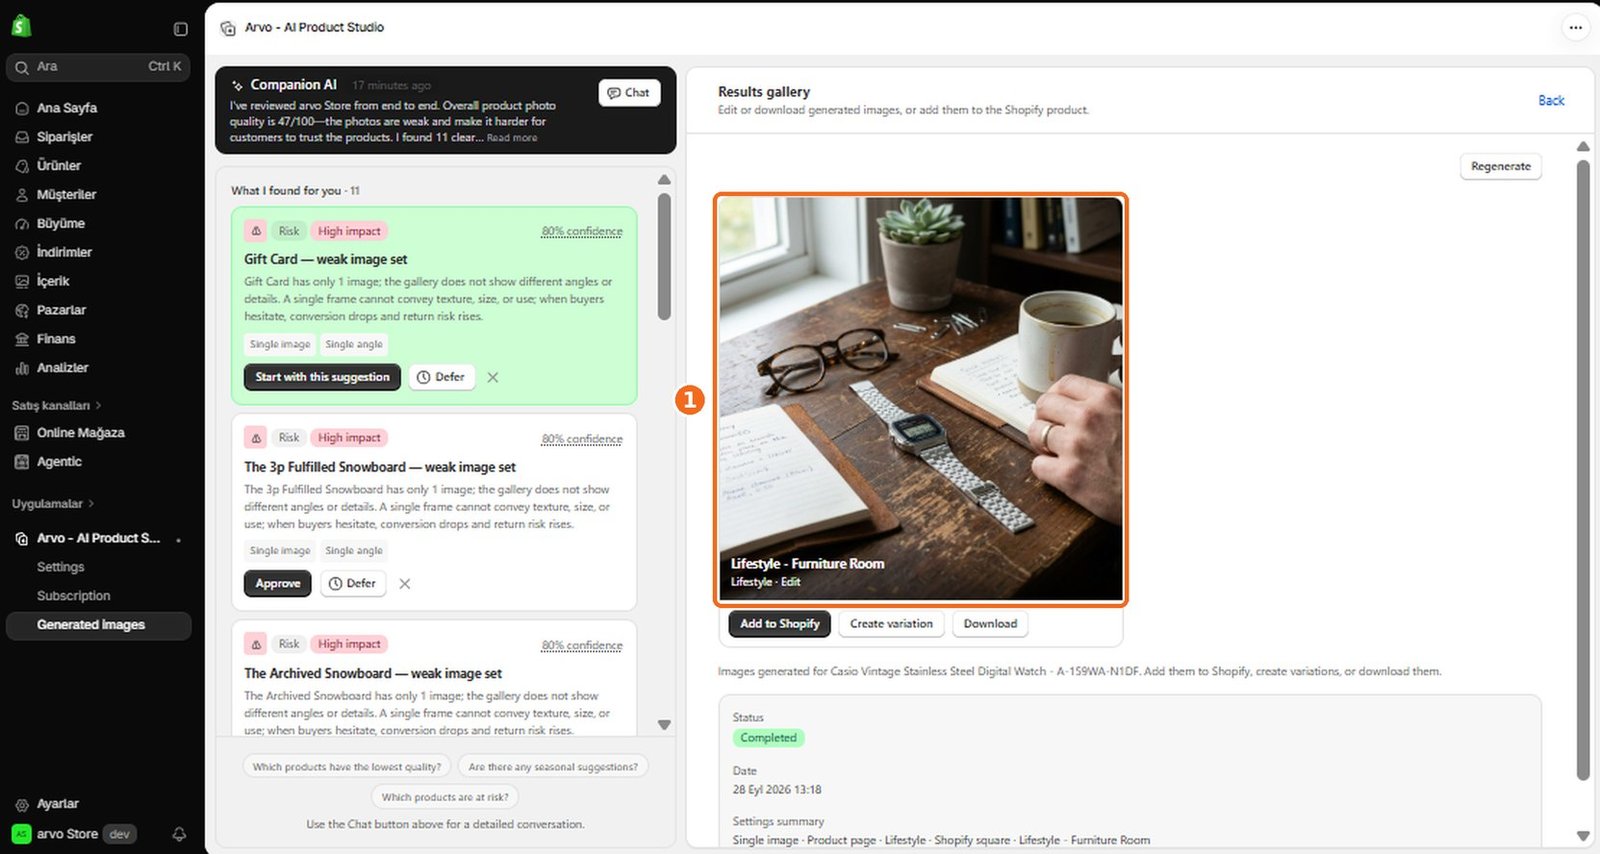
Open a completed result in the Gallery to view a larger preview.
2
Inspect the product appearance, composition, details, and suitability for its intended placement before downloading it or adding it to Shopify.
3
If the preview does not load, confirm that generation has completed and try opening the result again.
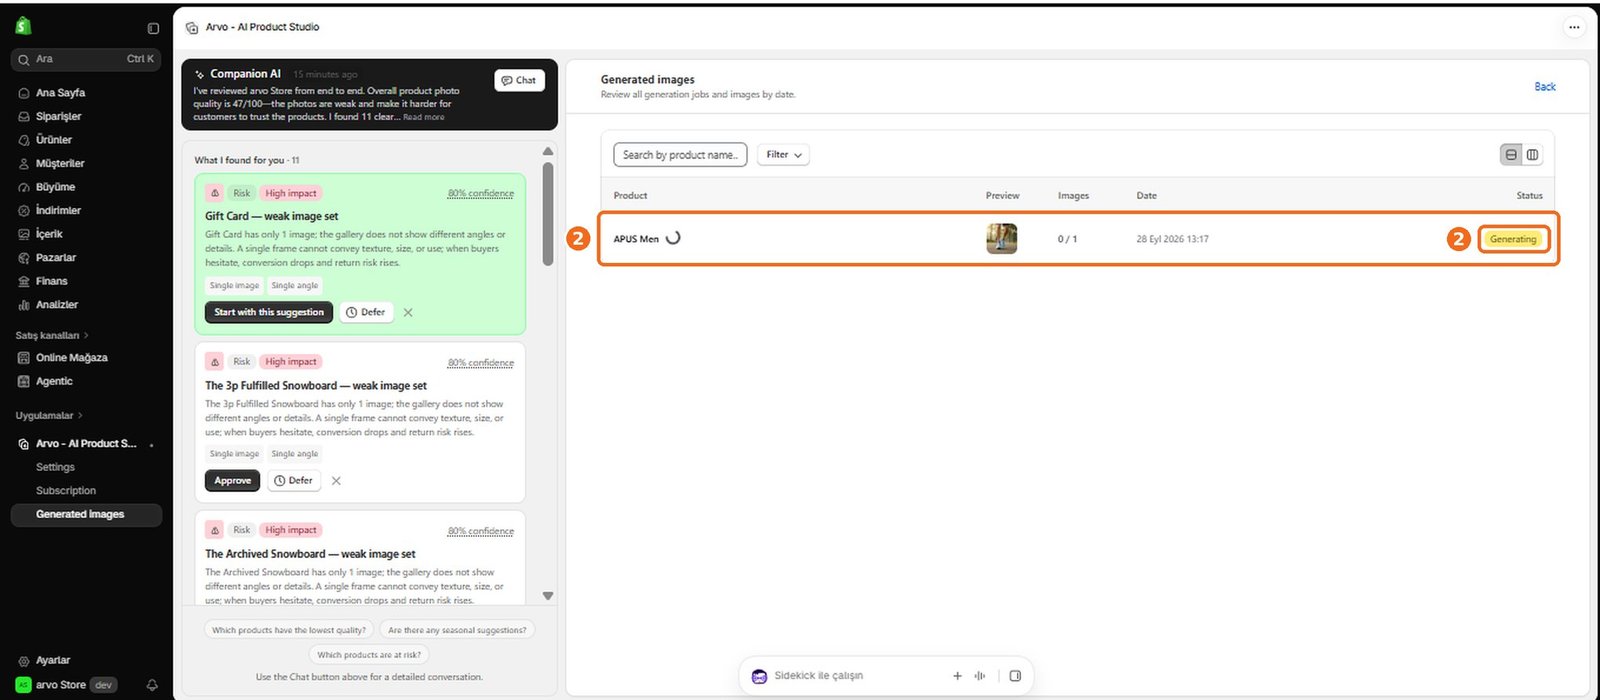
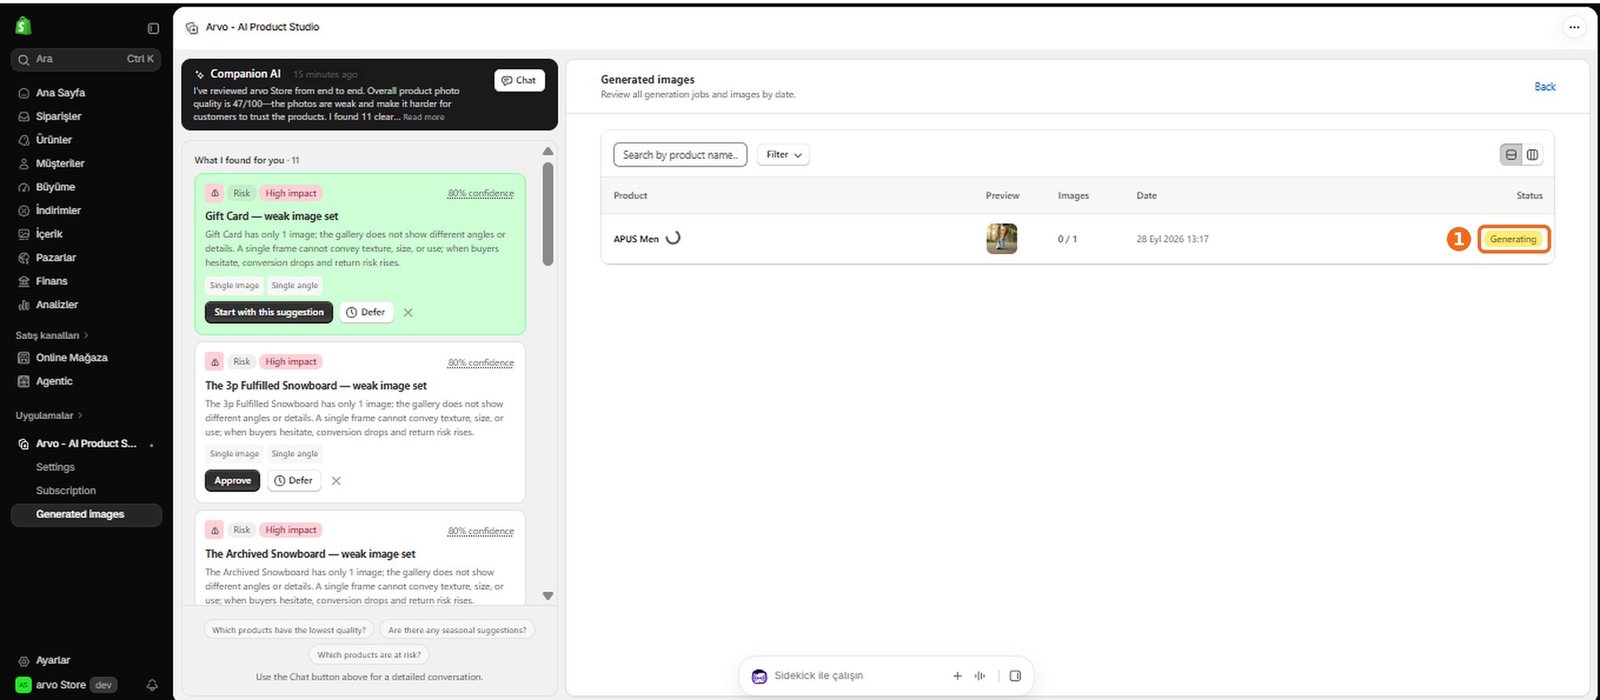
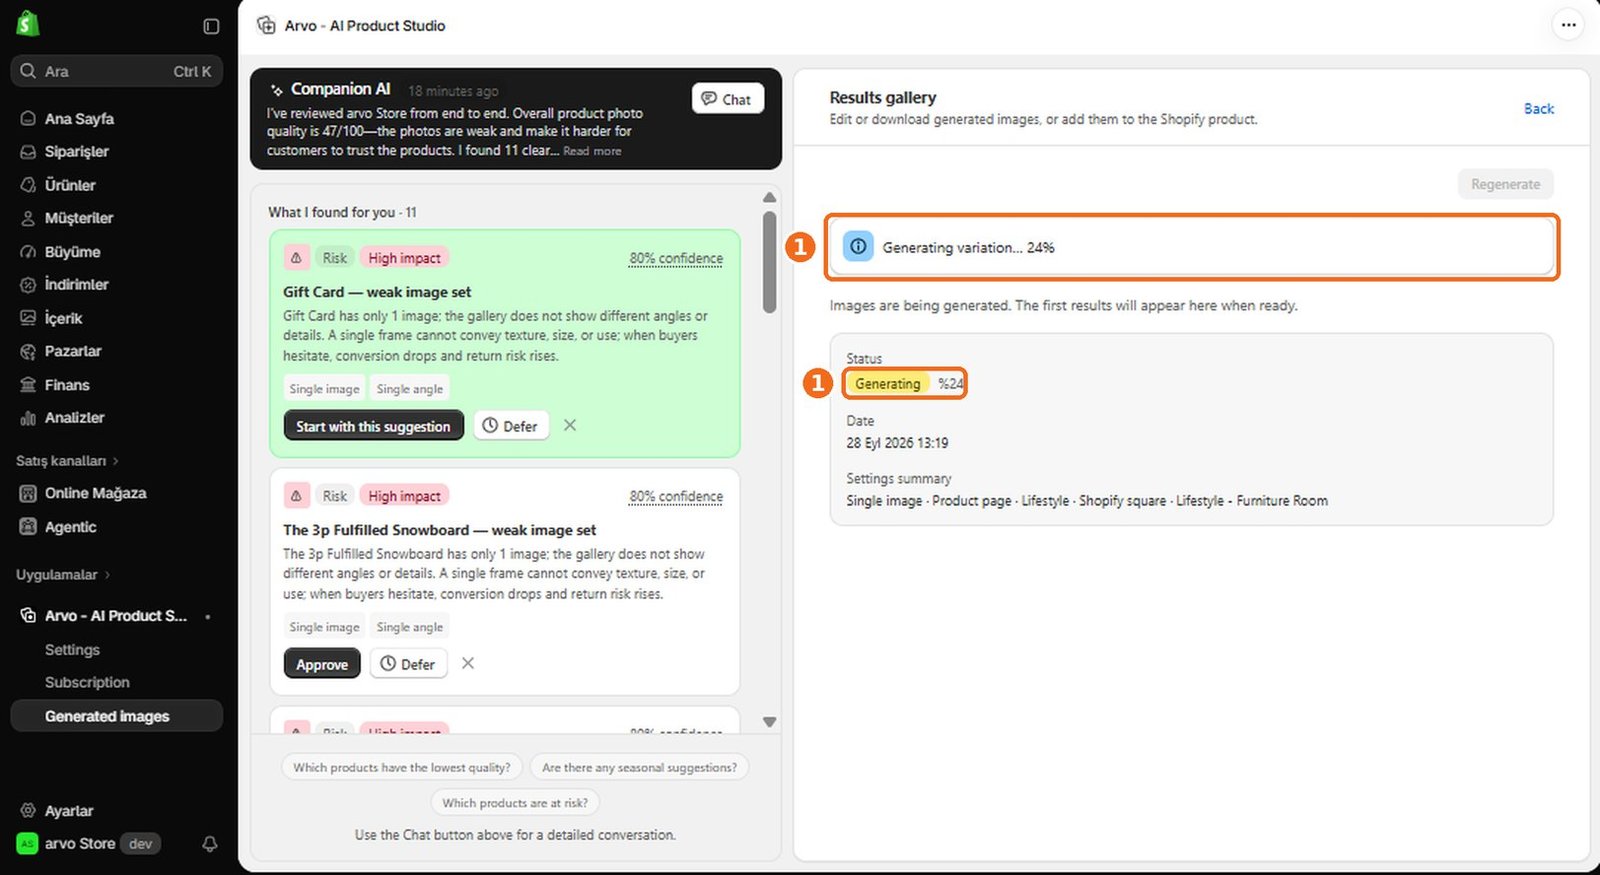
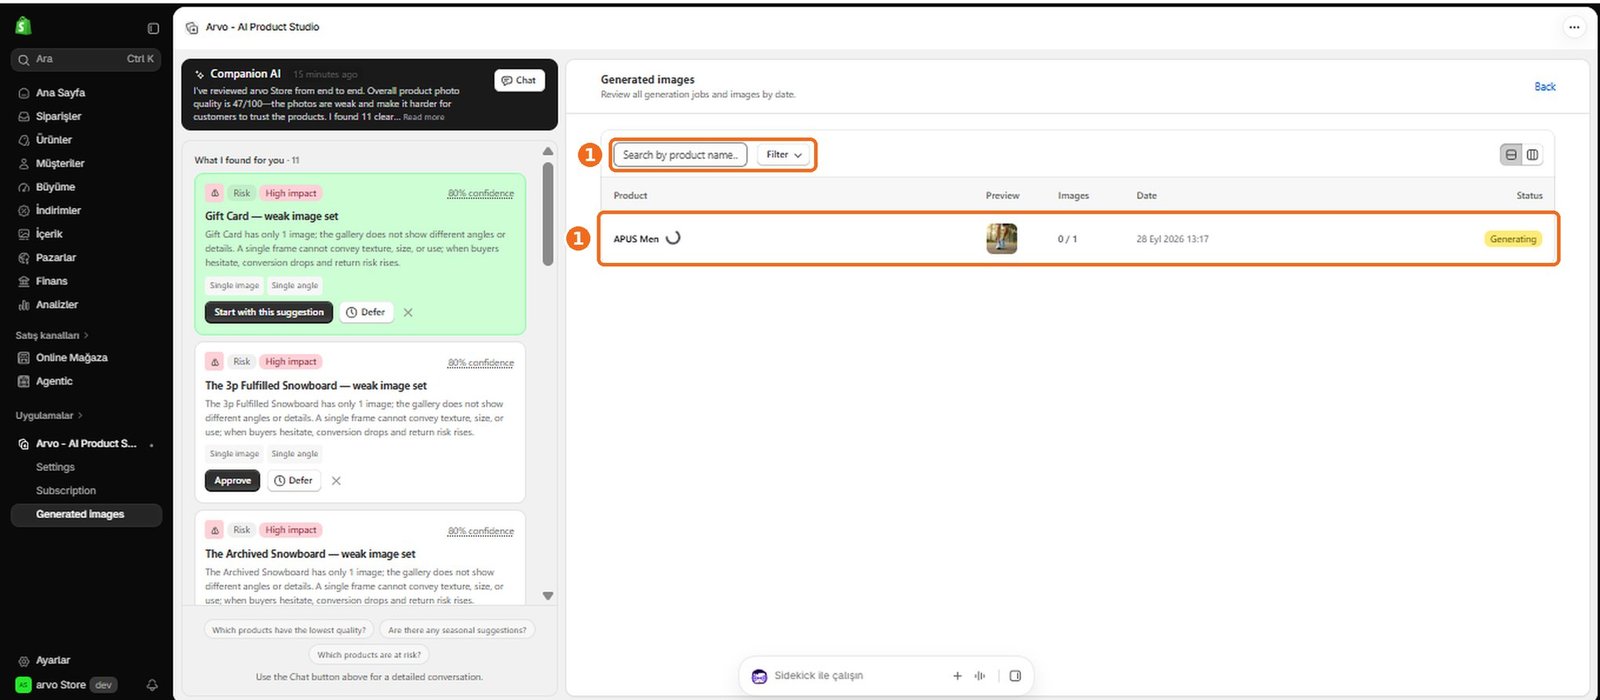
How do I check the status of an image generation?
1
Open the Gallery or the relevant result to see whether the generation is waiting, processing, completed, or unsuccessful.
2
A completed status means the image is ready to preview and use; an unsuccessful status means the request did not produce a usable result.
3
If the status does not change or an error appears, review any message shown and try again later or adjust the generation inputs.
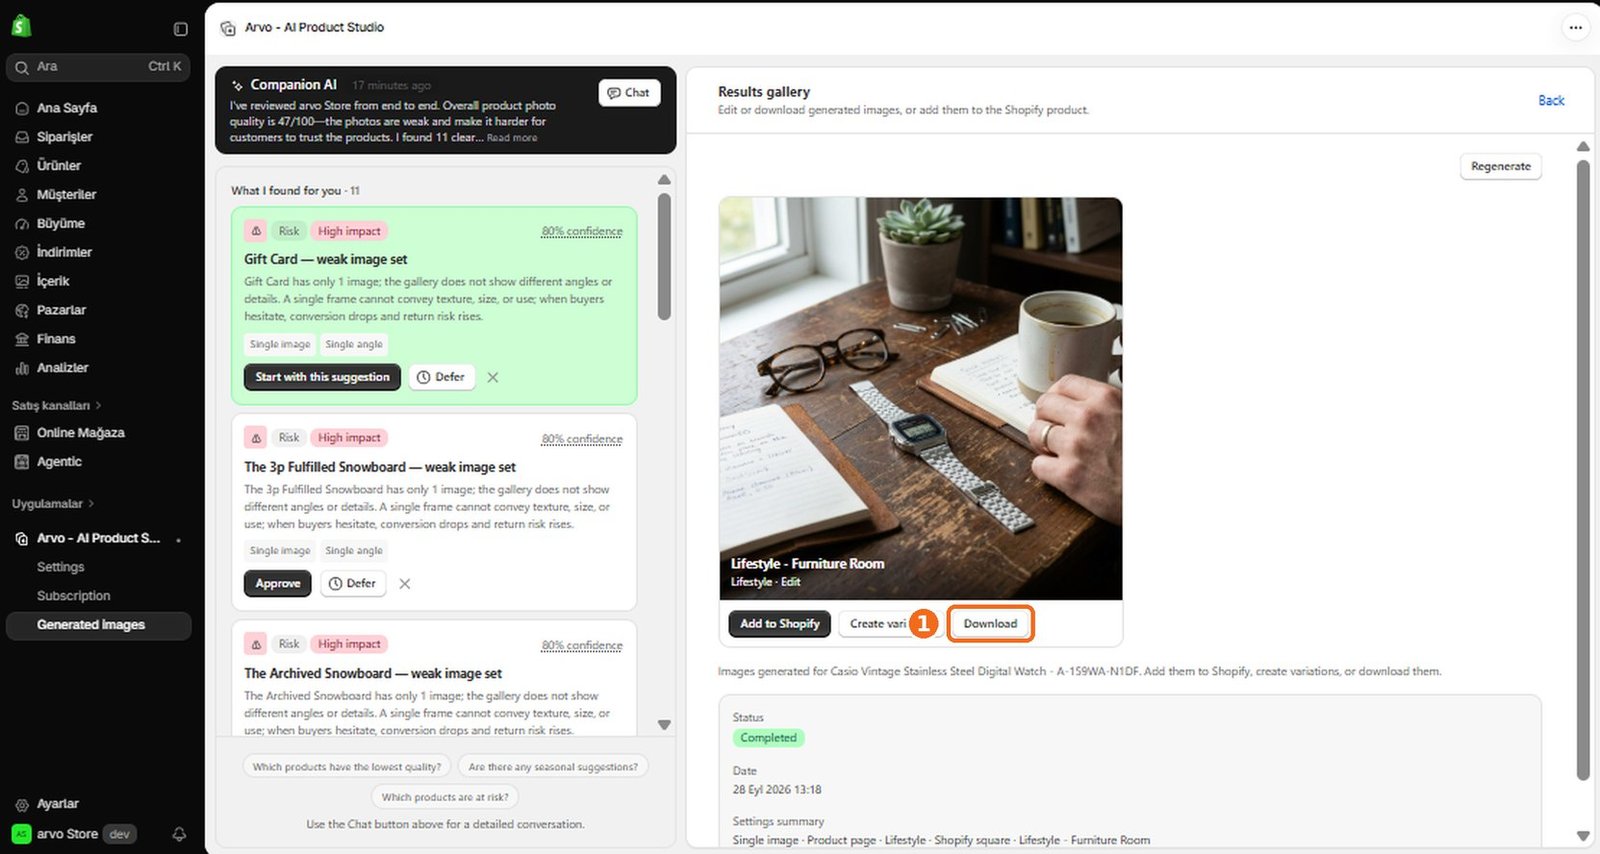
How do I download a generated image?
1
Open a completed image in the Gallery, review the preview, and use the available download action to save it to your device.
2
Check the downloaded file before publishing it to make sure it is the intended result.
3
Downloading may be unavailable while generation is still processing or if the result failed.
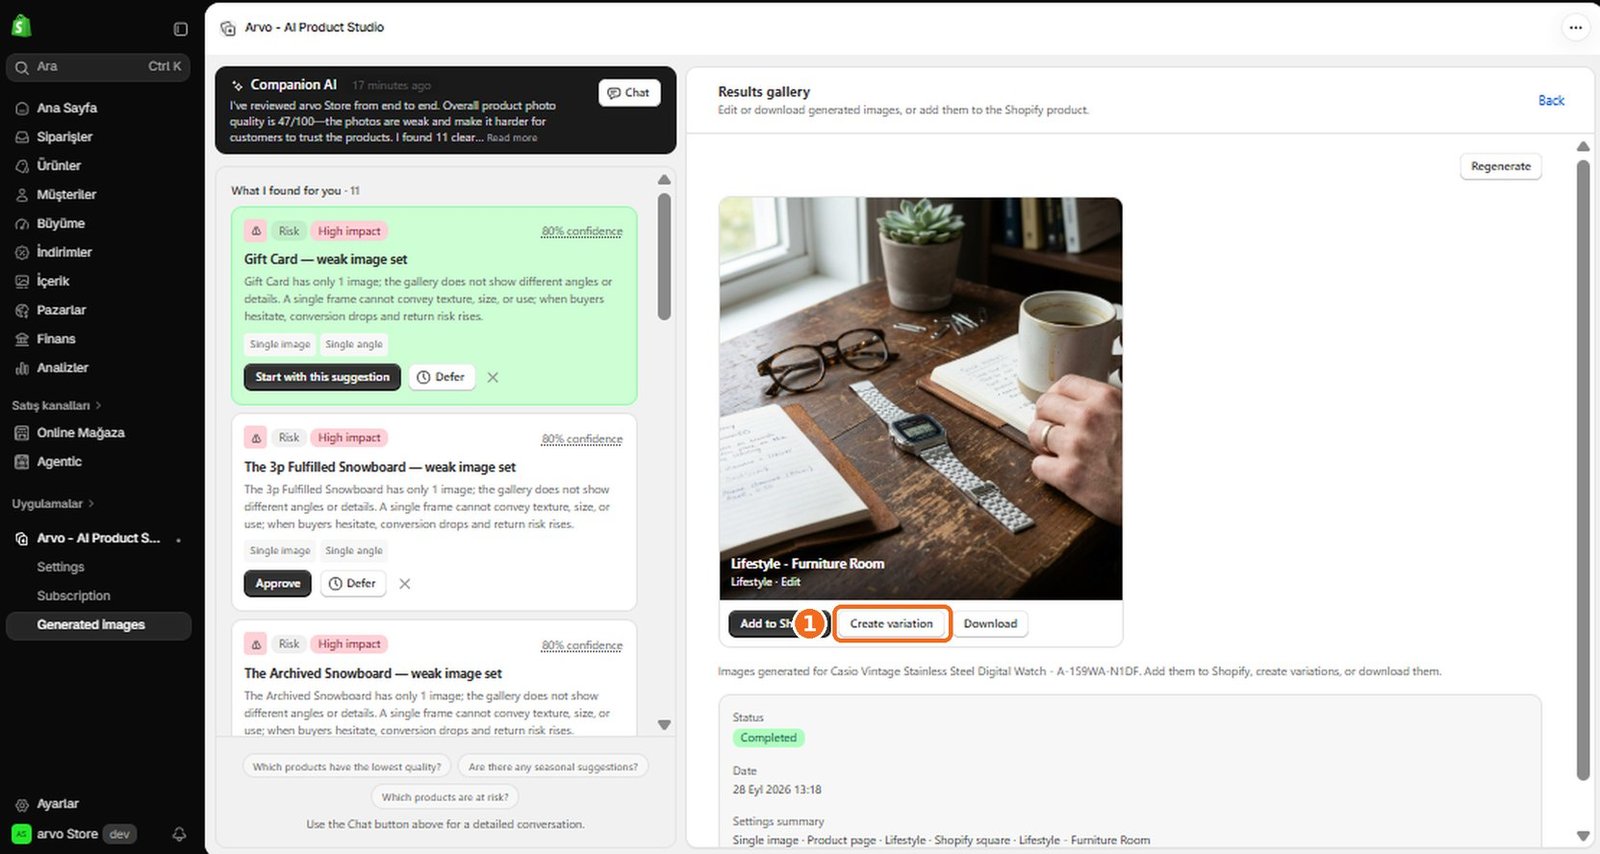
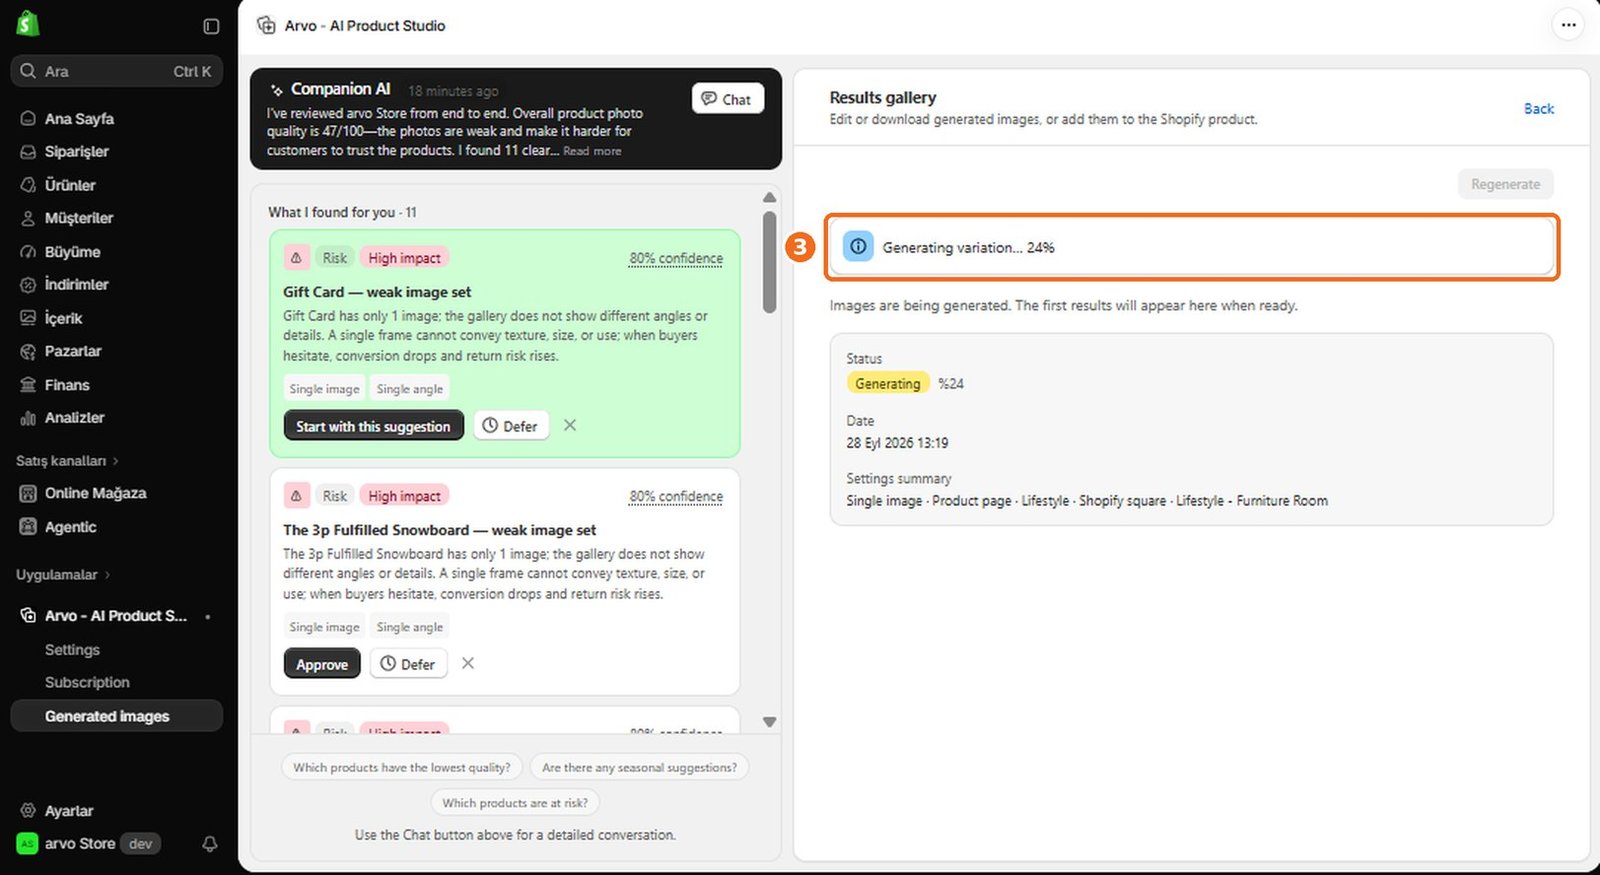
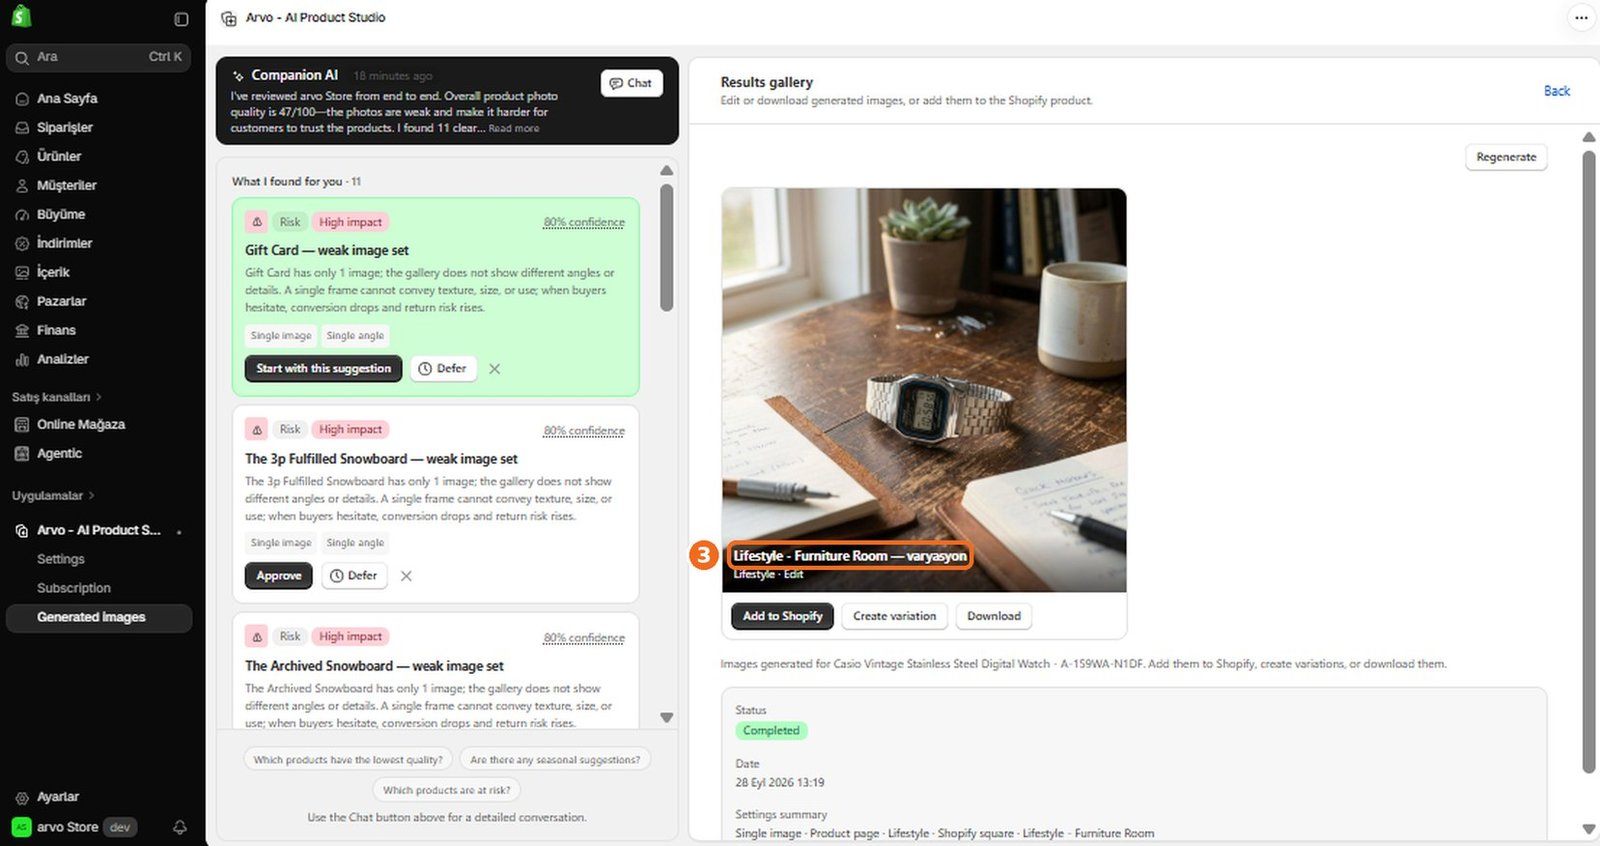
How do I create a variation of a generated image?
1
Open the completed image in the Gallery and choose the available variation option.
2
Keep the original result as the creative starting point, adjust any available guidance if needed, and review the credit requirement before beginning the new generation.
3
The variation should appear as a separate result, allowing you to compare it with the original.
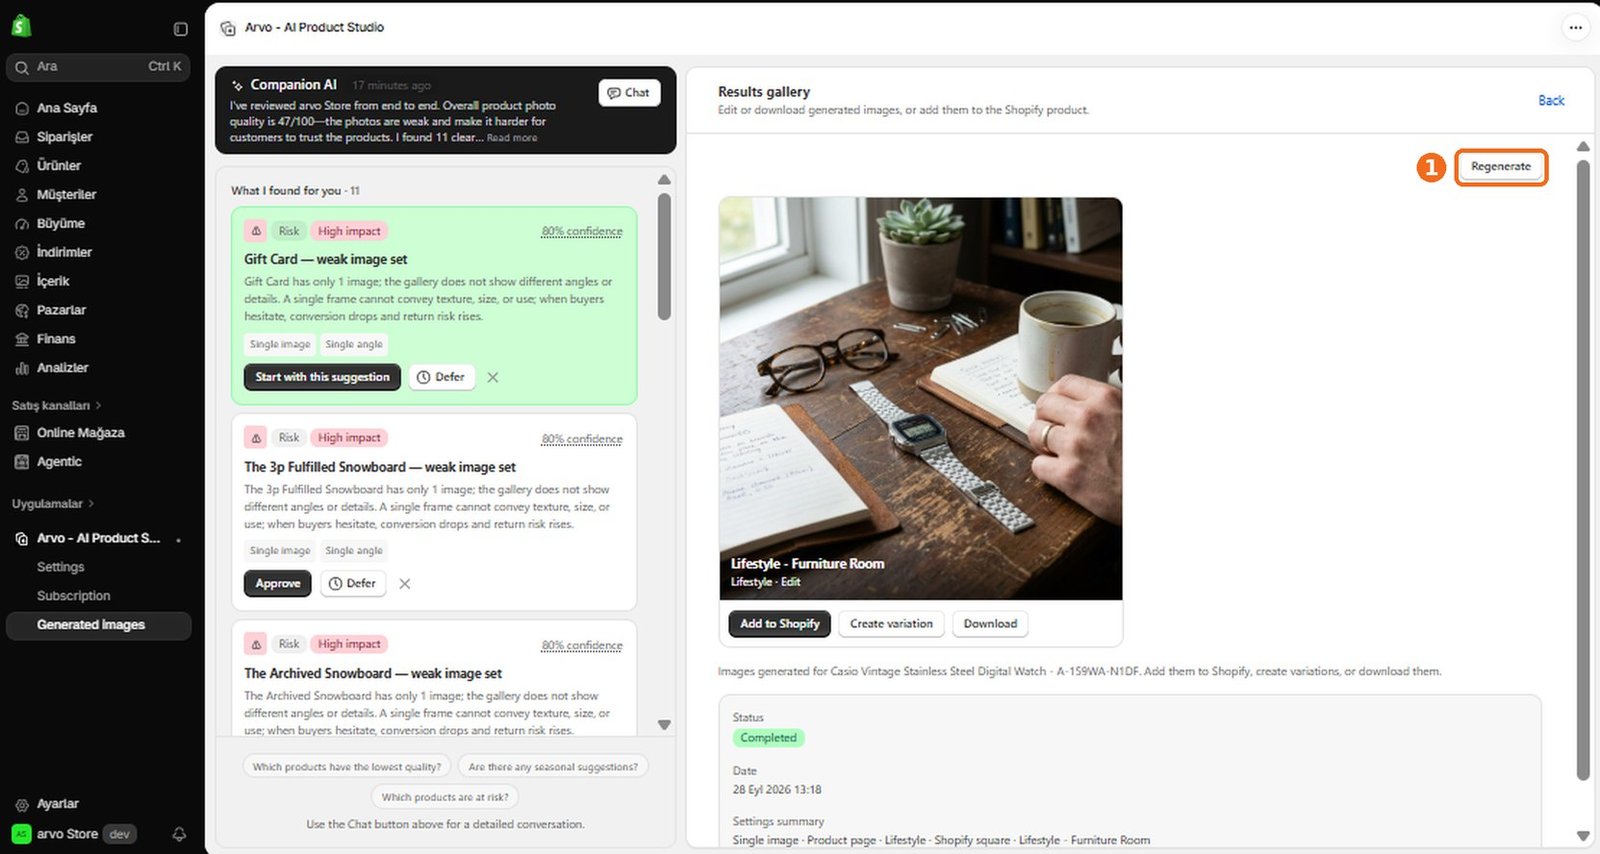
How do I regenerate an image?
1
Open the relevant result and choose the available regeneration action to run the generation again using the applicable setup.
2
Review the product, template, reference image, prompt, and other settings first, especially if you want to improve the next result.
3
Regeneration creates another result and uses the same credits as the original image type.
4
If the original request failed, review any error before trying again.
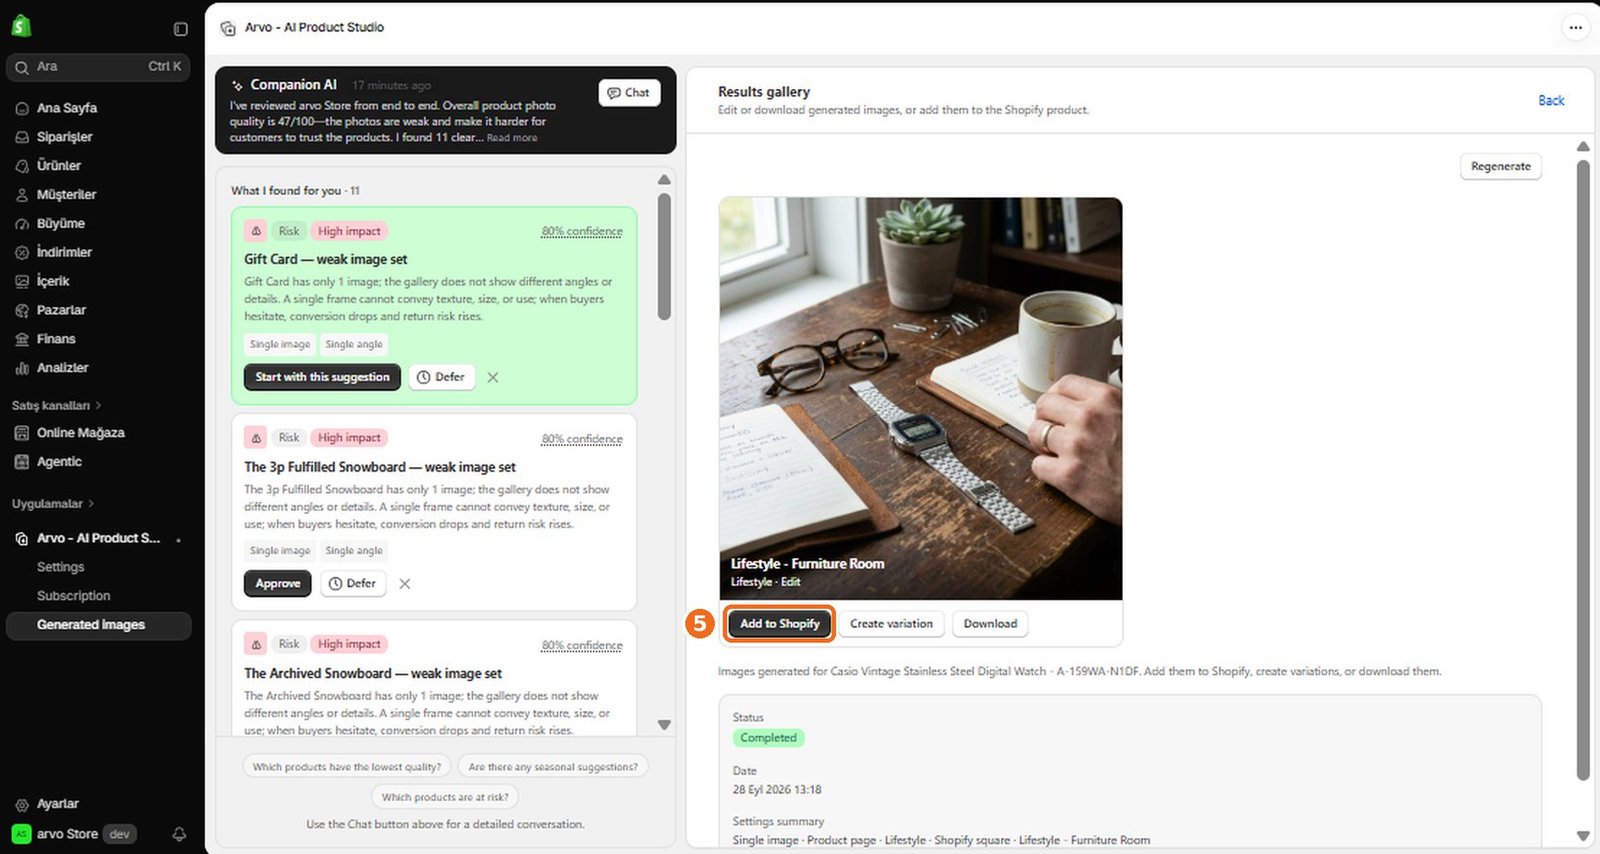
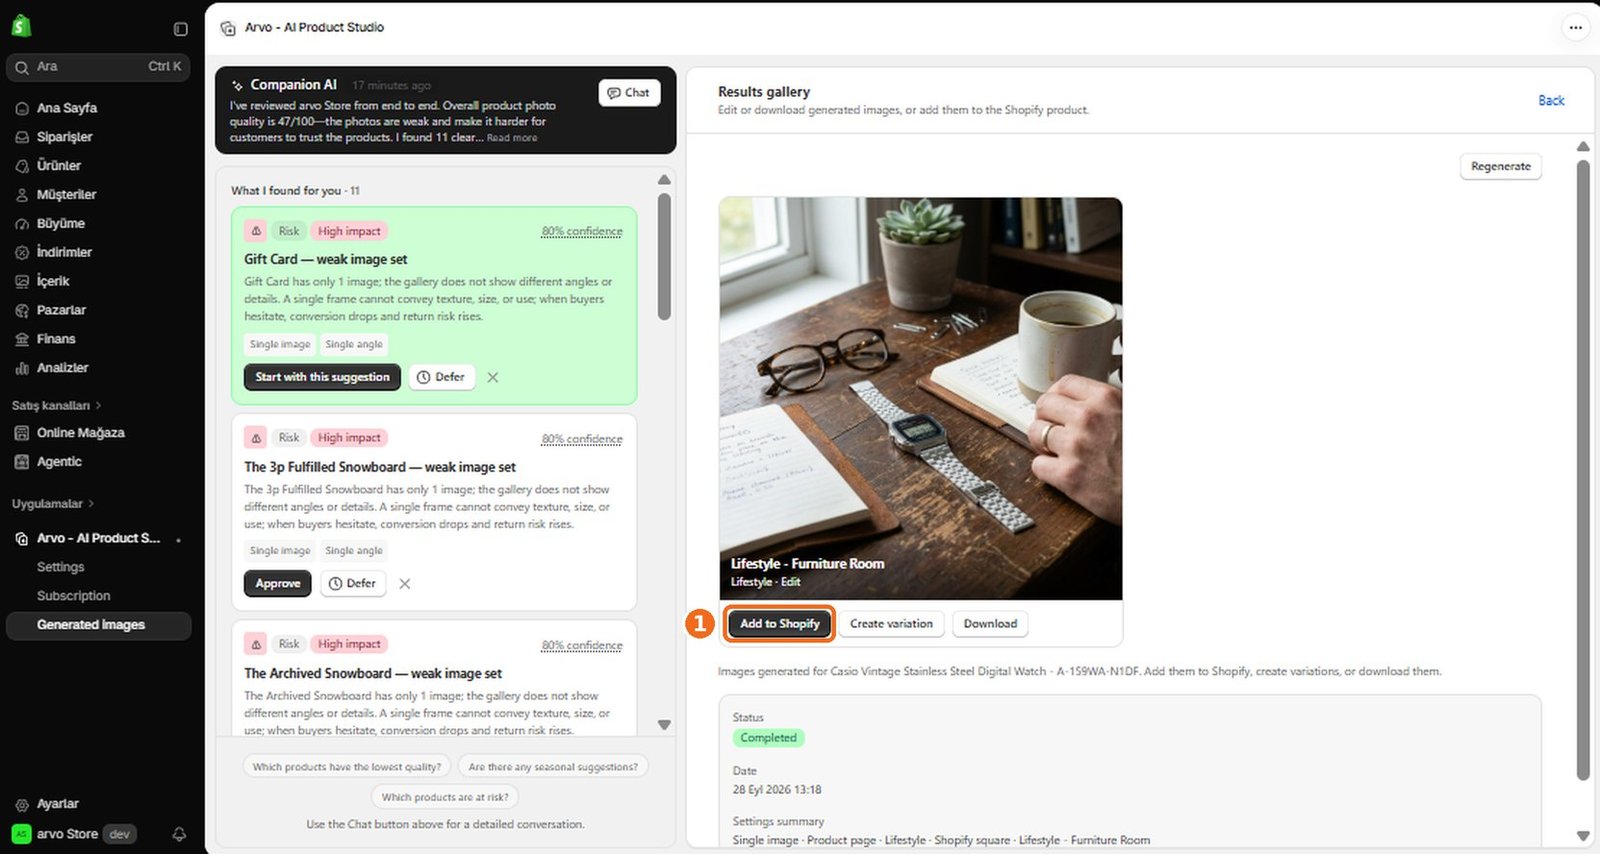
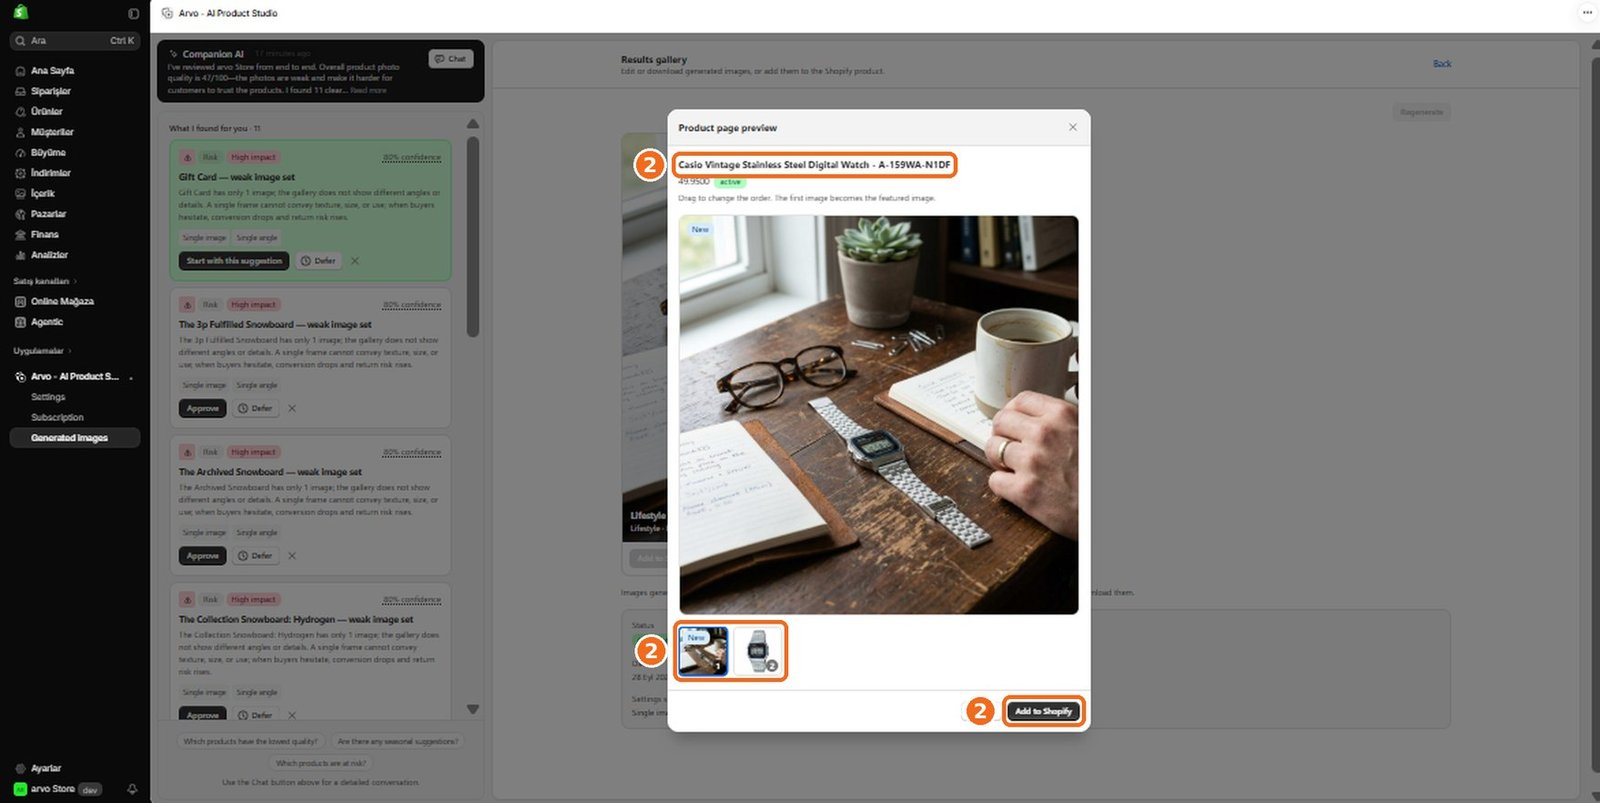
How do I add a generated image to Shopify?
1
Open a completed image in the Gallery, review it carefully, and use the available Shopify action to add it to the relevant product.
2
Confirm that the correct store and product are selected before completing the action.
3
After a successful transfer, check the Shopify product to confirm that the image appears as intended.
4
If the action fails, verify the store connection and product availability, then try again.
How do I manage my generated images?
1
Use the Gallery to review generated images and open each result for the actions available to it.
2
From there, you can work with completed visuals by previewing, downloading, creating another version, or adding them to Shopify.
3
Check an image's status before managing it, and verify the product and intended use before publishing.
What happens after image generation is completed?
The completed image is stored in the Gallery, where you can preview and evaluate it. If it meets your needs, you can download it or add it to Shopify; if you want another option, you can create a variation or regenerate it.
Review the result before publishing, particularly the product details, composition, and suitability for the intended placement.
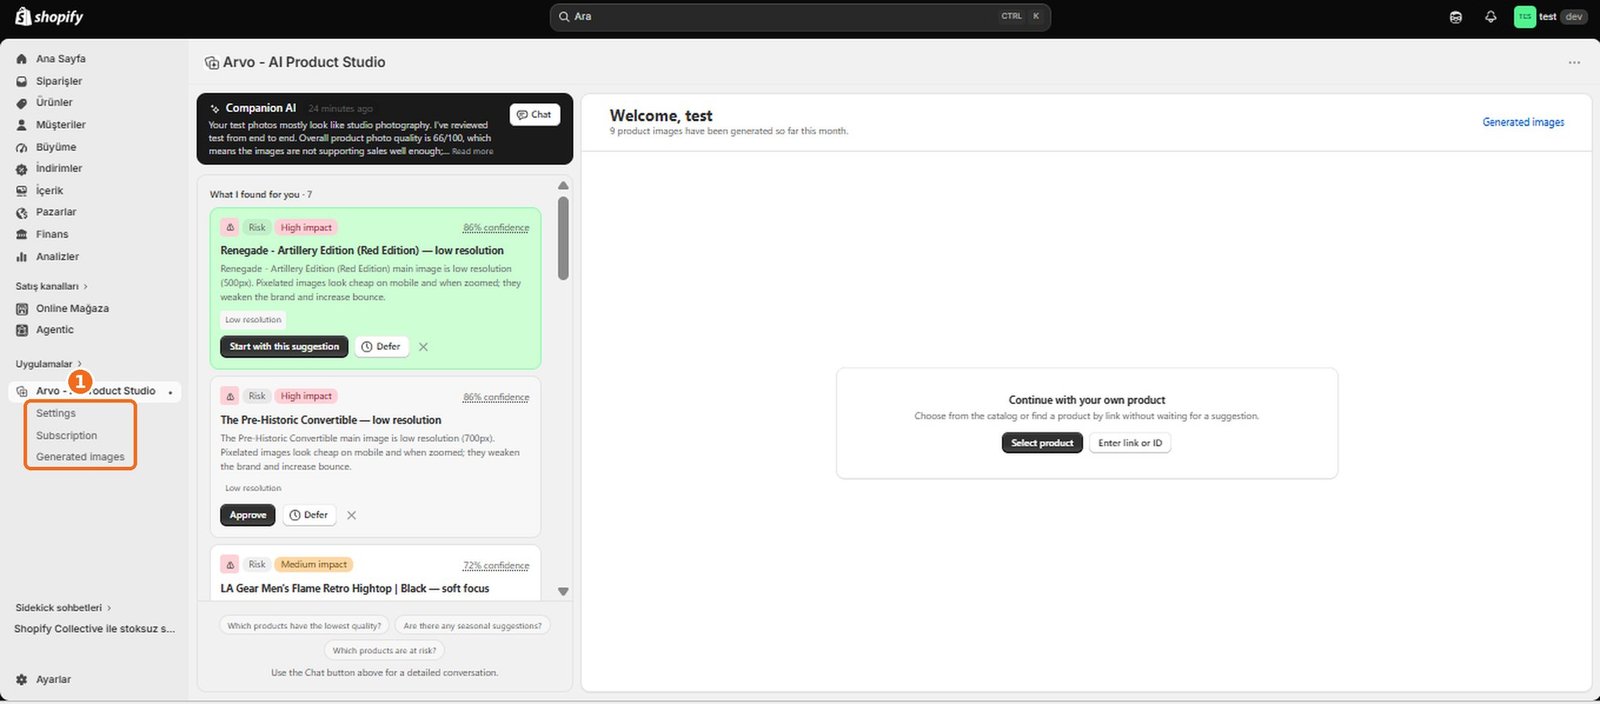
How do I access my settings?
1
Open Arvo AI Product Studio from your Shopify store, then look for the settings area in the app navigation or account menu.
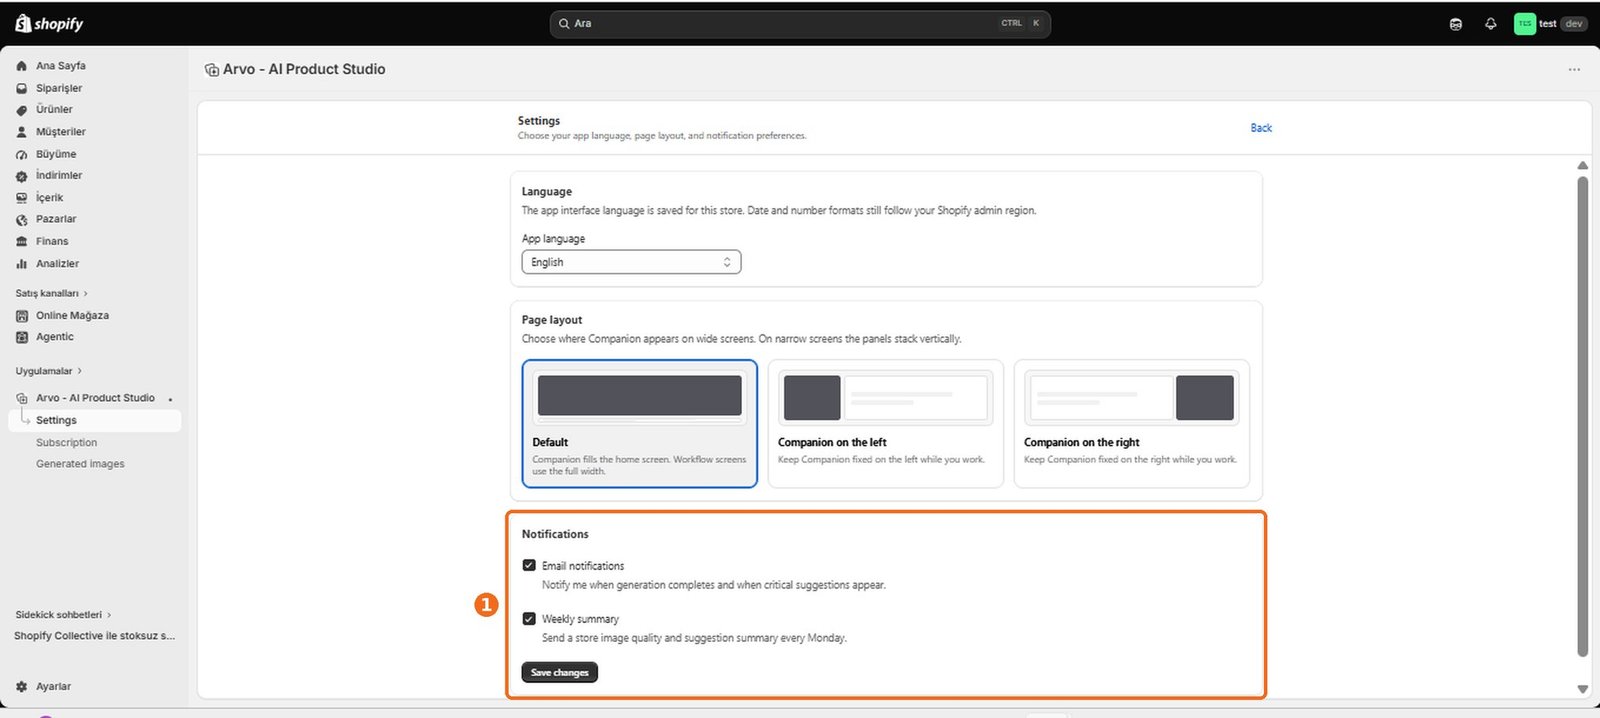
2
Settings are where you can review and adjust available preferences for the app, Companion AI, notifications, and your account.
3
If the settings area is unavailable, refresh the app and confirm that your Shopify account has permission to manage the app.
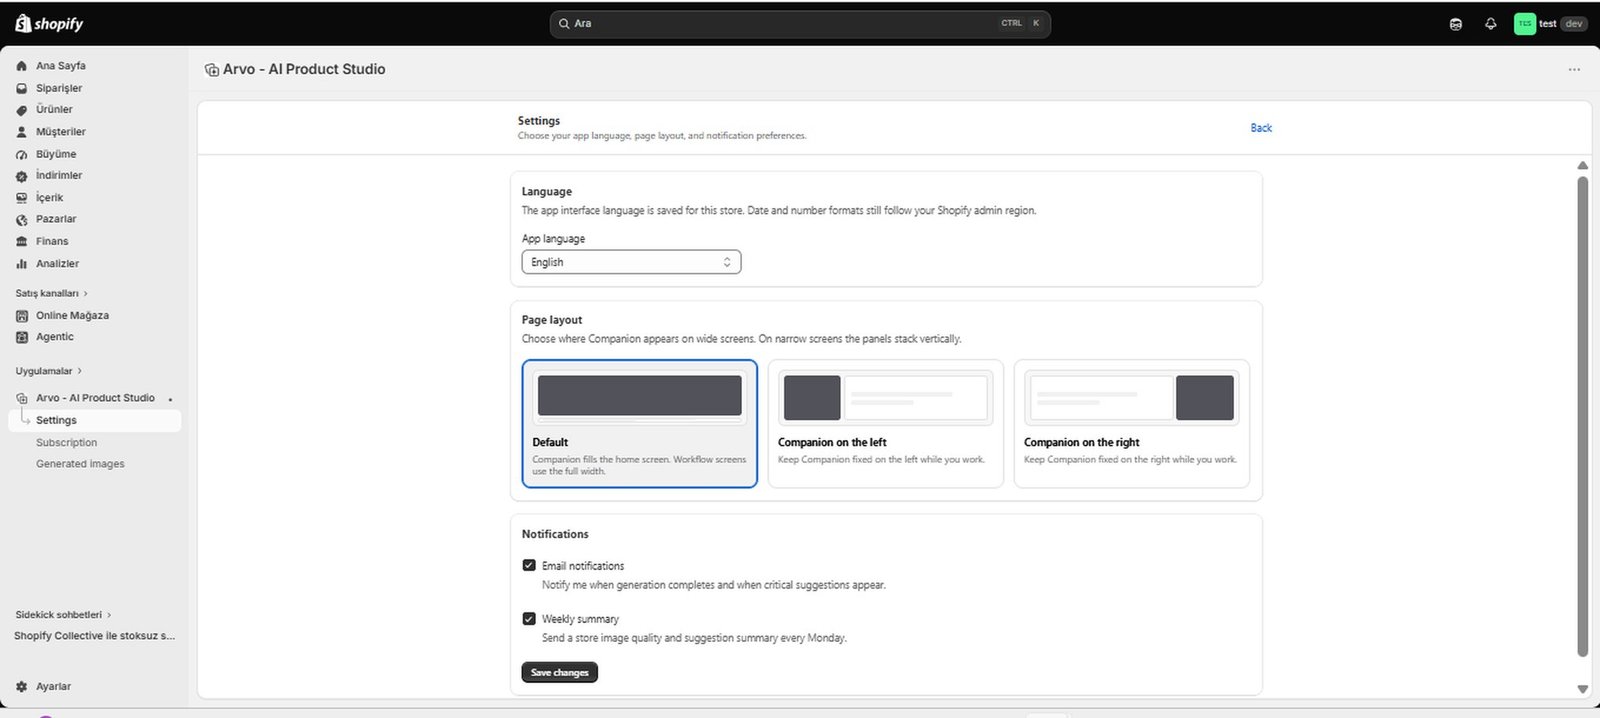
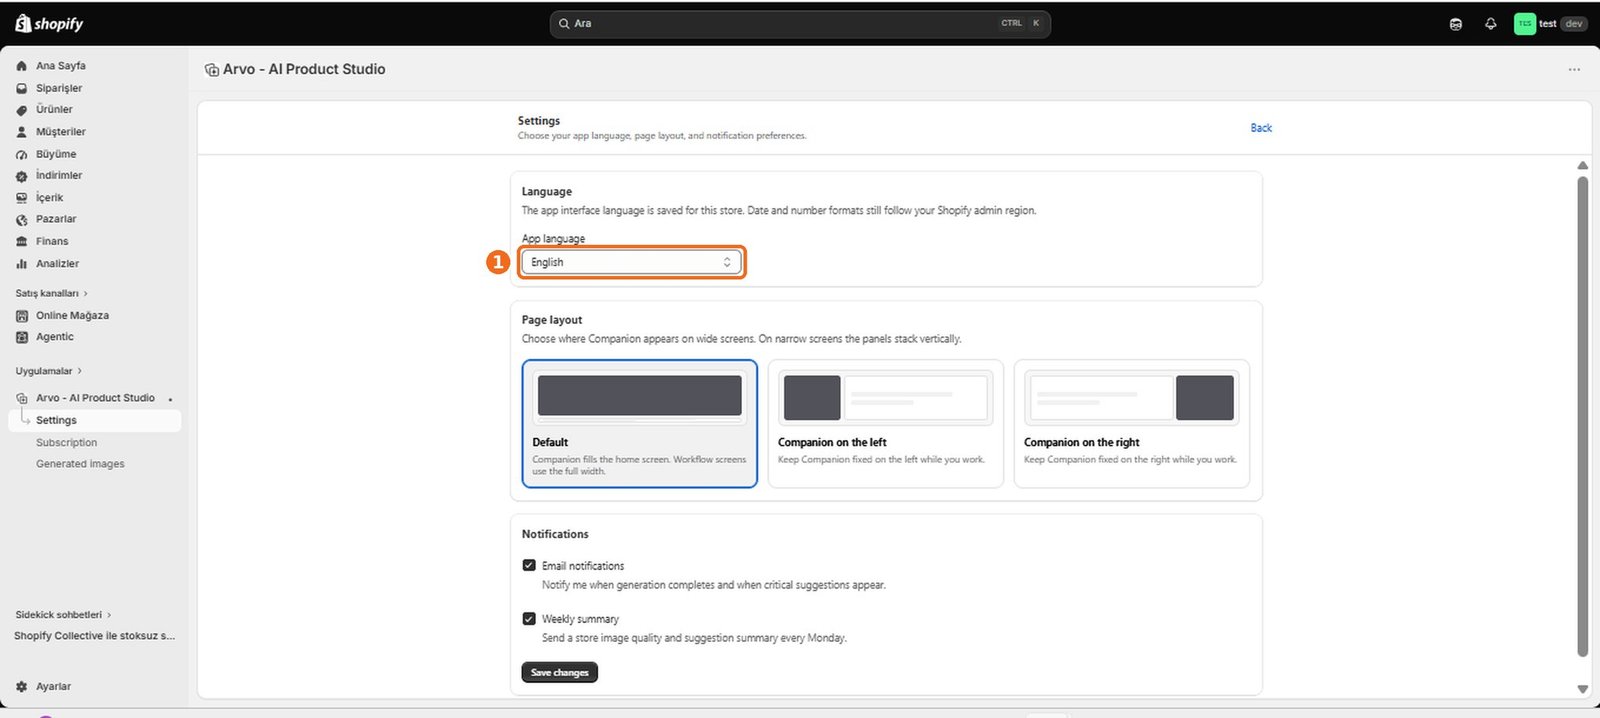
How do I change the application language?
1
Go to the app settings and find the language preference.
2
Choose your preferred language and save or apply the change if prompted; the app interface should then appear in that language.
3
If the change does not appear immediately, refresh the app or reopen it.
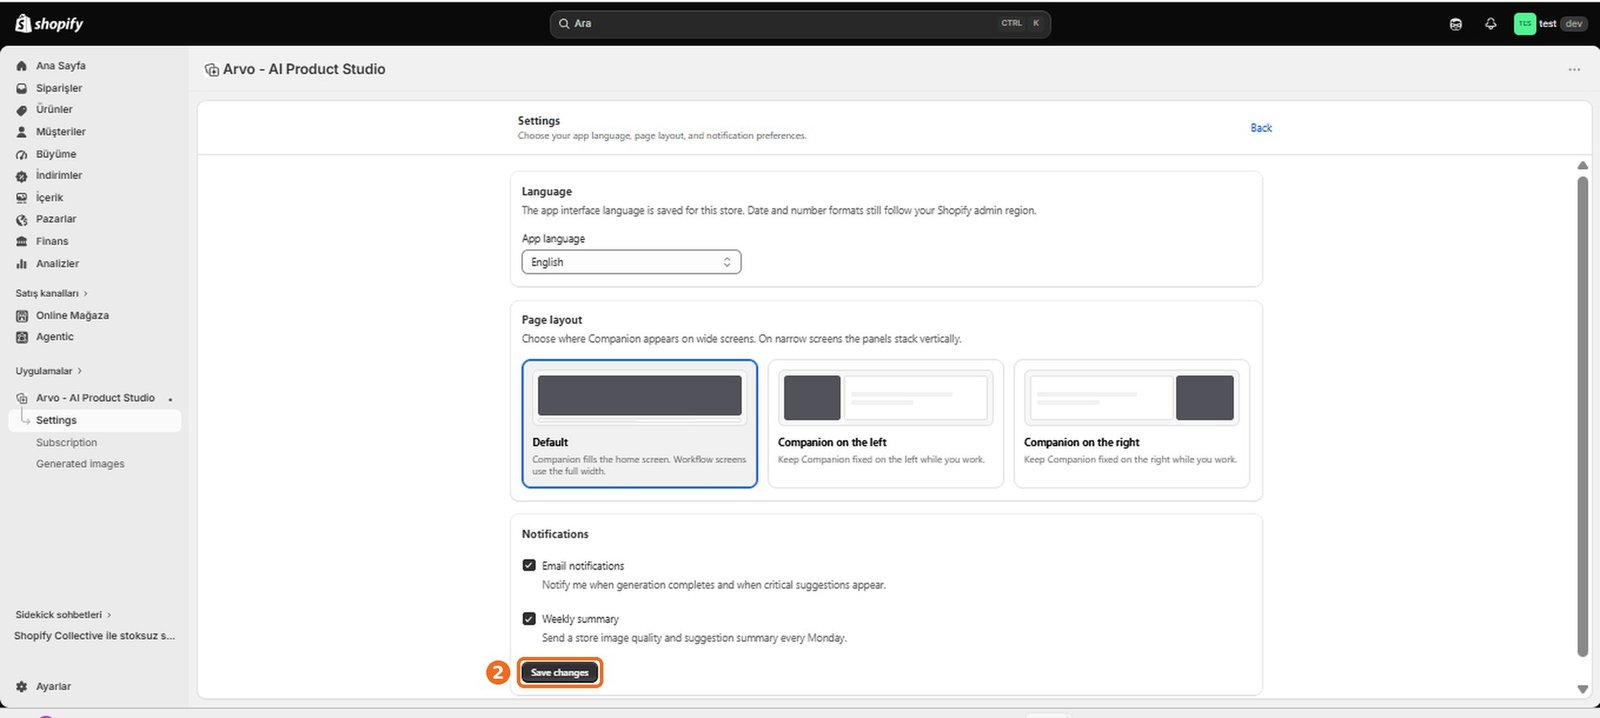
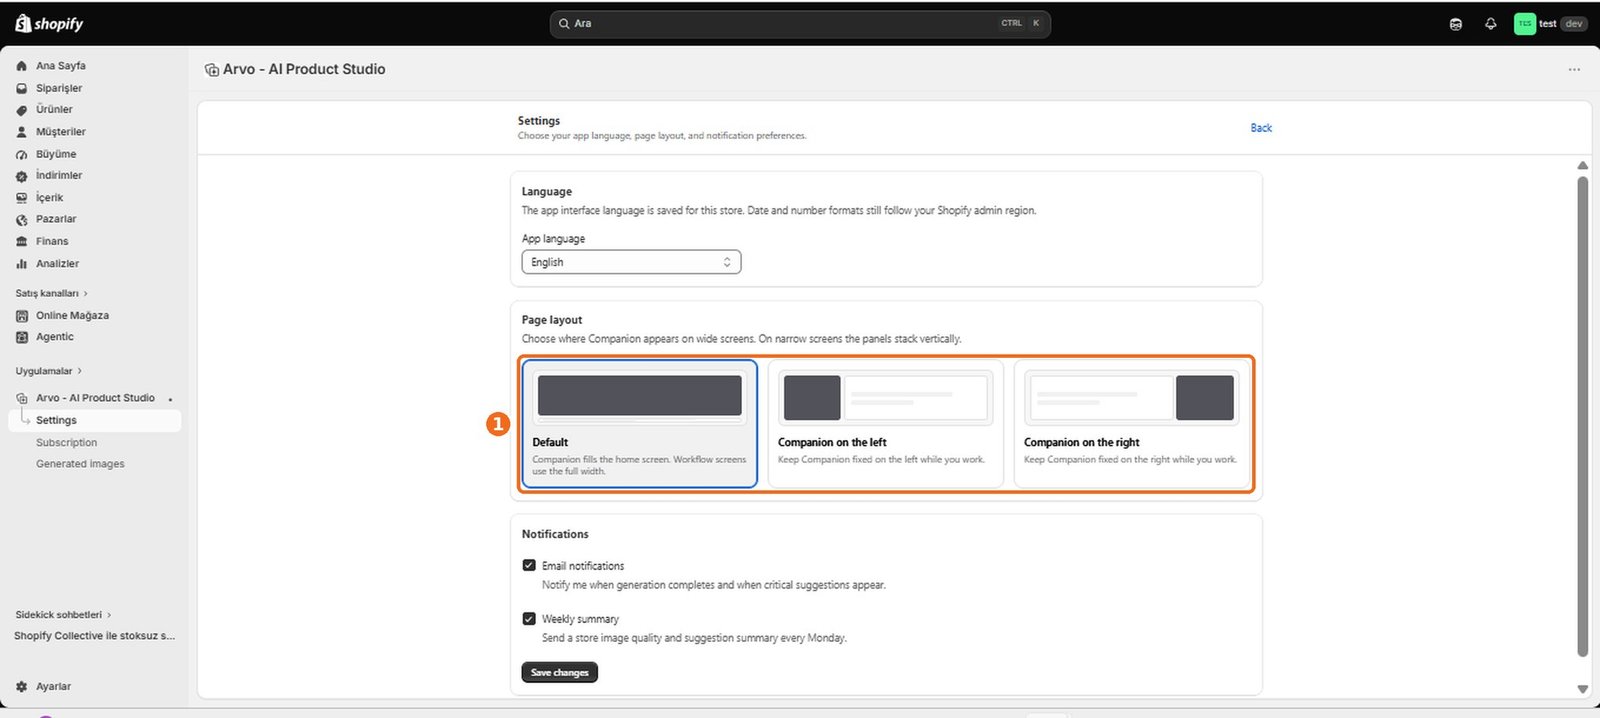
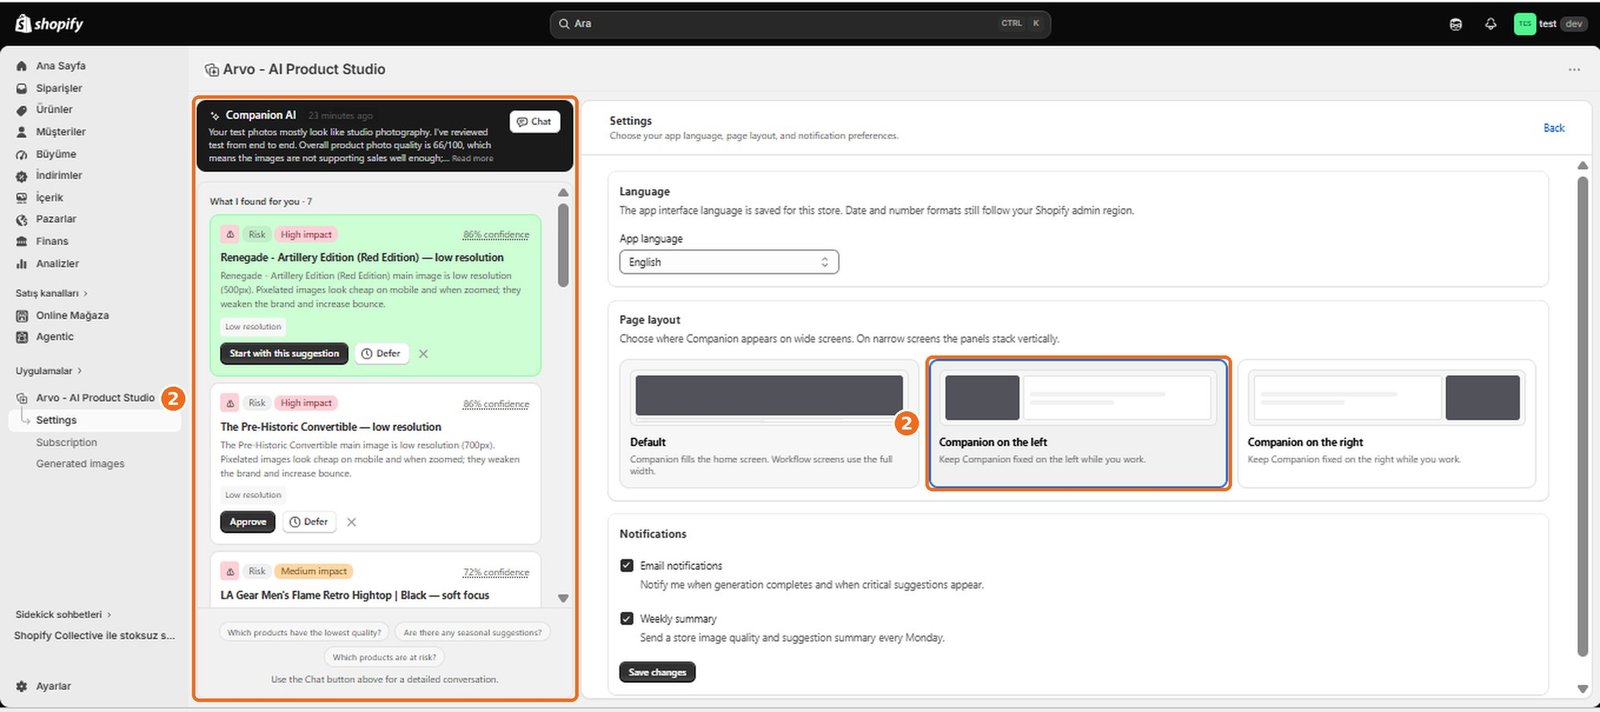
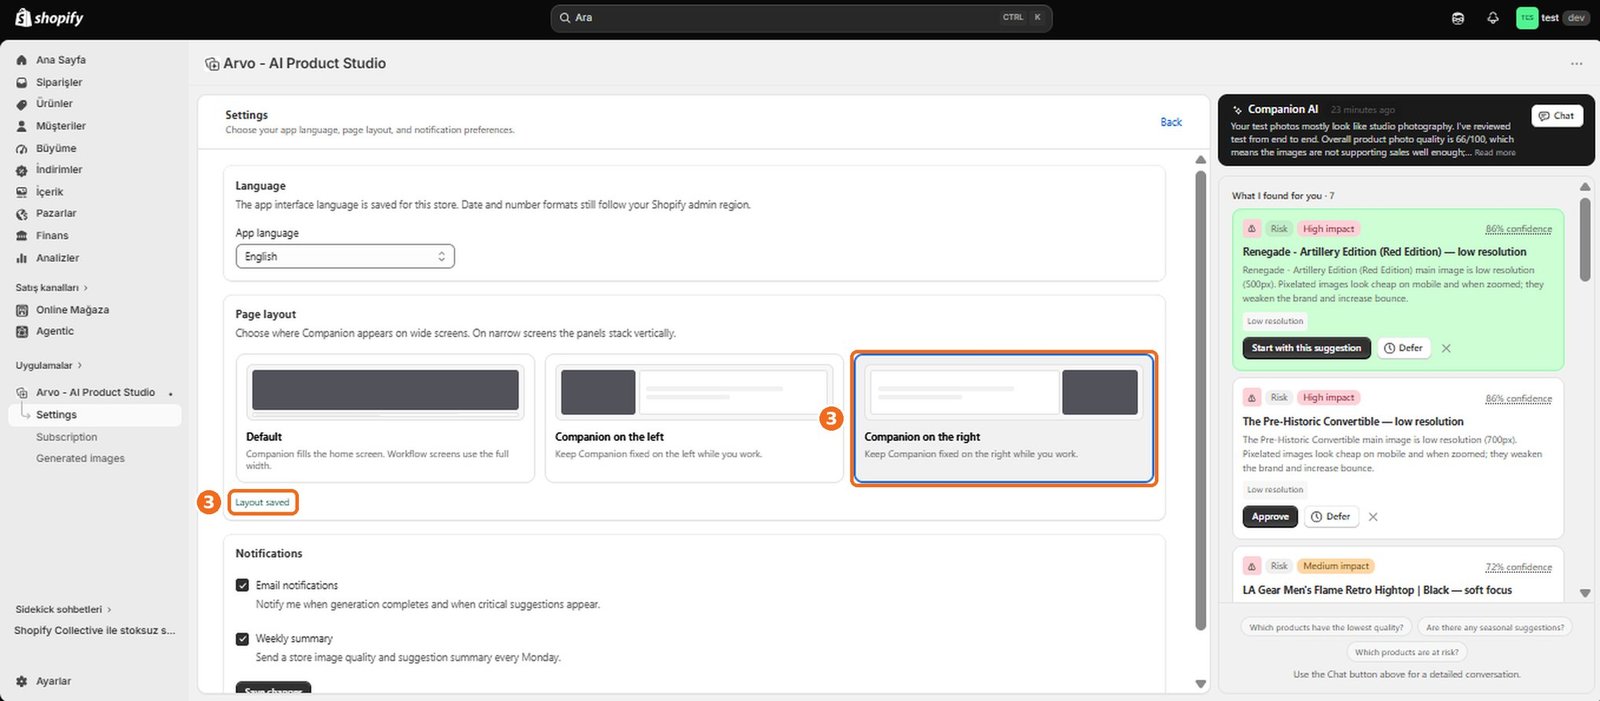
How do I change the Companion AI layout?
1
Open the settings for Companion AI and select the layout that best fits how you work.
2
A layout preference may change where Companion AI appears or how much workspace it uses without changing its recommendations or capabilities.
3
Apply the preference if needed, then return to your workspace to confirm the new arrangement.
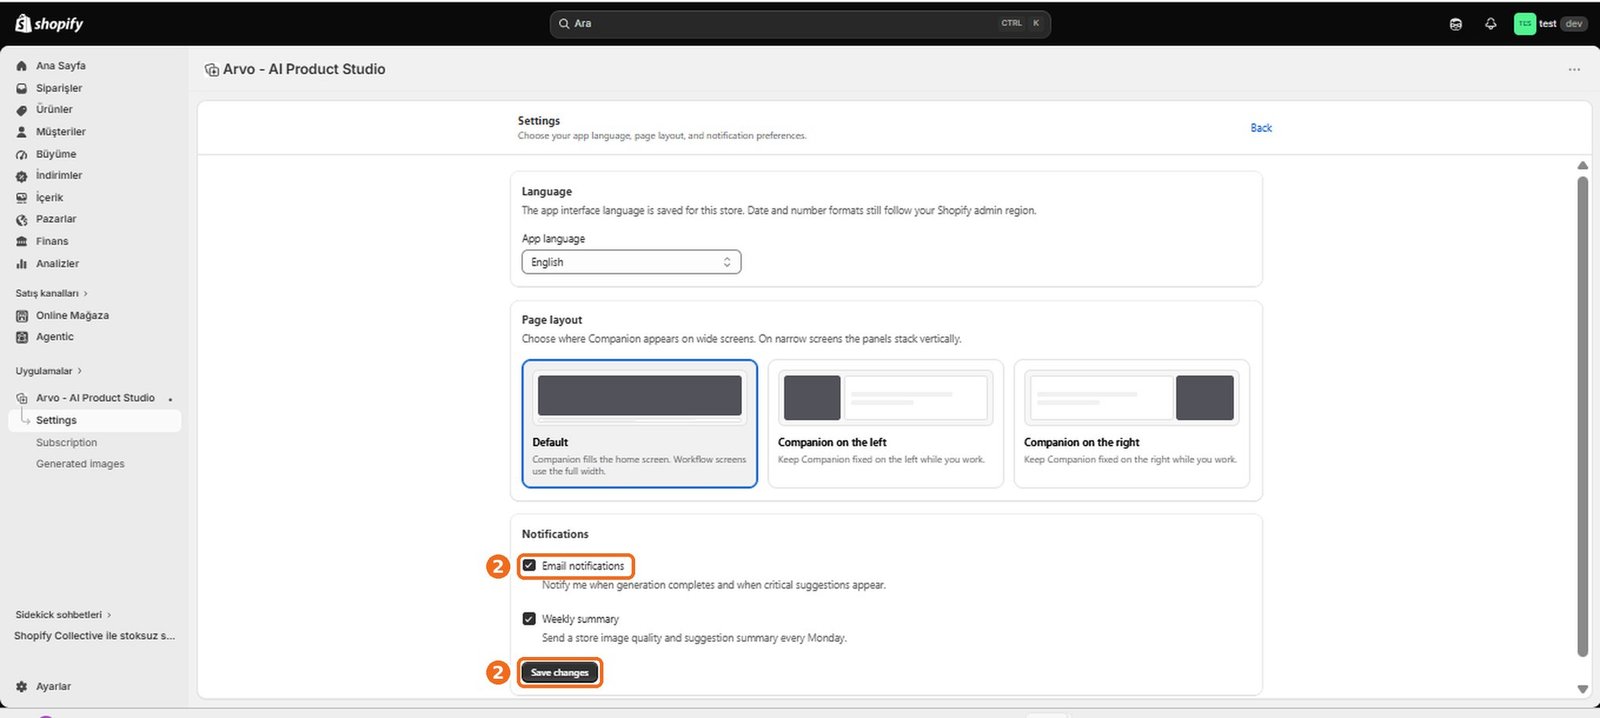
How do I manage email notifications?
1
Open the notification section of your settings and review the available email preferences.
2
Enable the messages you want to receive and disable those you do not, then save your changes if prompted.
3
Your new choices should apply to future emails; essential service or account messages may be handled separately.
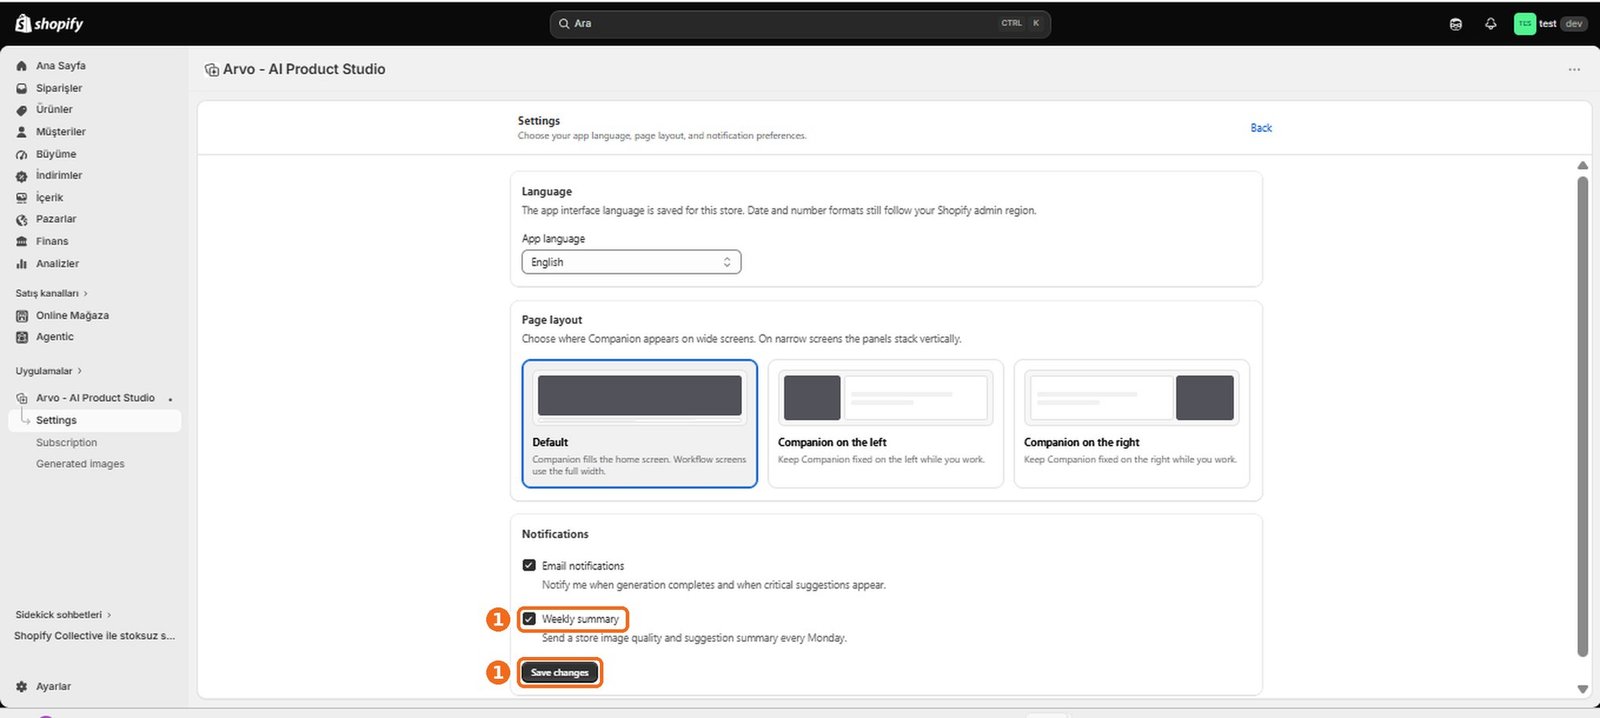
How do I enable or disable weekly summaries?
1
In your notification settings, find the preference for weekly summaries and turn it on or off.
2
When enabled, summaries may provide a regular overview of relevant activity or recommendations; when disabled, those summary emails should stop while other selected notifications remain unchanged.
How do I manage my account settings?
1
Open the account area within settings to review the account details and preferences available to you.
2
Update any editable information, then save the changes if required.
3
Some store, identity, or billing information may be managed through Shopify rather than directly in Arvo AI Product Studio.
What are credits?
Credits are the usage units for AI image generation in Arvo AI Product Studio. Every paid plan includes a monthly credit allowance, and each image you generate uses a fixed number of credits based on its image type.
All images are generated at a single quality level, so the credit cost depends only on the image type, not on the output size or the template you choose.
How many credits does each image type use?
Each image type has a fixed credit cost. More complex visuals use more credits.
Image type
Credits per image
Main / cover image
1
Detail image
2
Lifestyle image
3
Campaign visual
3
Banner
3
Social media visual
3
Dimensions image
6
Infographic
6
1
Variations and regenerations use the same number of credits as the original image type.
2
The output size or aspect ratio does not change the credit cost.
3
Full Catalog generations get a set discount. See “How much does a Full Catalog generation cost?” below.
What plans are available?
Arvo AI Product Studio offers three paid plans. Every plan includes all features; plans differ in the number of monthly credits and the price per credit.
Plan
Monthly
Annual (per month)
Credits / month
If all credits are used on one type
Starter
$9.90
$7.90
100
100 main OR 50 detail OR 33 lifestyle OR 16 infographic
Growth
$29.90
$23.90
400
400 main OR 200 detail OR 133 lifestyle OR 66 infographic
Scale
$79.90
$63.90
1,200
1,200 main OR 600 detail OR 400 lifestyle OR 200 infographic
The image counts are alternatives, not a combined total. For example, 100 credits can create 100 main images or 33 lifestyle images, not both. You can mix image types freely: for example, 40 main images (40 credits) and 20 lifestyle images (60 credits) also use 100 credits.
1
All plans include every image type, Full Catalog generation with the catalog set discount, Companion AI, templates, and publishing to Shopify.
2
Larger plans lower your price per credit: about $0.099 on Starter, $0.075 on Growth and $0.067 on Scale.
3
The Scale plan also includes priority support.
4
Annual plans save 20% and are billed once a year: $94.80 for Starter, $286.80 for Growth and $766.80 for Scale.
5
All prices are in USD and are billed through Shopify.
Is there a free trial?
1
Every plan starts with a 7-day free trial. You choose a plan and approve it in Shopify, but you are not charged during the trial.
2
During the trial you receive 15 credits. That is enough for 15 main images OR 7 detail images OR 5 lifestyle images OR one standard Full Catalog set. These are alternatives, not a combined total.
3
You can use every feature of the plan you selected during the trial.
4
When the trial ends, your plan starts automatically, you are charged for the first period, and your full monthly credits are added.
5
To avoid being charged, cancel your plan before the trial ends.
6
The free trial is available once per store, including if the app is uninstalled and installed again.
How are credits used?
1
Before you confirm a generation, the Plan Confirmation screen shows the total number of credits the request will use.
2
Credits are deducted when the generation starts.
3
If a generation fails because of a system error, the credits are refunded to your balance automatically.
4
Variations and regenerations use the same number of credits as the original image type.
5
Your monthly credits reset at the end of each billing month. Unused credits do not carry over.
How do I check my credit balance?
1
Look for your current credit balance in the app's account, subscription, billing, or credit area.
2
Check it before starting a generation to make sure you have enough credits for the request.
3
If the displayed balance appears outdated, refresh the app and review recent usage before trying again.
How do I view my credit usage history?
1
Open the credit, billing, or subscription area and look for a usage history.
2
This record should help you understand how your balance changed by showing relevant credit activity.
3
If an expected entry is missing, refresh the page and allow recent activity time to appear before contacting support with the approximate date and generation involved.
How much does image generation cost?
1
The cost of an image depends only on its image type: main 1 credit, detail 2, lifestyle, campaign, banner and social media 3, dimensions and infographic 6 credits.
2
To see the cost in money, multiply the credits by your plan’s price per credit. For example, a lifestyle image costs about $0.30 on Starter, $0.22 on Growth and $0.20 on Scale.
3
The exact credit total for your request is always shown on the Plan Confirmation screen before you start.
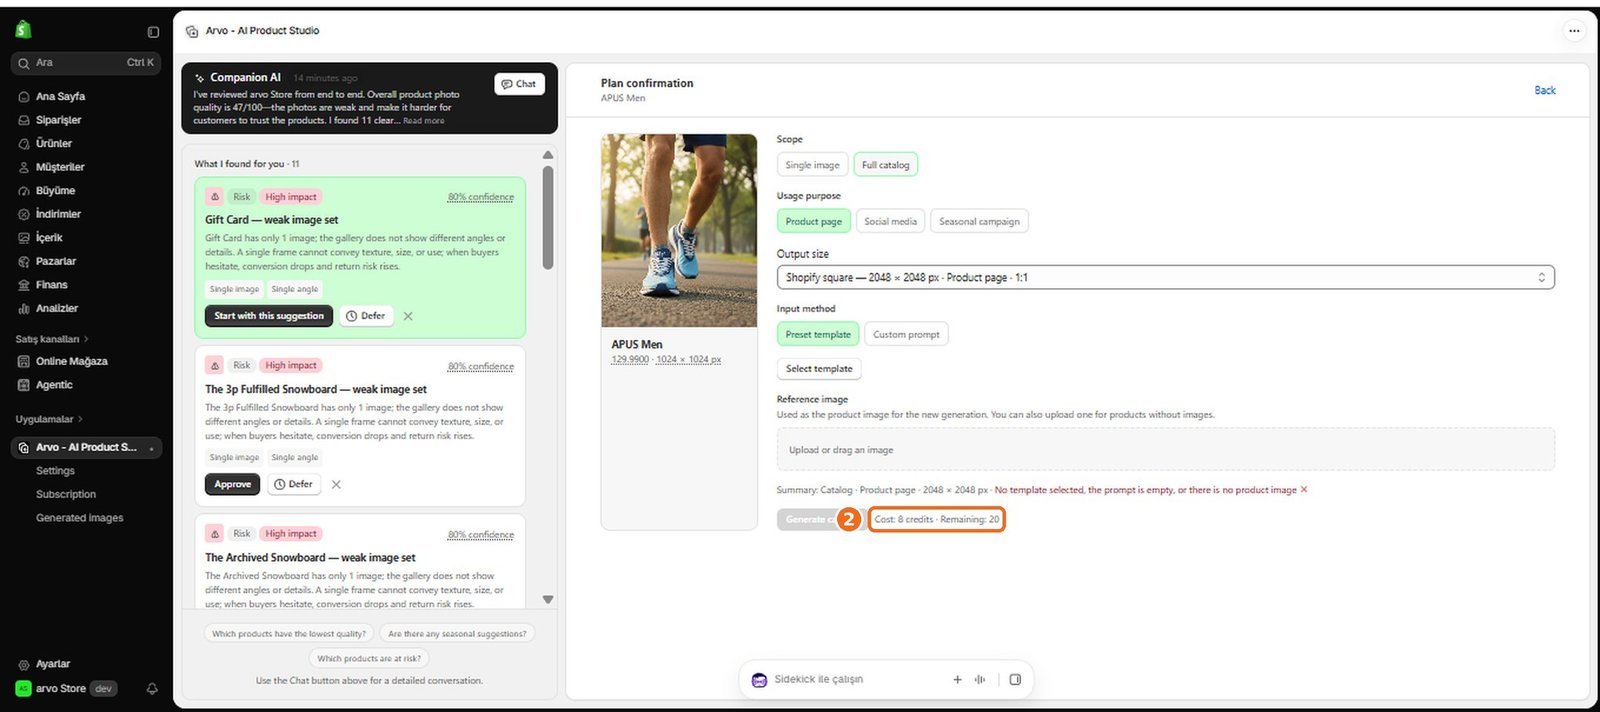
How much does a Full Catalog generation cost?
Full Catalog creates a set of 4 to 6 images for each product. Sets of 4 or more images get a 10% credit discount on the set total, rounded to the nearest whole credit.
The total cost of a catalog is the set credits multiplied by the number of products. For example, the standard set for 50 products uses 400 credits.
2
The total is shown on the Plan Confirmation screen before you start, so you can adjust the set or the product selection if needed.
3
With the standard set, Starter covers about 12 products per month, Growth about 50, and Scale about 150.
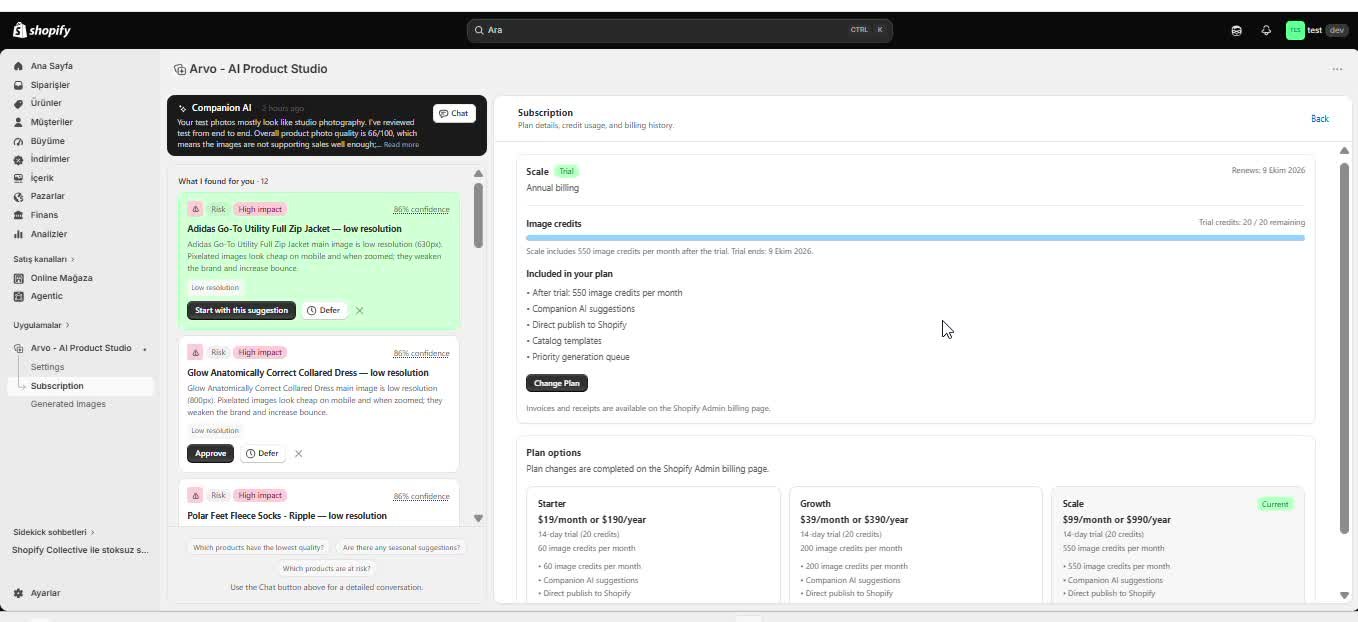
How do I manage my subscription?
1
Open the subscription or billing area in Arvo AI Product Studio to see your current plan, credit balance and renewal date.
2
Choose a different plan to upgrade or downgrade. You will be directed to Shopify to approve the change, because all Arvo AI charges are billed through Shopify.
3
You can switch between monthly and annual billing from the same area.
4
To cancel, cancel the plan from the subscription area or uninstall the app from Shopify. Images you already generated remain yours.
How do I view my billing history?
1
Check the app's billing or subscription area for past charges and billing records.
2
Because Arvo AI Product Studio is a Shopify app, some or all charges may instead appear in your Shopify billing information.
3
Compare both locations if you cannot find a charge, and use the charge date and amount when requesting help.
What happens when I run out of credits?
1
You cannot start a new image generation until you have enough credits for the request.
2
You have three options: buy an extra credit pack, upgrade to a larger plan, or wait for your monthly credits to renew.
3
Images you have already generated stay in the Gallery and are not affected.
4
Generations that were already in progress are completed normally.
Can I buy extra credits?
1
Yes. On any paid plan you can buy an extra pack of 100 credits for $11.90.
2
It is a one-time purchase and does not change your plan, price or renewal date.
3
If you regularly run out of credits, upgrading to a larger plan is usually cheaper per credit.
Do unused credits roll over?
1
No. Monthly credits reset at the end of each billing month and do not carry over to the next month.
2
On annual plans, credits are also added monthly. The full year’s credits are not added at once.
3
Trial credits are valid only during the 7-day trial.
Why did my image generation fail?
A generation can fail if required information is missing, an image cannot be processed, credits are unavailable, or the service encounters a temporary problem. Check the error message, confirm that a product and generation options are selected, verify that any reference image or prompt is usable, and check your credit balance. Then retry once; if it fails again, note the affected product, your selections, and the approximate time before contacting support. If the generation failed because of a system error, the credits are refunded automatically.
Why is my image generation taking too long?
Generation time can vary with the request and current service demand. Check the generation status, keep the app available if instructed, and refresh the Gallery after a reasonable wait to see whether the result completed in the background. Avoid repeatedly starting the same request, as this may create duplicates or use additional credits. If the status does not change, record the product and approximate start time for support.
Why is my generated image low quality?
Quality may be affected by the source product image, reference image, prompt, template, or chosen output settings. Start with a clear product image, choose a template suited to the intended visual, and describe important details plainly in a custom prompt. Preview the result closely before adding it to Shopify; if needed, adjust one input at a time and regenerate or create a variation.
Why doesn't my generated image match my product?
AI can misinterpret a product when the source image is unclear, partially hidden, or visually inconsistent with a reference image or prompt. Use the clearest available product image, remove conflicting instructions, and describe the product features that must remain accurate. A more suitable template or reference image may also help. Always review product shape, color, labels, and other important details before publishing the result.
Why is my product image not loading?
First confirm that the product has an accessible image in Shopify and that the product data has finished appearing in Arvo AI Product Studio. Refresh the app, reopen the product, and check your connection. If only one image is affected, try opening it in Shopify to confirm that it is available there; if several images are affected, reconnect or resynchronize only if the app offers that option.
Why isn't my reference image working?
The reference image may be unreadable, unavailable, or unsuitable for the selected generation. Try a clear image that closely represents the style or composition you want, reselect it, and make sure it does not conflict with your product image, template, or custom prompt. If the app shows an upload or processing error, follow that message and try a different image.
Why isn't my template loading?
Refresh the template view and confirm that you still have access to the template. For a custom template, check that its reference images or required slots are still available and that the template was saved successfully. Try another template to determine whether the problem affects one template or the entire library, then reopen the app if necessary.
Why can't I generate an image?
Confirm that you have selected a product and completed all required generation choices. Check your credit balance, make sure product and reference images load correctly, and resolve any message shown beside a field. Refresh the app and retry once after a temporary error. If generation remains unavailable, record the visible message and your selected options for support.
Why can't I add my generated image to Shopify?
Make sure the generation completed successfully and the result is still available in the Gallery. Confirm that the Shopify product exists and that the account using Arvo AI Product Studio has permission to update its media. Refresh both the app and Shopify, then retry with the intended product selected. If it still fails, keep the error message and product details for support.
Why isn't my Shopify product appearing in Arvo AI?
Confirm that the product exists in the connected Shopify store and is visible to the account using the app. Refresh the product list, clear any active search or filter, and allow recent Shopify changes time to appear. If other products are also missing, check that Arvo AI Product Studio is connected to the correct store and still has the access it needs.
Why isn't Companion AI showing recommendations?
Companion AI needs enough accessible store and product information to identify visual gaps and recommend improvements. Confirm that the correct Shopify store is connected, products and images are available, and any store analysis has completed. Refresh the app after recent catalog changes. It is also possible that no current visual opportunities meet the recommendation criteria.
Why isn't Companion AI responding?
Check your internet connection, refresh the app, and try a short, clear request related to your store or visual needs. Confirm that Shopify data is loading elsewhere in Arvo AI Product Studio, because Companion AI may need that context to answer or prepare a visual plan. If the issue continues, note the request, approximate time, and any visible error before contacting support.
Why did my credits not update?
Refresh the credit or billing view and compare the balance with any available usage history. Recent generations, plan changes, purchases, or failed requests may take time to appear. Credits for generations that failed because of a system error are refunded automatically. Avoid starting extra generations while the balance is uncertain. If it still looks incorrect, collect the relevant generation or billing details and contact support so the activity can be reviewed.
Why did my payment fail?
A payment may fail because Shopify could not authorize the charge, the payment method needs attention, or the billing approval was not completed. Review the billing message in Shopify, verify your store's payment information, and try again only after resolving the stated issue. If the payment appears completed but your subscription or credits do not update, keep the transaction details and contact support.
What is Arvo AI Product Studio?
Arvo AI Product Studio is a Shopify app that helps store owners create product and marketing visuals with AI. You can generate main, detail, lifestyle, campaign, banner, and social visuals using preset or custom templates, reference images, or custom prompts. Completed results are stored in the Gallery and can be added to Shopify.
What is Companion AI?
Companion AI analyzes your store to identify visual gaps and recommend improvements. It can help you understand opportunities and shape a visual plan based on your store's products and existing imagery. You should review its recommendations and generated results before applying them to your store.
What types of visuals can I create?
You can create main or cover images, detail images, lifestyle images, campaign visuals, banners, and social media visuals. The best choice depends on whether you want to present a product clearly, highlight a feature, show it in context, or support a marketing campaign.
Can I create visuals for multiple products at once?
1
Arvo AI Product Studio is intended to support visual creation for multiple products, including catalog-oriented workflows.
2
Select the relevant products and choose consistent generation inputs, then review each completed result in the Gallery before adding it to Shopify.
Can I use my own reference images?
1
Yes.
2
A reference image can guide the style, composition, or overall direction of a generation.
3
Choose a clear image relevant to the result you want, and make sure it does not conflict with your product image, template, or custom prompt.
Can I create my own templates?
1
Yes.
2
Custom templates let you prepare a reusable visual direction for future generations, potentially using reference images and template slots.
3
Review the template after it is analyzed or configured, save it, and test it with a product before using it more broadly.
Can I use custom prompts?
1
Yes.
2
Custom prompts let you describe the scene, style, composition, mood, or product details you want the AI to consider.
3
Use clear, specific language, focus on the most important requirements, and avoid instructions that conflict with the selected template or reference image.
4
Always review the result for product accuracy.
Can I add generated images directly to Shopify?
1
Yes.
2
After a generation completes, review the image in the Gallery and use the available Shopify publishing option to add it to the intended product.
3
Confirm the product selection and inspect the image in Shopify afterward to make sure it appears in the right place.
How are credits calculated?
1
Each image type has a fixed credit cost: main 1, detail 2, lifestyle, campaign, banner and social media 3, dimensions and infographic 6.
2
Full Catalog sets of 4 or more images get a 10% discount. The standard set of 4 images uses 8 credits instead of 9.
3
Variations and regenerations use the same credits as the original image type.
How much does Arvo AI Product Studio cost?
1
There are three plans: Starter at $9.90 per month with 100 credits, Growth at $29.90 with 400 credits, and Scale at $79.90 with 1,200 credits.
2
Annual billing saves 20%. Every plan starts with a 7-day free trial that includes 15 credits.
What happens if an image generation fails?
The app should show that the generation did not complete, and no finished image will be available to publish. Review the error, check your inputs and credit balance, and retry after correcting any issue. If repeated attempts fail, record the product, settings, and approximate time for support. If the generation failed because of a system error, the credits are refunded to your balance automatically.
How long does image generation take?
Generation time can vary according to the request and current service demand. You can monitor the generation status and check the Gallery for the completed result; avoid submitting the same request repeatedly while it is still processing.
Can I regenerate or create variations of an image?
1
Yes.
2
From a generated result, you can regenerate to request a new output or create a variation that builds on the existing direction.
3
Review the inputs before continuing, because changing the template, reference image, prompt, or other settings can affect the result.
4
The new output should appear in the Gallery for review. Variations and regenerations use the same credits as the original image type.